Add a Workflow
System Administrators can build an automated case management process in Case IQ by creating workflows. To add a workflow for your application, click the Workflow tab in Settings. Then, click the Add Workflow button. The New Workflow form walks you through each step to set up a workflow and the chevron at the top of the page indicates your progress. Click through the article tabs for guidance on each chevron step.
To complete each step in the New Workflow form, you will fill in fields and save records for statuses, steps, and rules. Each step contains its own grid to summarize the records you have created. In addition to the standard grid functionality (see Grids):
- After adding a record, you can update it by clicking the record row in the relevant section's grid.
- To delete a record, click the record row, then click the Options (
 ) button and select the "Delete" option.
 - Delete multiple records by clicking the row's checkbox, then clicking the Delete button above the grid.
Your progress will not be saved if you navigate away from the form but you can save your workflow without activating it in the "Summary" step.
Workflow
Start filling in the basic details of your workflow on the “(1) Workflow” page:
- Name: type in the name of the workflow you are creating. The workflow name will be displayed in application grids and in the options menu on cases. It must be a unique name in the system.
- Description: add a description of the workflow in the text box. The workflow description will be displayed on the Workflow’s page.
- Visible Externally: if your application has the Secure Case Communication feature, you can show or hide the workflow to portal users and external parties to see the progress on cases to which they have access. Reporters and parties will only see the workflow timeline, including its statuses and steps, but will not see sensitive workflow data, like the user who progressed the workflow through each step. See Manage External Access to a Case for details on secure case communication.
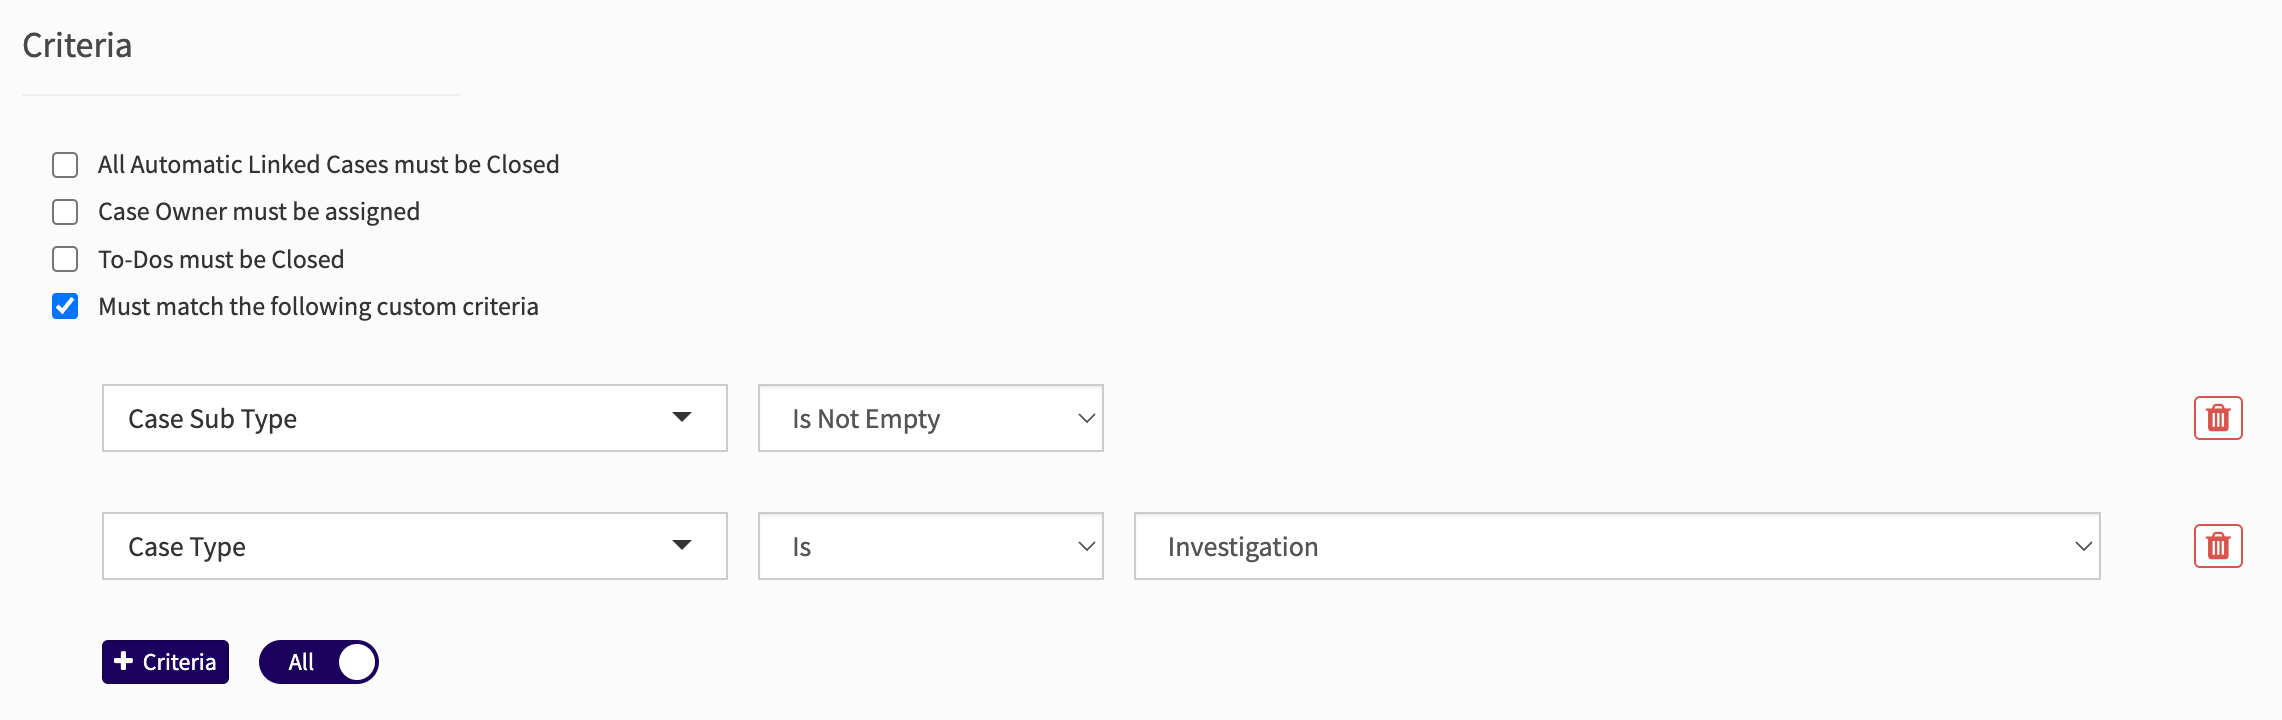
Criteria: you can set up criteria statements to tell Case IQ the cases for which the workflow should apply based on case field filters. You can use any case field for your filters, such as “Case Type”, “Country”, and “Department”. For example, the criteria filters in the screenshot below mean that the workflow will only be applied to cases where the "Case Type" field is "Investigation".
Click the Next button to go to the next step in creating a workflow.
Status
Workflow statuses are key in structuring your workflow in Case IQ, as each status is a stage that cases will progress through in a workflow. For example, a simple workflow will have the following statuses: (1) new, (2) in progress, and (3) complete. It is likely that your workflows will have more statuses, such as “Under Investigation” or “Pending Assignment”.
To create a status, fill in the following fields in the Statuses section:
- Status Name: create a name for the status. The status name will be displayed in the workflow timeline on a Case page.
- Status Type: select if the status is an “open” or “closed” status type. The “Status Type” field determines when the workflow is in progress or completed. If a case workflow is in an open status type, the workflow will be considered open or in progress. However, the workflow will be closed if the case workflow status is a closed status type.
- Description: add a status description as needed, which will also be displayed in the step menu to provide more context to the user.
- Default Status: choose which status should be the default for the workflow using the checkbox. A case will start in the workflow’s default status. There can only be one default status selected for a workflow.
When you have completed adding statuses, click the Next button at the bottom of the page.
DeleteSteps
Steps define how the user will transition between the workflow statuses that you created in the previous step. The steps are displayed in the step menu when you click the timeline arrow on a Case’s page. On the Steps page, fill in the fields described below.
- Name: the step name will be used in the step menu.
- Description: adding a description provides useful context to the user who is completing the step. The step description will be displayed in the step menu, asking the user to confirm if they want to move a case to the next step.
- If this text is not filled in when creating the workflow, the following text will be displayed in the step menu: “Are you sure you want to [Step Name]?”. To avoid any confusion, filling in this field is recommended to provide users with clear guidance on completing the case workflow.
- Status To and Status From: as steps transition a case from one status to the next status in the workflow, indicate the status transition for this step with the “Status From” and “Status To” fields:
- “Status From” should be the status where the step starts.
- “Status To” will be the step to which the case is progressed.
- Sequence: type a numerical value to set the order that the step should appear in the case menu. If the “Sequence” field is left empty and there are multiple possible next steps in the workflow, the steps will be sorted alphabetically. Setting the sequence is particularly helpful when creating complex workflows.
- Reasons: if you are interested in capturing why users are transitioning cases to the next step of the workflow, you can use the “Reasons” field to create a picklist in the step menu. Users can choose to explain why they are moving the case to the next step by choosing an item from your list in the “Reason” picklist. If you do not add any values in the “Reasons” field when creating a workflow, the reasons picklistwill not be displayed on the step menu.
- In the “Reasons” field, type in a phrase and hit the Enter or Return key to save it as one item in the picklist. Repeat to add more items in the list.
- Users are not required to select a reason, even if the “Reason” picklist is displayed on the step menu.
- Mandatory Fields: you can specify any case fields for which a user must fill in, complete, or select a value as part of a workflow step using the “Mandatory Fields” dropdown. Users will not be able to move the case to the next step if any of the case’s “Mandatory Fields” are empty. Any mandatory fields will be clearly displayed in the step pop-up if a user attempts to move a caseto the next step.
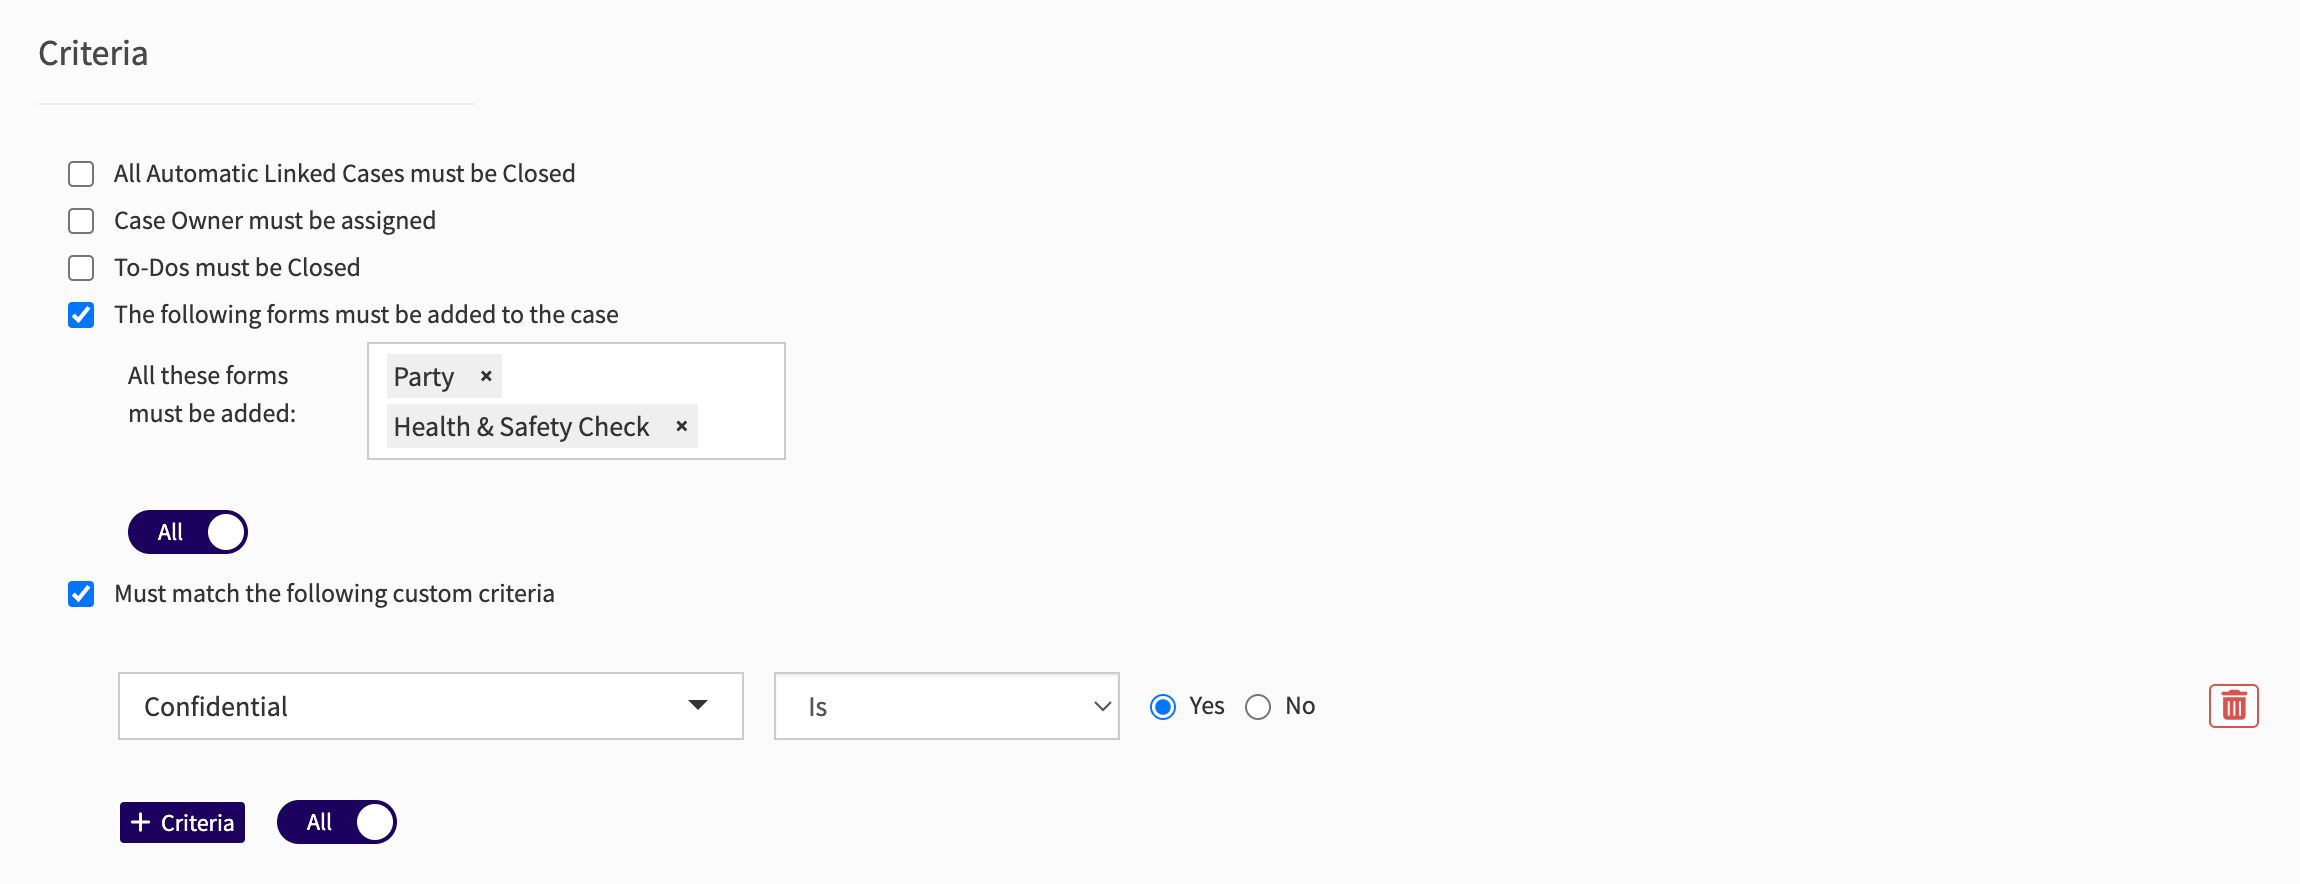
- Criteria: you can ensure that cases meet specific criteria before the user can move the case to the next step in this section. System Administrators can select from the following criteria options and may select as many as necessary:
- "All Automatic Linked Cases must be Closed": all the cases's automatically linked cases must be closed before the case can be moved to the next step in the process. See Link Related Cases: Automatic Links for details on automatic case links.
- “Case Owner must be assigned”: cases must be assigned to a case owner before they can proceed to the next step in the process.
- “To-Dos must be Closed”: all case to-do items must be completed before the case can be moved to the next step in your workflow. Using this option alongside workflow rules is especially powerful in driving compliance to a specific process (read more in the Workflow Rules tab of this article).
- “The following forms must be added to the case”: choose the forms that must be added to the case before it can be move to the next step in your workflow. Users will have to add at least one record of the form type you choose. If you select multiple forms, the “All/Any” toggle will be displayed, so you can choose if users must add all or at least one of the form types you selected.
- “Must match the following custom criteria”: create your own standards for the workflow by setting custom criteria for case fields. In the example below, the Custom Criteria selections will ensure that users set the case as "Confidential" before they can move it to the next step in the workflow. See Searching in Case IQ: Create Search Criteria Statements for details on using criteria filters.
- Click the Save button to save each step record, which will be populated in the Step grid.
When you have completed adding all required steps, click the Next button at the bottom of the page.
Workflow Rules
You can program Case IQ to automatically complete actions for a case as part of your workflow on the Rules chevron. The system will carry out these actions when the workflow step is initiated and your custom criteria are met. Workflow rules are automated actions associated with a single workflow step, but you may also create more flexible automation for case and other record types using standalone rules (see Add a Rule). If you are interested in setting up workflow rules, click Add Rule and complete the Workflow Rules form as detailed below. Click Skip for now to proceed to reviewing a summary of your workflow.
- Name: add your rule name. The name is only displayed in the Workflow page, i.e. for System Administrators.
- Step: select the workflow step to which the rule is applicable.
- Criteria: set up your criteria to determine when this rule will be applicable to the case. See Searching in Case IQ: Create Search Criteria Statements for details on using criteria filters.
- Actions: set up what the system should do if a case meets the criteria. Read Add a Rule for details on creating rule actions.
When you have completed adding rules, click the Next button at the bottom of the page.
DeleteSummary
The Summary section will display all details that you added for your workflow, so you can review and edit any items as needed before publishing the workflow.
To save your workflow, click Finish. In the Confirm pop-up, you will have the option to: (1) activate the workflow, meaning that it will be implemented across your application and be applied to any future cases, or (2) save the workflow details but leave it inactive, so you can make changes later. The workflow will not be applied to cases if you leave it inactive.
When activating the workflow, the system will dynamically add permissions for your application (see Access Control List). However, user roles will not have permissions to the new workflow by default, meaning that users, including System Administrators, will not be able to move cases to the next workflow step or edit workflows. When the Workflow Permissions pop-up is displayed, click the Go to User Roles button to quickly navigate to the User Roles page and adjust permissions for the new workflow.
In addition to granting access to the workflow, you can restrict user permissions for workflows. For example, you can adjust workflow permissions so only certain user roles can close a workflow and all other user roles will not see that step in the workflow.
Delete