Add a Rule
In Case IQ, rules are configured by system administrators to automatically execute tasks. You can add a rule by filling the New Rule form. This form will load more fields as you complete the "Rule Type" and "Record Type" fields, so this article is organized into tabs and sections to click through as you fill in the form. There are three key components to configure when creating a rule: the type, criteria, and actions.
- The type and criteria tell the system when it should execute the rule, i.e. the conditions or situations when the rule is applicable.
- You program the rule's actions to tell Case IQ what it should do when the rule is triggered.
The way you access the New Rule form depends on the type of rule you want to create (see Rules Overview for a description of workflow and standalone rules). You can create a workflow rule when adding a workflow (see Add a Workflow) or editing a workflow (see A Workflow's Page). To add a standalone rule, select the “Rules” option on the Workflow tab's page menu, then click the Add Rule button to load the New Rule form.
When you complete filling in the details, adding all actions, and setting your custom criteria for your rule, click the Save button at the top of the page to submit the New Rule form. The rule will be set as “Active”, meaning its actions will be triggered when the rule's criteria are met. You can deactivate the rule to stop the actions from triggering (see Edit, Deactivate, or Delete a Rule: Deactivate a Rule for details).
Rule Details (Type)
The New Rule form will initially display only two fields to complete:
- Name: type in a descriptive name for your rule, which will be displayed on the Workflows grid.
- Rule Type: select what will prompt the rule.
- Record Event: the rule will trigger when a record action occurs, e.g. a record is created or updated.
- Schedule: the rule will trigger before or after a context date for a record, e.g. created date, date assigned, etc.
- Schedule Process: the rule will trigger on a set frequency.
Based on your selection in the "Rule Type" dropdown, additional fields will be loaded, as summarized in the following sections:
"Record Event" Rule Type
If you select “Record Event” as the “Rule Type”, the additional fields listed below will be displayed:
- Record Type: select the kind of record for which you would like to create automation.
- Record Event: the Record Event dropdown will be updated dynamically depending on the record type that you choose, so you can select the event that should trigger the rule. For example, if you select the "party" record type, the rule actions can be initiated when a party is created, updated, or deleted.
- Case Assignment: a case owner has been assigned.
- Case Cancelled: a previously open case has been cancelled.
- Case Closed: all workflows have been completed and the case is in a “Closed” status type.
- Case Linked: another case is linked to a case.
- Case Reopened: one or more of the previously closed workflows has been moved to an “open” status.
- Case Restored: a previously cancelled case is restored, removing the “cancelled” status.
- Case Updated: any edits to a case field or an action completed by a user on a case (i.e. excluding email notifications).
- New Case Submitted: a case is added into Case IQ.
Delete
"Schedule" Rule Type
If you select the “Schedule” option for “Rule Type”, complete the following form fields:
- Record Type: select the kind of record for which you would like to create automation.
- Date Field: set the record date field that the system will use to calculate when to trigger the rule action. For example, you can choose “Created Date” to schedule a rule action to occur after the date a record is added.
- You cannot use an aggregate field at as a schedule rule's "Date Field".
- Delay: use the “Delay” fields to set the amount of time before or after the rule action should be triggered. Enter a numeric value and the unit of time (i.e. minutes, hours, and calendar days), then select “Before” or “After” to control when the action will be carried out by the system. In the example below, the action will occur one day after a case is created.
- Occurrence: choose if the rule will be a one-time or recurring action when the criteria are met.
Delete
"Schedule Process" Rule Type
If you select the “Schedule” option for “Rule Type”, complete the following form fields:
- Frequency: choose the frequency with which the system should run the process. You can choose from the following options: calendar quarterly, daily, daily (work week), fiscal quarterly, weekly, and monthly.
- If you select "Daily (work week)", the process will be triggered every Monday, Tuesday, Wednesday, Thursday, and Friday.
- If you choose "Weekly" or "Monthly", a "Days of the Week" or "Days of the Month" field will be displayed so you can choose the days within the week or month to run the process. The "Days of the Month" field has a "Last calendar day of the month" option at the end of the list. You can choose multiple days.
- "Calendar quarterly" and "Fiscal quarterly" will schedule the process for 00:00:00:000 on the first day of the next quarter. Fiscal quarters are based on the "fiscalYearStartMonth" setting on the Options page, see Update Application Options.
- Trigger Time: set the time that the system should run the process. The system may not use the same timezone you do. Hover your cursor over the question mark icon beside the field to see the system's timezone.
Delete
Criteria
The Criteria section will be loaded when you select a record type for "Record Event" or "Schedule" rules, where you can set the conditions when the rule should be applicable. The “Must match the following custom criteria” checkbox will be displayed regardless of the record type you select. If you choose "Case" as the record type, three additional options will be available: “All Automatic Linked Cases must be Closed”, "Case Owner must be assigned", and "To-Dos must be Closed".
If you check the “Must match the following custom criteria” box, the Custom Criteria options will be displayed:- The “Search Fields” dropdown will reflect your record type selection, so you can choose the record field or detail for which you want to set criteria as part of this rule. For example, if you selected “Party” as the record, you can create custom criteria for the “Country” field to reflect any company policies for parties from specific countries.
- Click the + Criteria button to add more criteria statements.
- Using the Any/All toggle, you can set whether the record must meet all or any of the criteria on your list. In the example below, the rule will be applicable for cases that are set as "Confidential" or "High" priority. Setting the toggle to “All” means that the case must meet all criteria in the rule custom criteria list.
Delete
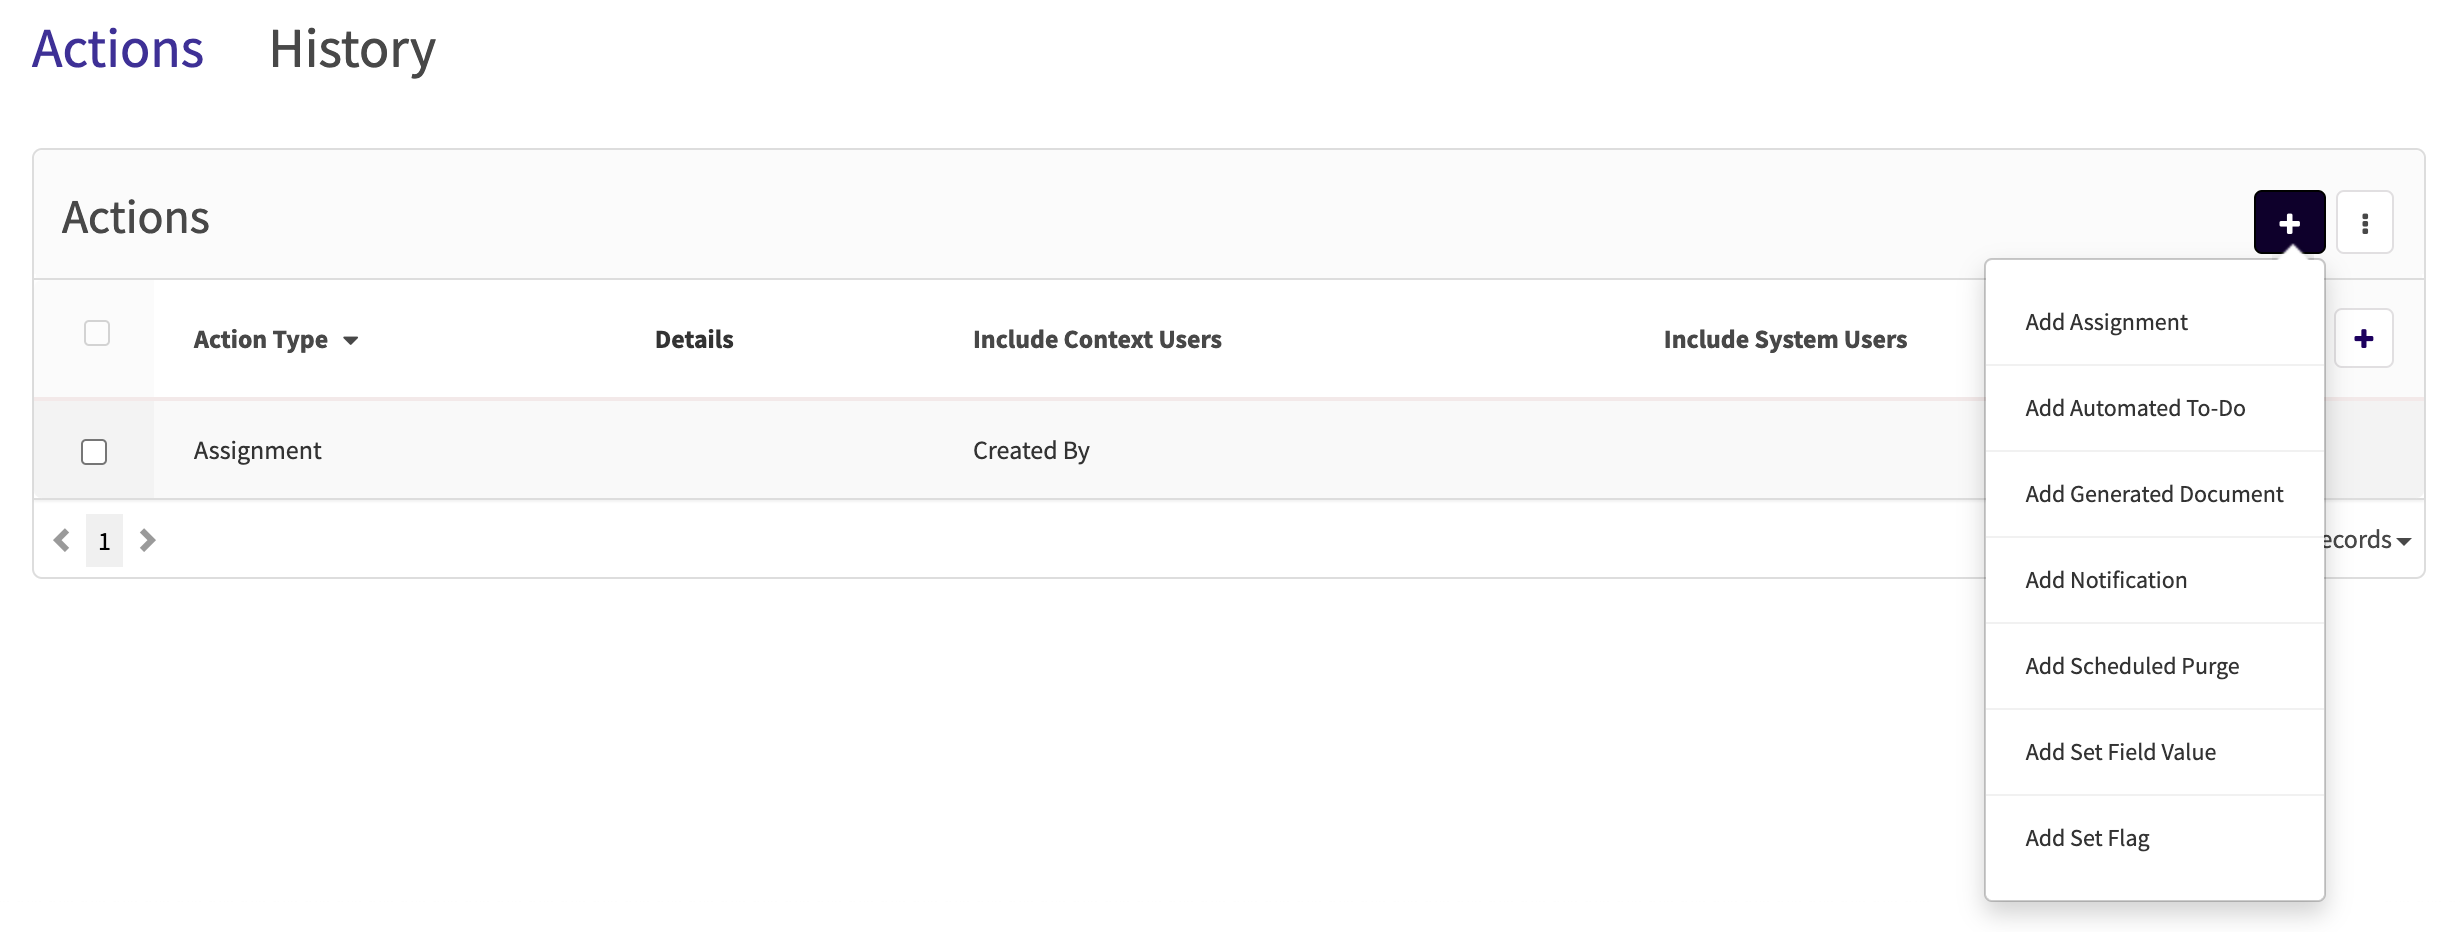
Actions
When you select a "Record Type" in the New Rule form, the Actions section will be loaded, where you can set up the tasks that the system will automatically execute, called "actions". Load the Add Action form by clicking the "+" button in the Action section, then selecting the type of action you would like to create from the list of options displayed.
Many of the Add Action forms contain the "Action Trigger Type" and "Responsible User" fields, which are explained in the "Set Action Trigger Type" and "Set Action Assignment" sections below.

Set the Action Trigger Type
When creating any type of action, you can select when the action should be executed using the “Trigger Type” field.
- If you choose “Immediate”, the action will occur as soon as the record meets your criteria for the rule.
- With the “Delay” option, you can choose how long after the criteria have been met that the action should be executed. In the “Delay” fields that appear, enter a numeric value and the unit of time (i.e. minutes, hours, and calendar days) to control when the actionwill be carried out by the system.
- For example, if you choose “5” and “days”, the action will occur 5 calendar days after the rule was triggered for a standalone rule or the step was initiated for a workflow rule if the rule criteria are still true.

Set the Action Assignment
The “Add Assignment” and “Add Automated To-Do” action types allow you to choose who will be assigned to the case or to-do respectively. There are two options in the “Responsible User” dropdown, so you can select how the assigned user will be determined by the system:
- Context: the field will be assigned based on the case’s or to-do’s user fields, meaning that you do not need to select a specific individual. Selecting a “Context User” is especially useful for streamlining the assignment process.
- For example, if you are creating an “Add Assignment” rule, you can choose the “Case Owner” option in the “Include Context Users” field. Case IQ will assign the user who creates a case to your chosen assignment field. You may select any user field in the “Include Context Users” field, such as “Last Updated By” or “Assigned By”.
- System: if your process requires that a specific named user must be assigned, you can select the “System” option. The responsible user field will always be updated to the individual that you select for this rule.
Add Assignment
By setting up an “Add Assignment” action, the system will automatically assign a record to a user when it meets the rule criteria or proceeds through a workflow step. Currently, you can only set up Assignment actions for case records. Choosing this option on the “+” button menu will load the following form fields:
- Trigger Type: see the "Set the Action Trigger Type" section above for details.
- Assignment Field: indicate which case field should be reassigned as part of the rule. The assignment rule allows you to assign a user as case owner, to the investigative team member, or to the user denied access list.
- Please note that you cannot update system generated user fields for the purpose of data integrity, although there may be additional assignment fields present in this dropdown depending on the configuration of your application.
- Responsible User Type: choose who will be assigned in the “Assignment Field”. See the "Set the Action Assignment" section above for details on the "Context" and "System" options.
- An additional option, “Unassign”, will be displayed if you select “Case Owner” as the “Assignment Field”. By selecting “Unassign”, the system will remove a case’s current owner without replacing them with another user when the rule is triggered.

Add Automated Request
The "Add Automated Request" action sends a response form to a case's parties and creates a request record to track their responses. You can create an “Add Automated Request” action for any record type except profiles. Learn more about request and response records in Edit, Resend, Cancel, or Delete a Request and View, Edit, or Delete a Response to a Request.
The following fields will be loaded when you select "Add Automated Request”:
- Trigger Type: see the "Set the Action Trigger Type" section above for details.
- Response Form: select the response form to send to recipients. Administrators can configure the response forms in your application, see Add and Edit a Response Form Type for full instructions.
- Party Type: choose the party type to whom to send the request. For example, if you select “Witness”, the rule will send the request to all the case's parties where the “Party Type” field is set to “Witness”.
- Include Primary Party: send the request to the case's primary party. If you select this option, the system will always send the request to the case's primary party, even if the action's party types and additional emails would not include them.
- Additional Emails: type in any other email addresses to which to send the request.
- Days Until Request Expires: enter the number of days that the recipients have to complete the request. The system will use this number to set an expiry date for the request. For example, if you enter 7 as the "Days Until Request Expires", the request will expire 7 days after the system sends it to the recipients.
- Send Email Reminder: you can choose to send an email reminder to the recipients to complete the request. If so, select the number of days before the expiry date that Case IQ should send the email reminder.
- Request Message: type in the main text of your email to recipients. Use the text formatting options as needed. You can enter a maximum of 10,000 text characters in the request message.
- You can select a standard response to populate the request message. See Add, Edit, or Delete a Standard Response to learn how to configure standard responses for your application.
- Secure Message: enter any confidential or sensitive information you need to share with recipients in the secure message. Recipients will only see the secure message after accessing the form with their verification code. Use the text formatting options as needed. You can enter a maximum of 10,000 text characters in the secure message.
- You can enter field name tags in the secure message, which will be automatically populated with case information when the request is sent. For example, the secure message “Please complete this survey for Case {case.caseNumber} submitted on {case.dateSubmitted}" would provide the recipient with the case number and date it was submitted. Learn more about using field name tags in Add Case Fields to a Request Template.
- You can select a request template to populate the secure message. See Add, Edit, or Delete a Request Template to learn how to configure request templates for your application.

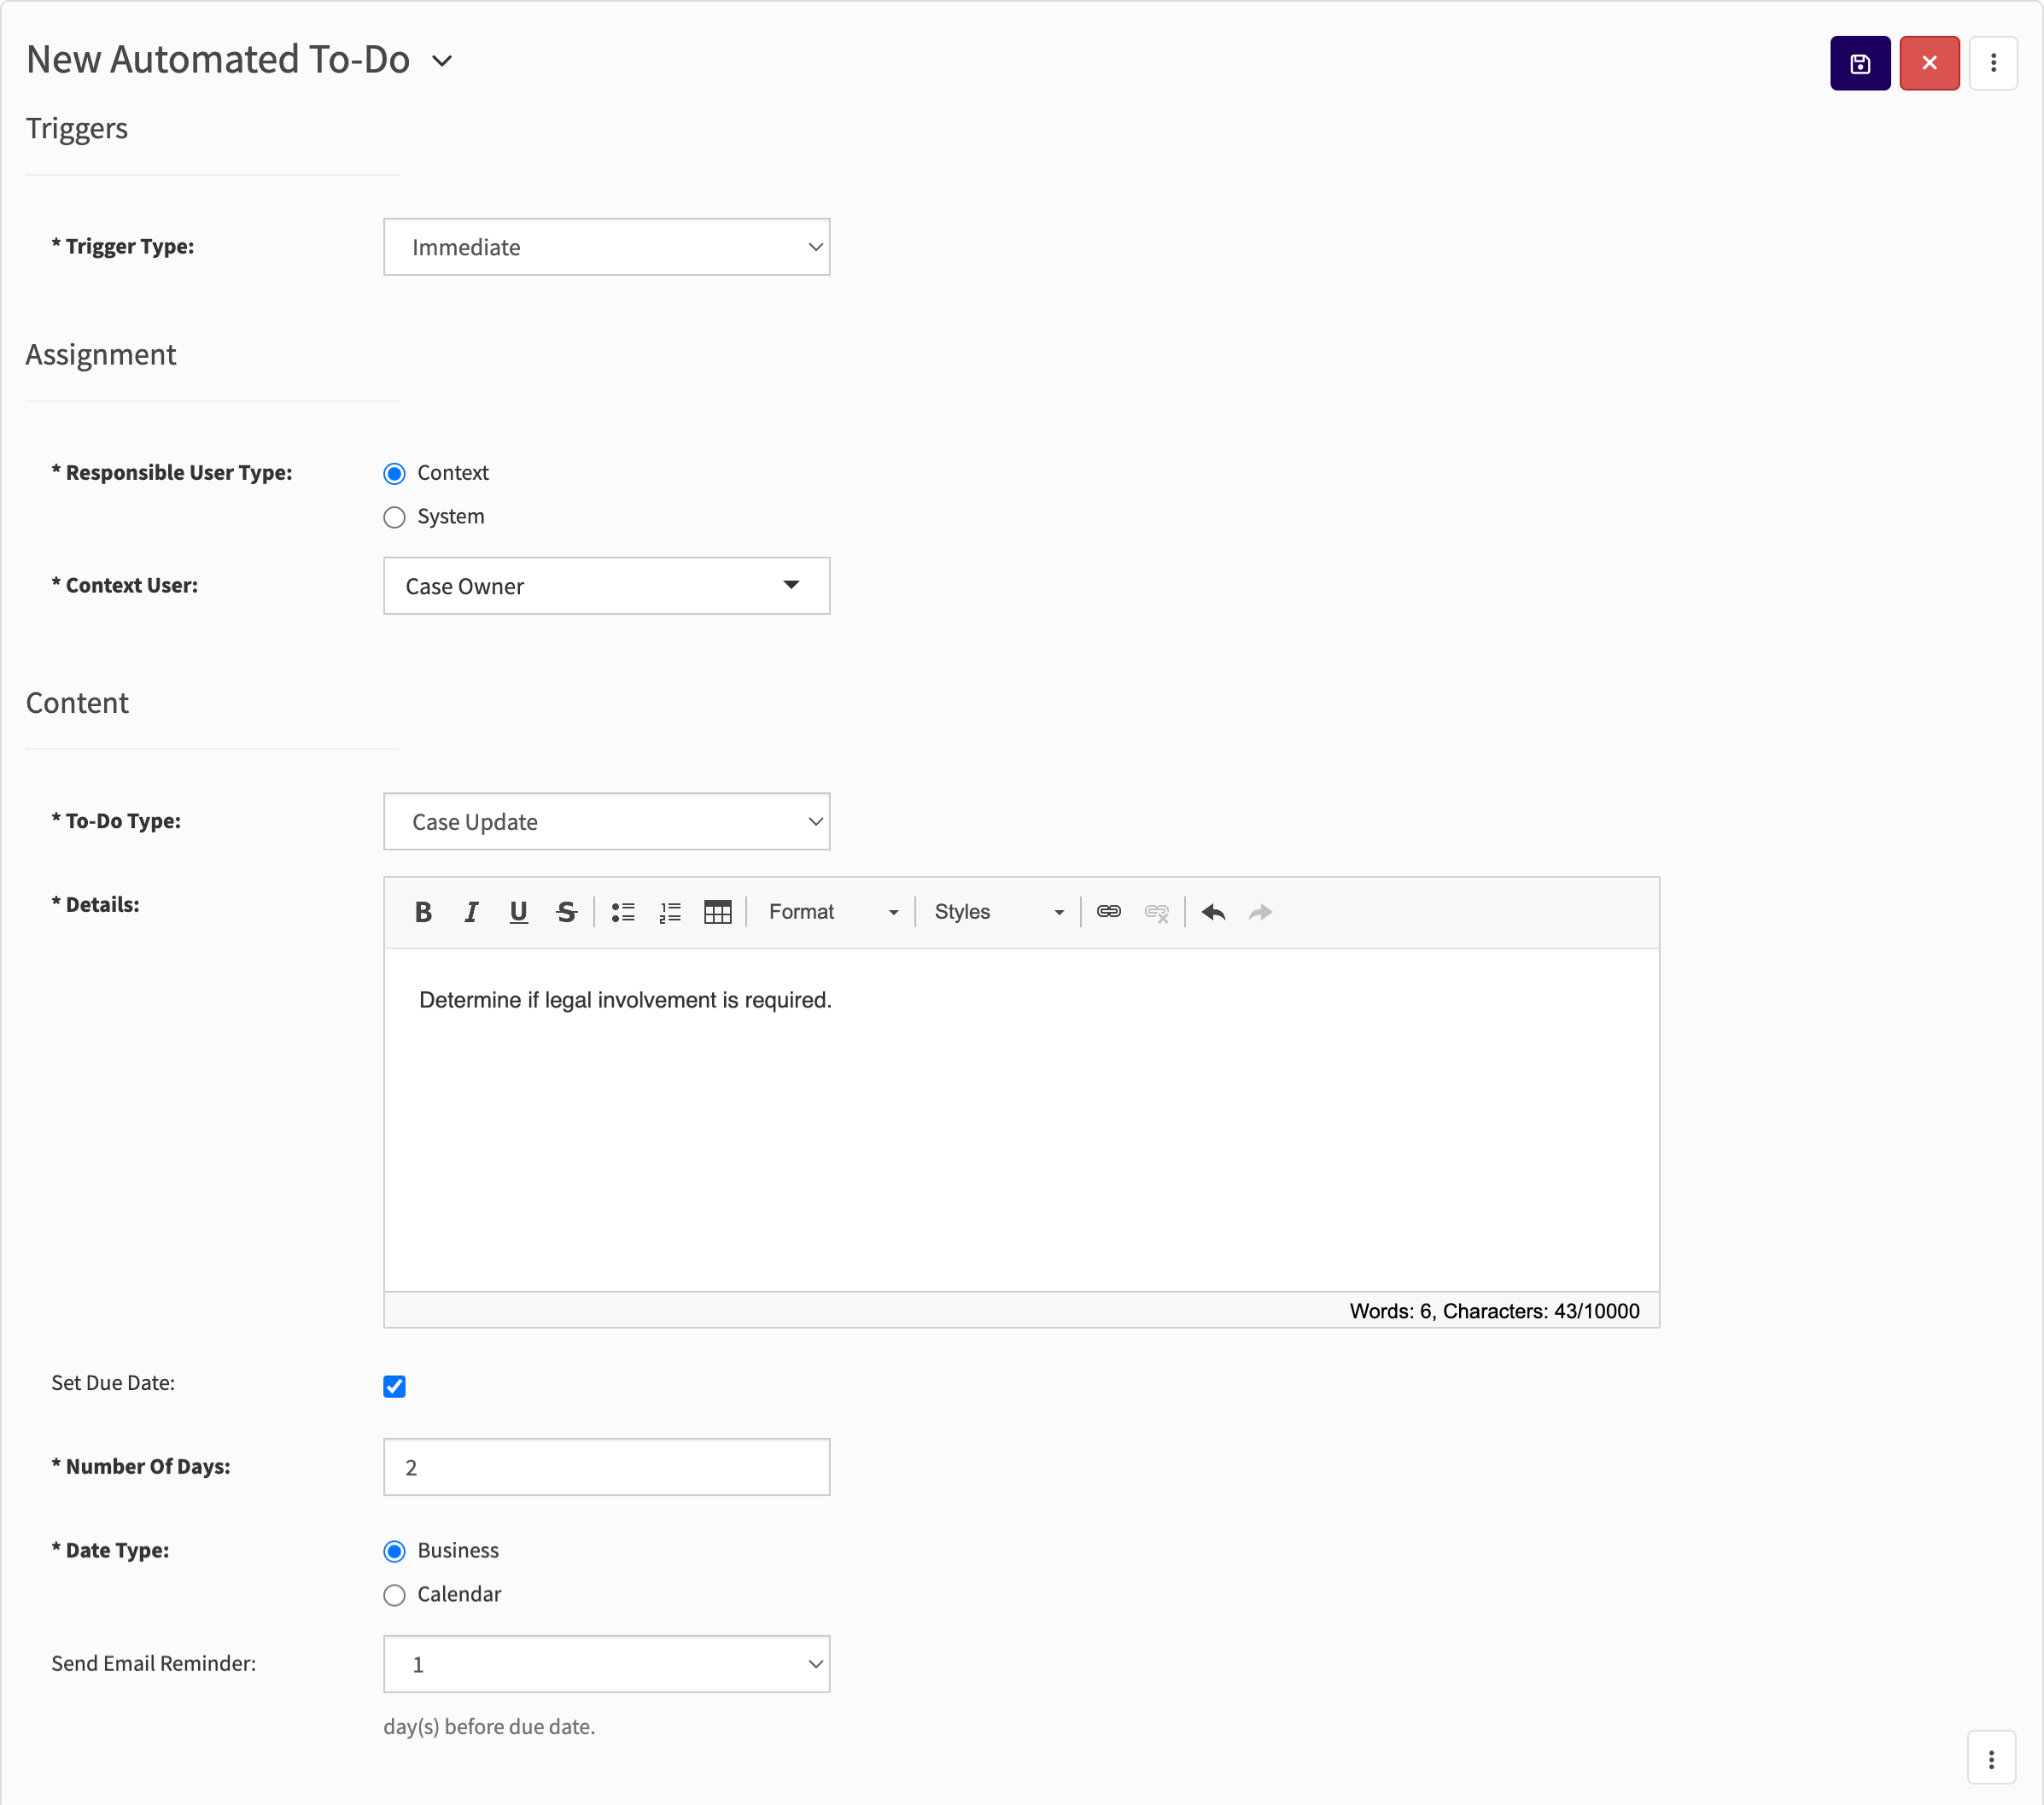
Add Automated To-Do
The “Add Automated To-Do” action will create and assign a to-do record. You can create an “Add Automated To-Do” action for any record type except profiles. The following fields will be loaded in the “Add Automated To-Do” form:
- Trigger Type: see the "Set the Action Trigger Type" section above for details.
- Responsible User: choose who will be assigned to the to-do. See the "Set the Action Assignment" section above for details.
- To-Do Type: choose one of the “To-Do Types” configured for your application. The values in the “To-Do Type” picklist can be customized at any time (see Add and Delete Picklist Options).
- Details: type in the details of the to-do action to tell users what task they need to complete.
- Set Due Date: by checking this box, you may set an automatic due date for the to-do action. Additional form fields will be displayed:
- Number of Days: input a numerical value to indicate how many days the user has to complete the to-do.
- Date Type: indicate if the number of days to the due date should be business days or calendar days.
- Send Email Reminder: choose the number of days prior to the due date that Case IQ should automatically send an email reminder to the to-do’s assigned user.
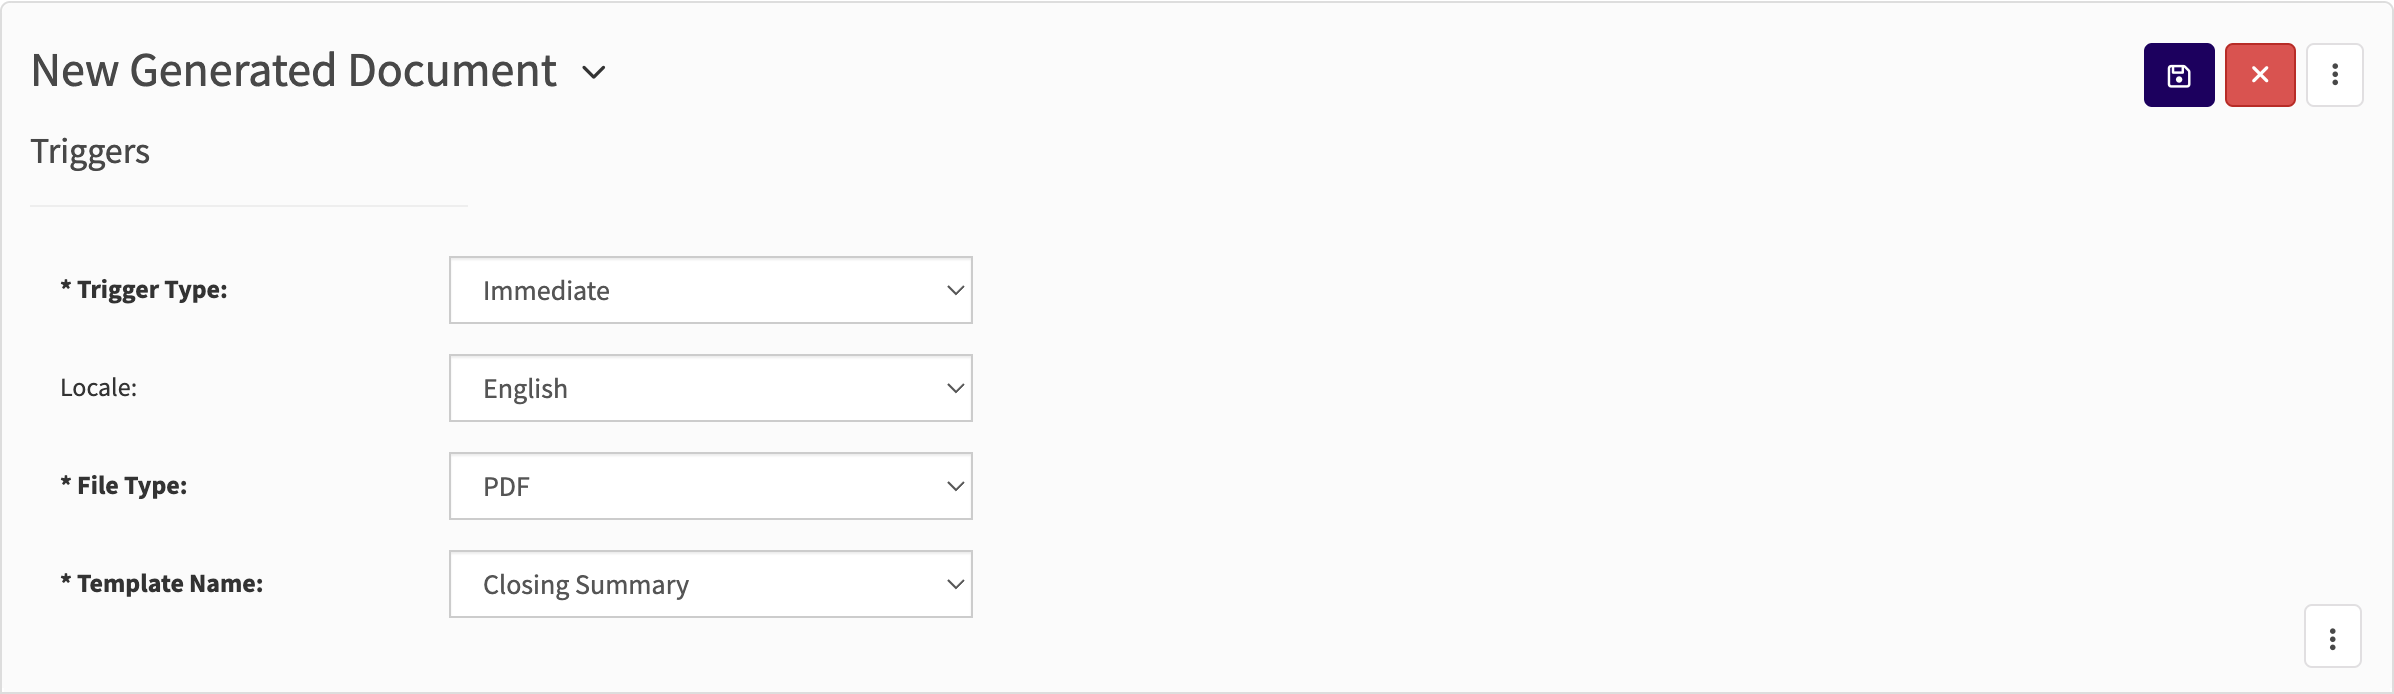
Add Generated Document
The “Generated Document” action will create a document by taking a template and populating it with case information. The document will be attached to the case record that triggered the rule. The Generated Document action will only be available when you select “Case” as the rule record type. Choosing this option on the “+” button menu will load the following form fields:
- Trigger Type: see the "Set the Action Trigger Type" section above for details.
- Locale: choose the same language as the template file.
- Template Name: set the template file to use for the generated documents.
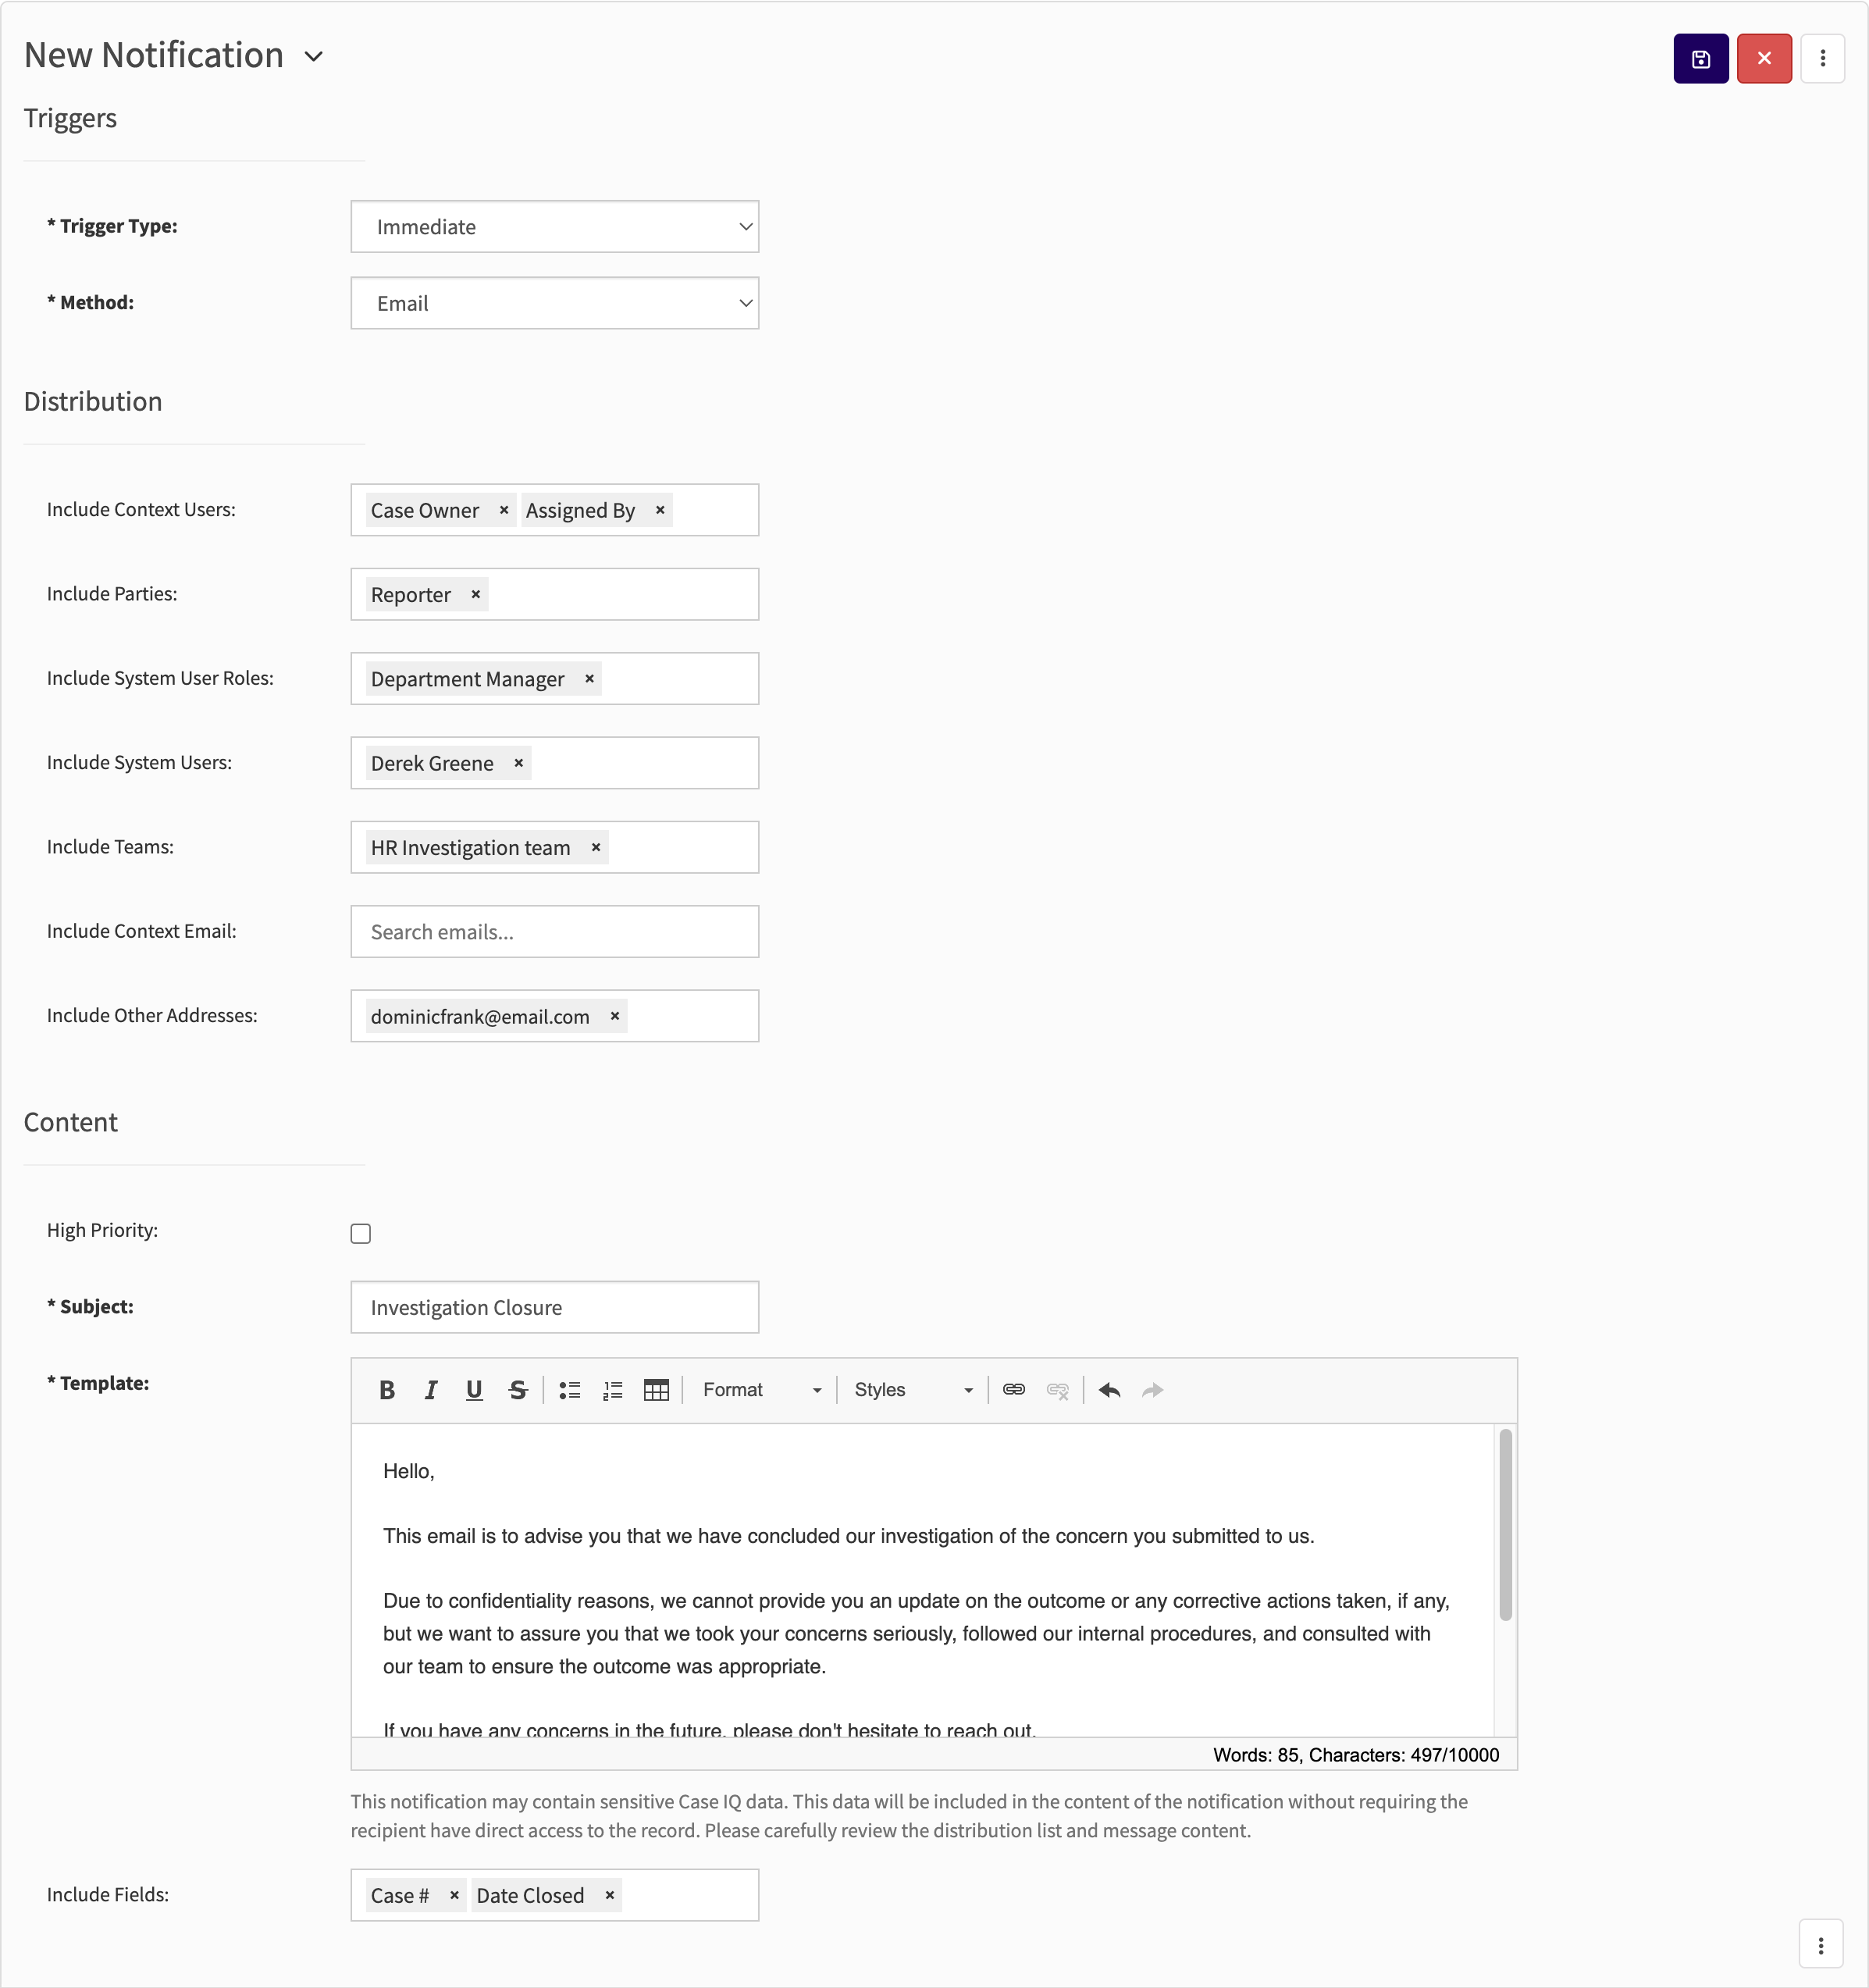
Add Notification
The “Add Notification” action will generate an email message for a user. You can create an “Add Notification” action for any record type. Generally, notifications are used to remind users to promptly complete or follow up on a record. For example, you could set up a notification action to send an email to your compliance team when a new case is created.
The “Add Notification” form includes the fields detailed below:
- Trigger Type: see the "Set the Action Trigger Type" section above for details. If you are adding an “Add Notification” action for a "Schedule Process" rule, the only available option will be "Immediate".
- Method: select how you would like Case IQ to send the notification. The default option is “Email”. If you have a Twilio account for Case IQ, you may also choose to send notifications via SMS or phone call. You will not see additional methods if you have not set up a Twilio integration (see Twilio Integration for details).
- Include Context Users: similar to the “Context User” option for “Add Assignment” and “Add Automated To-Do” actions, you can choose to have the notification sent to a user based on user fields of the record. You can send the notification to multiple users with all “Distribution” section fields.
- If you are adding an “Add Notification” action for a "Schedule Process" rule, "Include Context Users" will not be available.
- Include Parties: if you select “Case” as the “RecordType” for the rule, you can send the notification to the case's parties based on party type. For example, if you select the party type “Reporter” in “Include Parties”, the notification will be emailed to all parties where the “Party Type” field is set to “Reporter”.
- Case IQ will send notifications to up to 25 parties total. If more than 25 parties match the selected “Include Parties” types, Case IQ sends notifications only to the 25 most recently created matching party records across all selected types.
- If you are adding an “Add Notification” action for a "Schedule Process" rule, "Include Parties" will not be available.
- Include System User Roles: you can send the notification to all users with a specific user role. For example, you could send a notification to all users with a "Manager" user role.
- Include System Users: select a specific named user to which to send notifications.
- Include System Teams: search for and select any of your existing teams in Case IQ who should receive the notification.
- Include Context Email: if you select "Case", "Party", "Profile", or "To-Do" as the “Record Type” for the rule and choose "Email" as the "Method" for the action, you can send the notification to email addresses listed in the record type's email fields. For example, if your case form includes a "Manager Emails" field to capture the relevant manager's email address for the case, you could select the "Manager Emails" field in "Include Context Email" for a notification rule action. When the notification rule action is triggered, the system will send your notification to any emails listed in the "Manager Emails" field.
- If you are adding an “Add Notification” action for a "Schedule Process" rule, "Include Context Email" will not be available.
- Include Other Addresses: type in email addresses directly to send the notification to people who are not Case IQ users.
- High Priority: check the box and Case IQ will send the email notification with high priority, based on the recipient’s email browser.
- Subject: enter the subject line that the system should use for the email.
- Template: to draft the content of your email notification, type in the text of your email in the “Template” text box and use the text editor to make any necessary formatting changes.
- Include Fields: you may choose to include a formatted list of record details using the “Include Fields” dropdown. Click the box to select which fields you would like to include in email notifications to users. Please note that you can select case details that contain Personally Identifiable Information (PII) and it is recommended that you send as little information as possible via email.
Add Scheduled Purge
The “Schedule Purge” action automatically sets up records of any type to be deleted. When records meet the rule criteria, they will be displayed in the Scheduled Purge page, just like records manually scheduled for purge (see Purge Records). The Scheduled Purge action form only contains one field, the “Purge Reason” dropdown, and your “Purge Reason" selection will be applied for all records to be purged via the rule. You can set what kinds of records should be purged using the rule’s criteria.

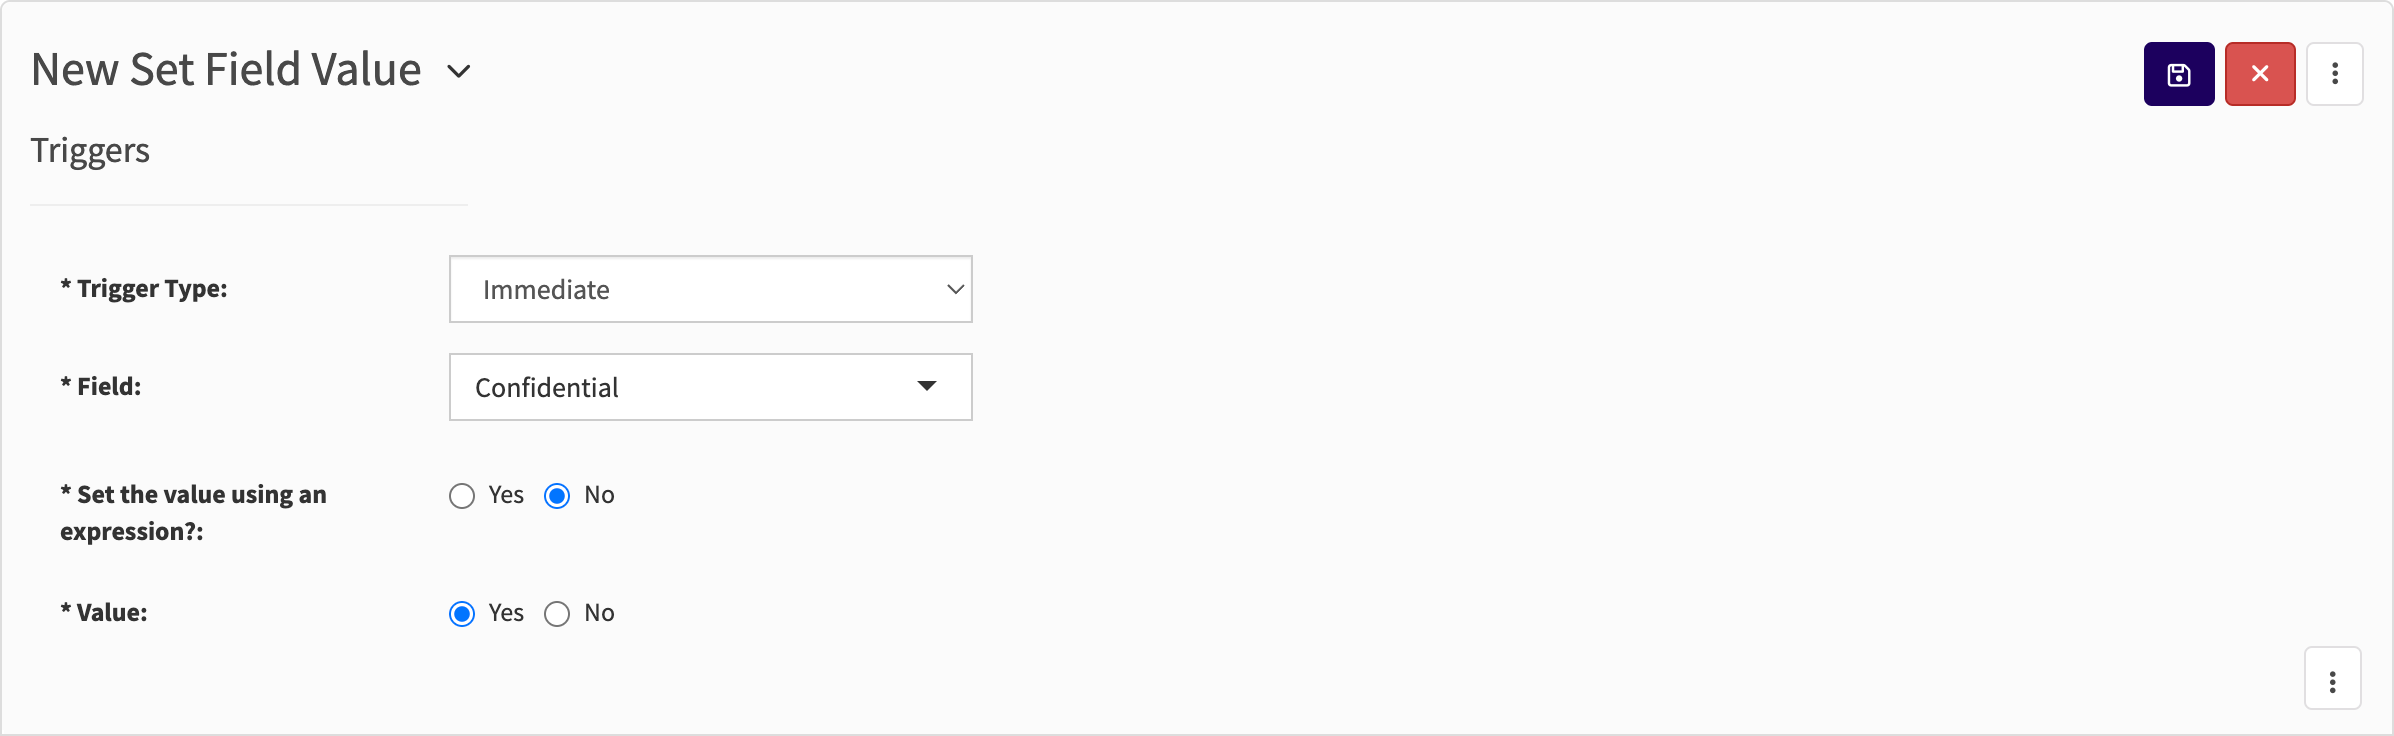
Add Set Field Value
Use the “Add Set Field Value” action to automatically update a record field based on your rule criteria. “Add Set Field Value” actions are especially powerful, as you can create these actions for any record type besides emails to update any record field that is not system-generated. See guidance on the “Add Set Field Value” form fields below:
- Trigger Type: see the "Set the Action Trigger Type" section above for details.
- Field: choose the field to update as part of the rule. The options in the “Field” dropdown will depend on the record type you choose. In the example below, the record type is case, so the “Confidential” field was an option.
- Set the value using an expression?: choose if the field should be set to a specific value or if the system should evaluate an expression to determine the value.
- Value: if you select “No” from the “Set the value using an expression?” options, indicate the value that the system should use to update the field. The input method for the “Value” field will be different based on the “Field” data type.
- For example, the “Confidential” field can only be set to “yes” or “no”, so the “Value” field can be input using radio buttons on the “Add Set Field Value” action form.
- If there are multiple options for the “Field”, “Value” can be set with dropdowns. If you choose a text “Field”, such as “Details” or “Description”, the “Value” can be inputted with a text box.
- Expression: if you select “Yes” from the “Set the value using an expression?” options, enter a statement using Case IQ Expression Language (ISEL) to tell the system how to calculate the field’s value when the rule criteria are met.
- For example, you could use an expression to automatically mark a case as confidential when you select a certain case type. In the following example expression, the system will set the case's "Confidential" field to "Yes" when you select "Investigation" in the "Case Type" field.
case.caseType == 'Investigation' ? true : false
- For comprehensive information on writing expressions for computed fields in Case IQ, see Case IQ Expression Language.
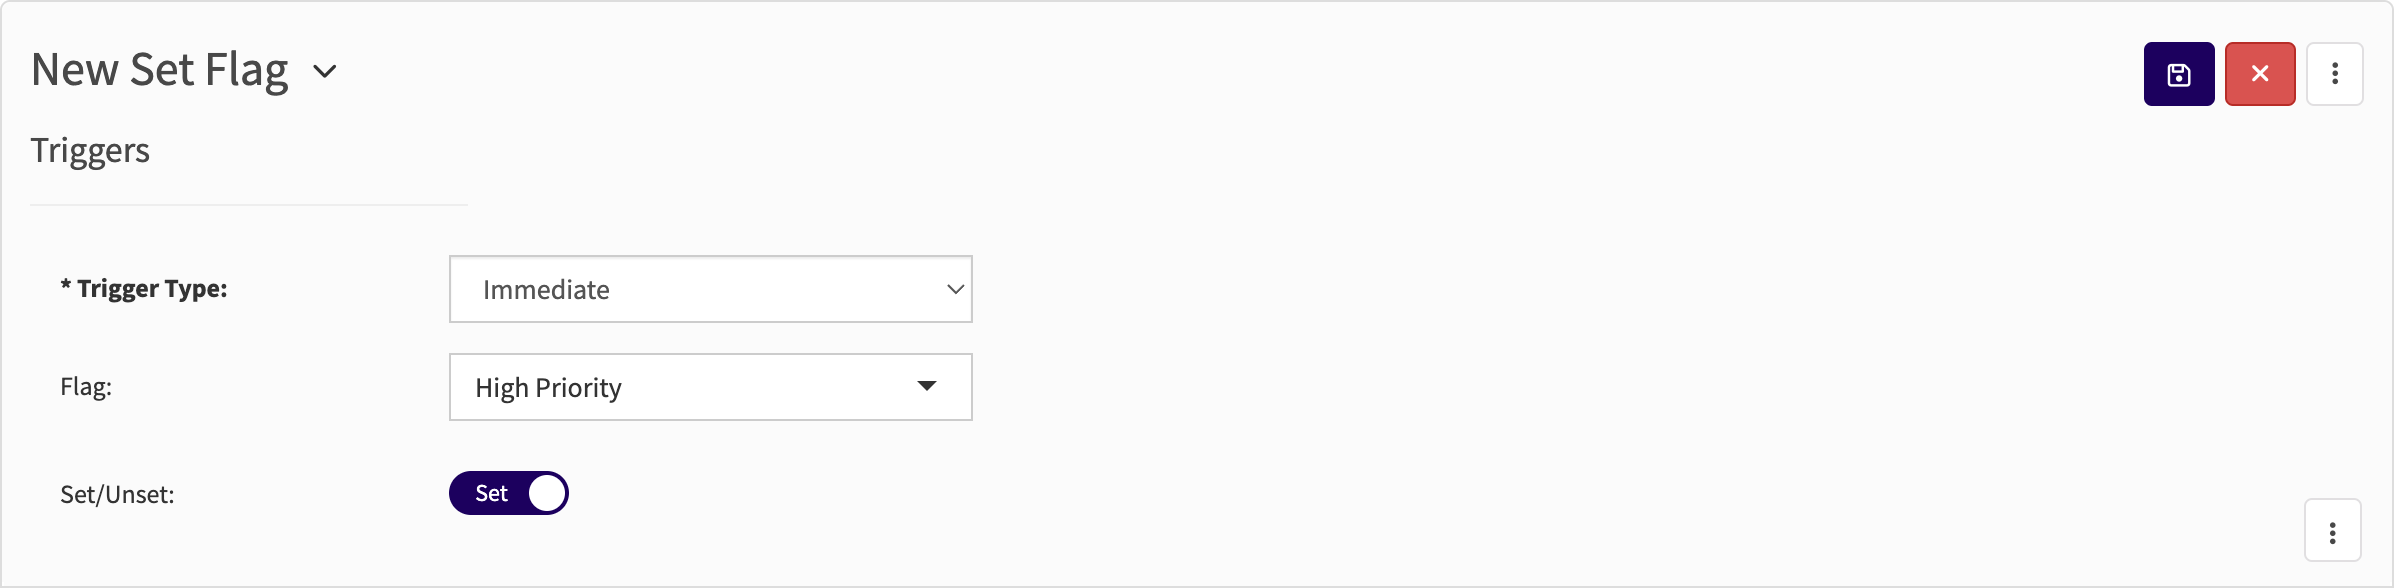
Add Set Flag
With the “Add Set Flag” action, you can create automation to tag or untag cases with your custom flags. Custom flags can only be set for case records, so you will only be able to create “Add Set Flag” actions for case records (see Flags for details on configuring flags). You can use “Add Set Flag” actions to automate the process of organizing cases, for example to set cases as “High Priority”. The “Add Set Flag” form contains the following fields:
- Trigger Type: see the "Set the Action Trigger Type" section above for details.
- Flag: choose the custom flag to toggle as part of the rule. The flag must be in the system prior to setting up this rule before it will appear in the “Flag” dropdown.
- Set/Unset: use the toggle to choose if the action will add or remove the flag from a case. One rule cannot carry out both actions.
Add SFTP Data Import
|
Data Imports Premium Feature Reach out to your Customer Success Manager or Account Executive to learn more about this feature. |
You can add an "SFTP Data Import" action to schedule when a data import is processed. The system will automatically import data from a file your organization uploads to Case IQ's SFTP server into Case IQ profile or data form entries based on the data import's settings when the "Schedule Process" rule is triggered. Data imports can overwrite all profile and data form data in Case IQ, so we recommend reviewing the data import's settings before saving the rule (see Add or Edit a Data Import for details).
- Data Import: select the data import you want to schedule. You can only select data imports that have already been added into the system (see Add or Edit a Data Import for details).
- Keep Source Files: choose if the system should retain the data files you upload to Case IQ's SFTP server. If you do not check the "Keep Source Files" checkbox, the file attachments will be moved to an inaccessible location on our SFTP immediately following the import and cannot be processed again.
- Validate Only: choose if the system should only validate the data file. If you check this option, the system will run validation on the data file you upload to Case IQ's SFTP when the rule is triggered, but it will not add or update records in Case IQ.
- Unique Filename Prefix: enter a unique set of lowercase characters you will add to the beginning of data file names for this import. Case IQ uses this unique file name prefix to identify the files to import into your application when this rule is triggered. For example, if you are importing information on your organization's personnel into Case IQ profiles, you could use "staff", "employees", or "contractors" as the unique file name prefix. Do not include spaces or special characters and ensure all characters are in lowercase.
- Data File Name Preview: when you fill in the unique file name prefix field, Case IQ will populate what your data file names should look like following our file naming conventions in the "Data file name preview" field, i.e. "[unique file name prefix]_{arbitraryId}.csv".
- Make sure the data files exported by your system are named following this format. All data file names must begin with the unique file name prefix for the import followed by an underscore. For example, if the unique file name prefix is "employees", your data file names must begin with "employees_".
- Any text following "[unique file name prefix]_" in a data file name is called an "arbitrary ID". Case IQ will not use the "arbitrary ID" to identify data files, so you can include any text as the arbitrary ID.
- Each data file for the data import can have a different arbitrary ID. Arbitrary IDs can be helpful for users to identify different data files in a recurring data import. For example, the arbitrary ID can be a timestamp when the data file was exported by your system.

FAQ
Can I use a field set by another rule in the criteria for a rule?
A rule’s criteria should not be dependent on another rule’s action, as the system will not be able to execute either rule. For example, if your system has a rule which sets the value of a field, do not use that field in the criteria for another rule.
Will a rule be triggered when an aggregate field is updated?
Case IQ will not trigger a rule when the system updates the value of an aggregate field on the case form. This means that, if you have configured rules where the "Rule Type" is "Record Event" and the "Record Event" is "Case Updated", the rule will not be triggered when the system calculates and updates an aggregate field. See the Aggregate Fields on Case Form tab on the Edit a Standard Record Type article for details on aggregate fields.