Create and Upload a Document Template
Case IQ provides an easy way to produce and automate document and letter generation. Information in a case record can be reproduced in a formatted and well-detailed document. Templates are completely configurable by System Administrators in the Settings tab, so you can add, revise, or delete templates in Case IQ at any time. This article covers the process to create and implement a new template in your Case IQ application, outlined in the tabs below. You can also combine template documents into one PDF by creating packets (see more in Packets Page and a Packet's Page).
You can create templates for any document used in your business processes (1) that includes data stored in Case IQ and (2) can be stored in a Word file (.docx). Common documents, such as opening statements, closing memos, investigation plans, or reports, can be generated for any case, ensuring all documents are consistent and accurate.
Create a Template
To start the process of adding a new template in your Case IQ application, you must create a new template file. All templates must be a Word document saved in the “.docx” file format. Templates can contain two types of text:
- Static text that will be the same every time a document is generated using the template. In the example template below, the static text is highlighted in purple.
- Placeholder text, called “tags”, that Case IQ will recognize and replace with contextual information when the template is used to generate a document. The tags are highlighted in pink in the example below.
Case Closing Summary
CaseNumber: {caseNumber}
To: Management
From: {owner}
Confidential: {confidential}
Date: {#system}{CurrentDate}{/system}
Created: {createdDate}
Status: {lastWorkflowStateId}
Type: {caseType}
Last Update: {lastUpdatedDate}, {lastUpdateBy}
Closure Details:
Closure Reason: {closeReason}
Closure Date: {dateClosed}
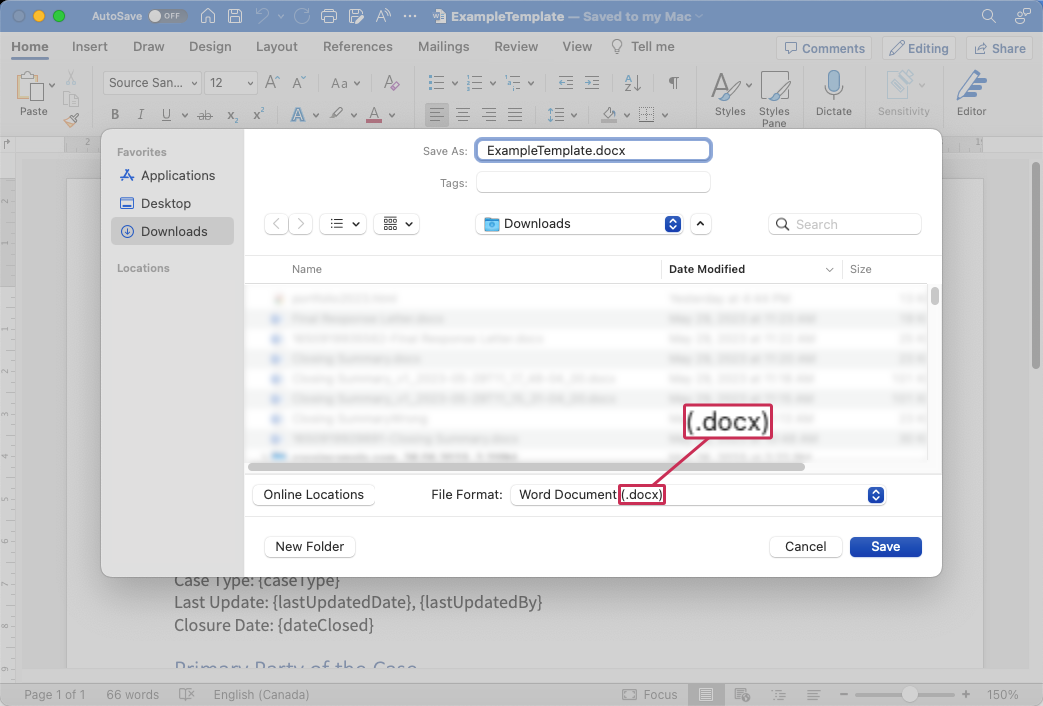
By including both types of text in your Word file, generated documents are standardized but always contain relevant case information, such as the date, record number, or action. The next section in this tab, "Field Name Tags", covers tags in more detail so you can add them to your template file. Make sure the file still has the “.docx” file extension in all lowercase characters when you save your template, as shown in the screenshot below. For example, Case IQ can accept a template file named "MemoTemplate.docx", but not "MemoTemplate.DOCX".
Field Name Tags
Case IQ identifies application fields using tags, which contain 2 components: (1) the field name and (2) the record type loop. The diagram below labels the components in a full field name tag. Curly brackets, “{}”, define the beginning and end of each component in the tag.
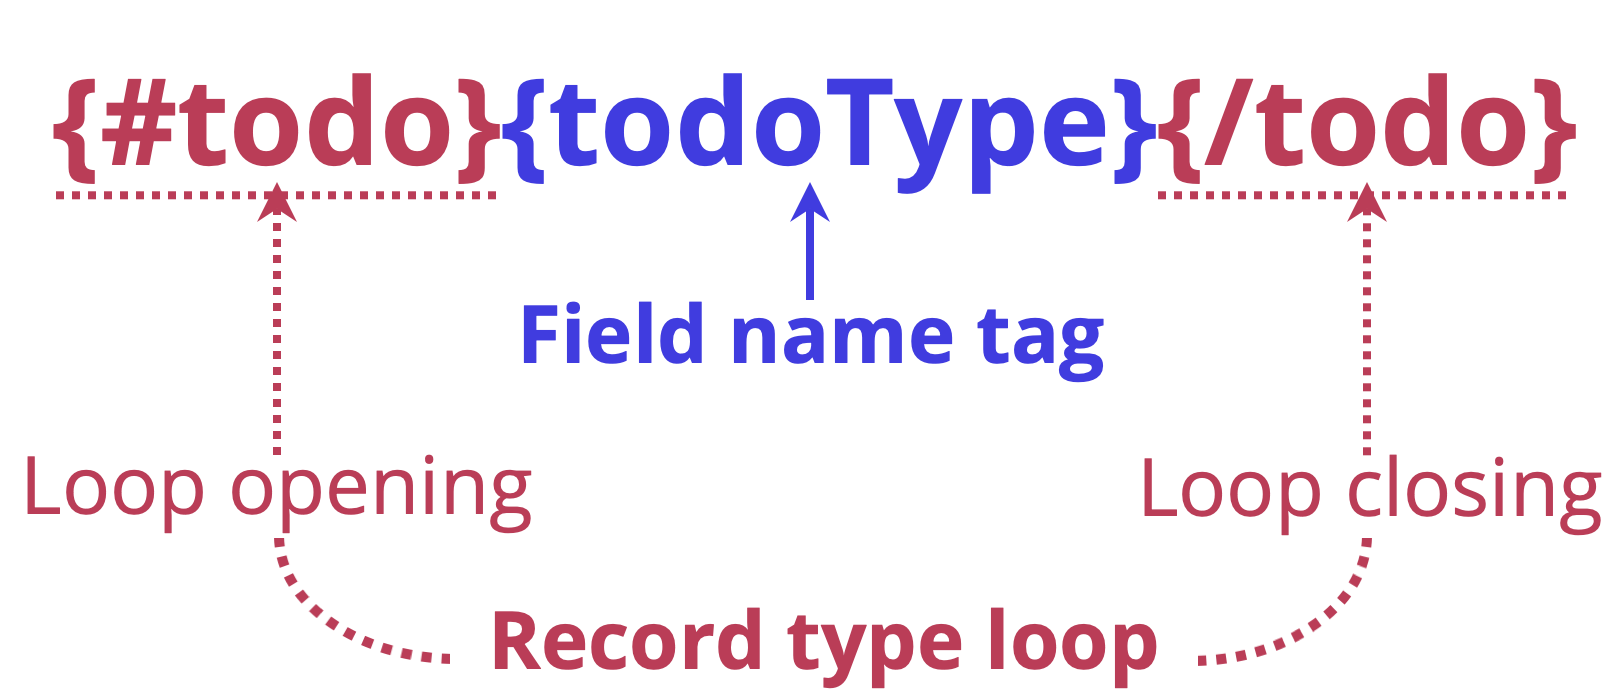
- Field name tag: the system name for the field in the application.
- The system records field names in camel case, where (1) the first word is lower case, (2) all subsequent words begin with a capital letter, and (3) there are no spaces between the words.
- However, including the field name in all lowercase letters is not an issue.
- Tags for fields that are commonly used in templates are listed in the "Common Field Name Tags" tab of this article. You can check the Static Field Glossary to find the field name tag for any standard application field. For additional fields, see Find Field Name Tags for detailed steps to identify the correct tags.
- Record type loop: two phrases that tell the system the record type of the case, such as to-dos, parties, and notes, in which the field is located.
- A record type loop is comprised of a “loop opening”, containing a “#” symbol before the record type name, and a “loop closing”, with a slash before the record type name.
- The loop text of any standard record type is simply the record name in lower case, e.g. for email records, the loop opening and closing will be {#email} and {/email} respectively.
- You do not need to add the record type for case fields, only for fields on a case's records.
- See more details on adding record fields in the next tab, "Format the Template".
The system uses each tag component to help it find specific fields in the application, so the components must follow the specific formatting rules summarized in the table below:
| Tag Component | General Format | Example |
|---|---|---|
| Field name tag | {fieldName} | {caseNumber} |
| Record type opening loop | {#recordtype} | {#email} |
| Record type closing loop | {/recordtype} | {/email} |
Format a Template
Font formatting you apply in a template file will be retained in the generated document. The example below shows how you can format your template file to produce easy-to-read generated documents. Font formatting can also be used to help test new templates, as you can highlight or change the colour of field name tags and then quickly scan the generated document for accuracy.
| Template File | Generated Document |
|---|---|
|
Dear {#party}{firstName} {lastName},{/party} Thank you for submitting your case, the case number assigned is {caseNumber}. The status is {lastWorkflowStateId}. Regards, Case IQ |
Dear John Doe, Jane Doe, Thank you for submitting your case, the case number assigned is 2020-01-00000005. The status is Open. Regards, Case IQ |
Add a Record Field in a Template
Records include parties, notes, to-dos, and any custom forms in the “Activity” tab of a case. When including fields from a record in the template, you must use loop openings and closings, e.g. {#party} and {/party}. You can use loops to control how fields are laid out in the generated document and you can insert multiple field name tags from that record between the loop opening and closing. However, you cannot add tags from one record type in another record type’s loop, except case fields.
The loop text of any standard record type is simply the record name in lower case, i.e.:
- Party = {#party} and {/party}
- To-do = {#todo} and {/todo}
- Note = {#note} and {/note}
When a template includes fields from a record, the data of all records associated with the case will be included in the merged document. For example, if you have more than one party for a case, the field values of all the case’s parties will be displayed in the generated document.
| Template File | Generated Document |
|---|---|
| Parties of the case: {#party}{firstName} {lastName},{/party}. |
Parties of the case: Jane Doe, Richard Miles, John Smith. |
Add a Custom or Response Field in a Template
You can include fields from your application's custom and response forms in templates like any other type of record. The loop text for a custom or response form is the record name in lower case. If the form name contains more than one word, separate the words with an underscore. In the chart below, see some example custom and response form names and what their loop text would be.
| Example Custom or Response Form Name | Loop Text |
|---|---|
| Allegation | {#allegation} and {/allegation} |
| Executive Interview | {#executive_interview} and {/executive_interview} |
| Witness Statement | {#witness_statement} and {/witness_statement} |
| Chain of Custody | {#chain_of_custody} and {/chain_of_custody} |
You can use these loops to include any custom or response form field in a template, including the dynamic fields you have added to the form using the Form Builder (see Add and Edit a Custom Form Type and Add and Edit a Response Form Type to learn how to create these form types and add fields to them). For example, suppose your application has a Witness Statement form, which has a "Relation to Case" field. You would enter the following loop and tag text to include the Witness Statement's "Relation to Case" field in templates. See Find a Field Name Tag for detailed steps to identify the correct tags for fields.
| Template File | Generated Document |
|---|---|
| Relationship to Case: {#witness_statement}{relationToCase}{/witness_statement} | Relationship to Case: Complainant |
Use Loops to Organize Template Content
To improve the layout of a document, you can place the loop openings and closings to clearly arrange merged values. If you generate the document as a Word file, you can remove any unwanted information after downloading it. This section shows how you can structure information in documents for cases with multiple records, such as lists and tables, using loop openings and closings. These methods are illustrated by showing a sample generated document for a case with multiple parties. The sample case used to generate the document for these examples had three parties, named Jane Doe, Richard Miles, and John Smith.
Combine Loop Tags for a Section
While you can add loop tags around each field, if a section in your template only includes fields from one record type, you can simply add loop tags around the section. The following example shows two different ways to arrange loop tags. In option 1, loop openings and closings are placed around each field. Option 2 simplifies the template, as the section begins with a loop opening and ends with a loop closing. Both will produce the same generated document text.
| Template File | Generated Document |
|---|---|
|
Option 1: Type: {#party}{partyType}{/party} First Name: {#party}{firstName}{/party} Last Name: {#party}{lastName}{/party} |
Type: Attorney Witness Defendant First Name: Jane Richard John Last Name: Doe Miles Smith |
|
Option 2: Type: {#party}{partyType} First Name: {firstName} Last Name: {lastName}{/party} |
Add a List of Fields
Using loops is useful when creating a list of field names. The following example shows how to create a list of fields in a sentence and with bullet points.
| Template File | Generated Document |
| The Parties associated to the case are {#party}{firstName} {lastName},{/party} and all were interviewed. | The Parties associated to the case are Jane Doe, Richard Miles, John Smith, and all were interviewed. |
|
The Parties associated to the case are:
|
The Parties associated to the case are:
|
Add a Table of Fields
You can arrange fields into tables in multiple ways depending on the location in which you place the loop openings and closings. By including the loop opening and closing in the row of the table, all fields will be contained in the same table, which is demonstrated in the first example below. However, each record will have its own table, as shown in the second example, if you place the loop opening and closing above and below the table respectively.
| Template File | Generated Document |
|---|---|
The Parties of the case are: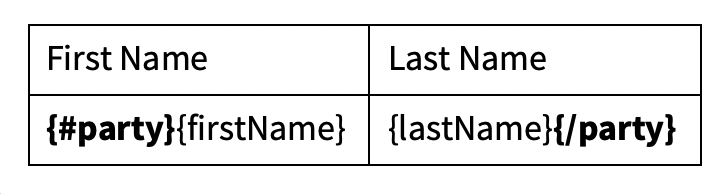
|
The Parties of the case are: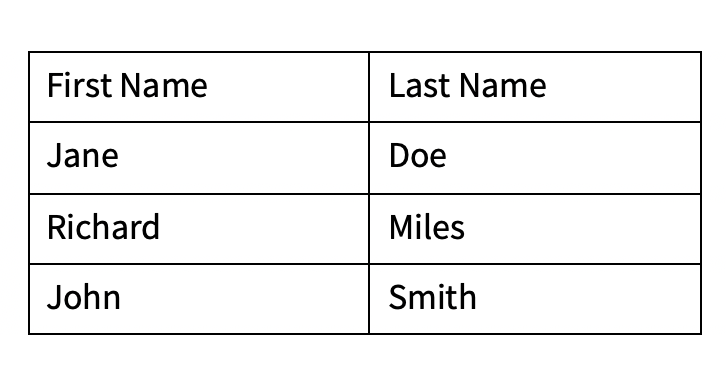
|
The Parties of the case are:
|
The Parties of the case are: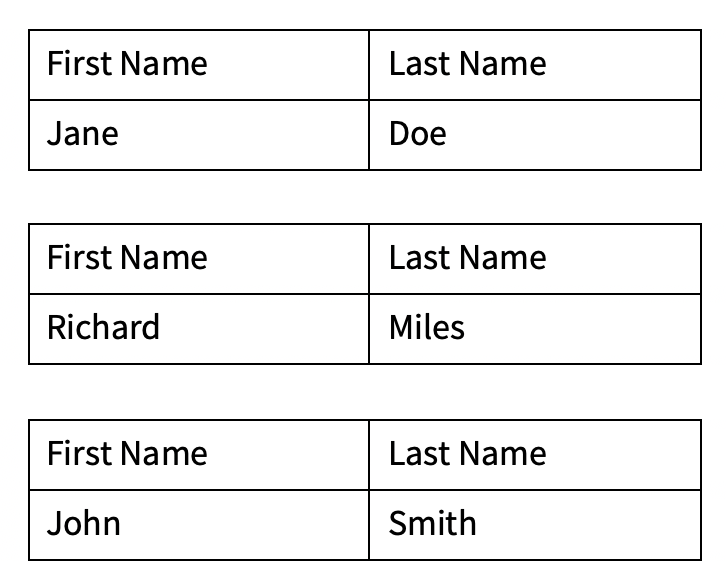
|
Add a Primary Party Field
If a party has been flagged as the “Primary” for a case, then this party’s values can be populated independently of all other parties for that case. Use “{#primaryParty}” as the loop opening and “{/primaryParty}” to close the loop. For example, if you want to address a letter to the case’s primary party, start the template file with the following text:
“Dear {#primaryParty}{firstName} {lastName}{/primaryParty},”
You can use the “primaryParty” loop around any of the party form’s fields to populate the primary party’s information. However, if you add tags for parties in general, i.e. {#party} and {/party}, all parties of the case will be populated in the generated document, including the primary party data.
Add Linked Case Details
You can include information about other cases that have been linked to a case (see the Link Related Cases article for details on linking cases). Use "{#caseLinks}" and "{/caseLinks}" to open and close the loop respectively , e.g. {#caseLinks}{type}{/caseLinks}. You can populate the following information on case links in your documents with the tags listed in the table below. Up to 100 case link records will be included in generated documents.
| Case Link Field Name Tag | Information Populated in Document |
|---|---|
| {entity1Id} | The initial case, i.e. the case for which you are generating the document. |
| {entity2Id} | The other case to which the initial case is linked. |
| {type} | The type of link between the cases, i.e. manual, suggested, or automatic. |
| {reason} | The reason provided for the case link. |
| {createdDate} | The date and time the cases were linked. |
Add a Current Date Value
You may need to include the date and time that a file was generated in Case IQ for certain document types, for example a Notice Letter or Report issue date and time. Use the “system” loop, with the loop opening {#system} and closing {/system}, to populate date values into the document, shown in the example below. See the "Common Field Name Tags" tab of this article for other date and time formats, e.g. the date short form (YYYY-MM-DD).
| Field Name | Format | Field Tag |
|---|---|---|
| Current Date & Time | June 18, 2021 10:17 PM | {#system}{CurrentDateTime}{/system} |
Upload a Template
When you have finished creating your template file, you can implement your new template in Case IQ by uploading the file in the application’s Settings. Navigate to the Settings sidebar tab, click the Data tab, and select “Templates” in the page menu.
See the following steps to upload template files. This file was uploaded in the video clip example below the steps, which you can use to follow along: ExampleTemplate.docx
- On the Templates page, click the Add Template button.
- Complete the New Template form by entering the following information:
- Template Name: enter a descriptive name for your new template. The name will be displayed in the “Template Name” dropdown when users are selecting a template to use.
- Locale: if your application supports multiple languages, choose the appropriate language of the template.
- File Type: choose the file format in which the document should be generated.
- Add File: upload your template Word file. To choose a file from the file browser, click the Upload a File from your Computer button. You may also drag and drop a file from your desktop. To do this, click and hold a file on your desktop and let go of your mouse cursor over the dotted box on the New Template form.
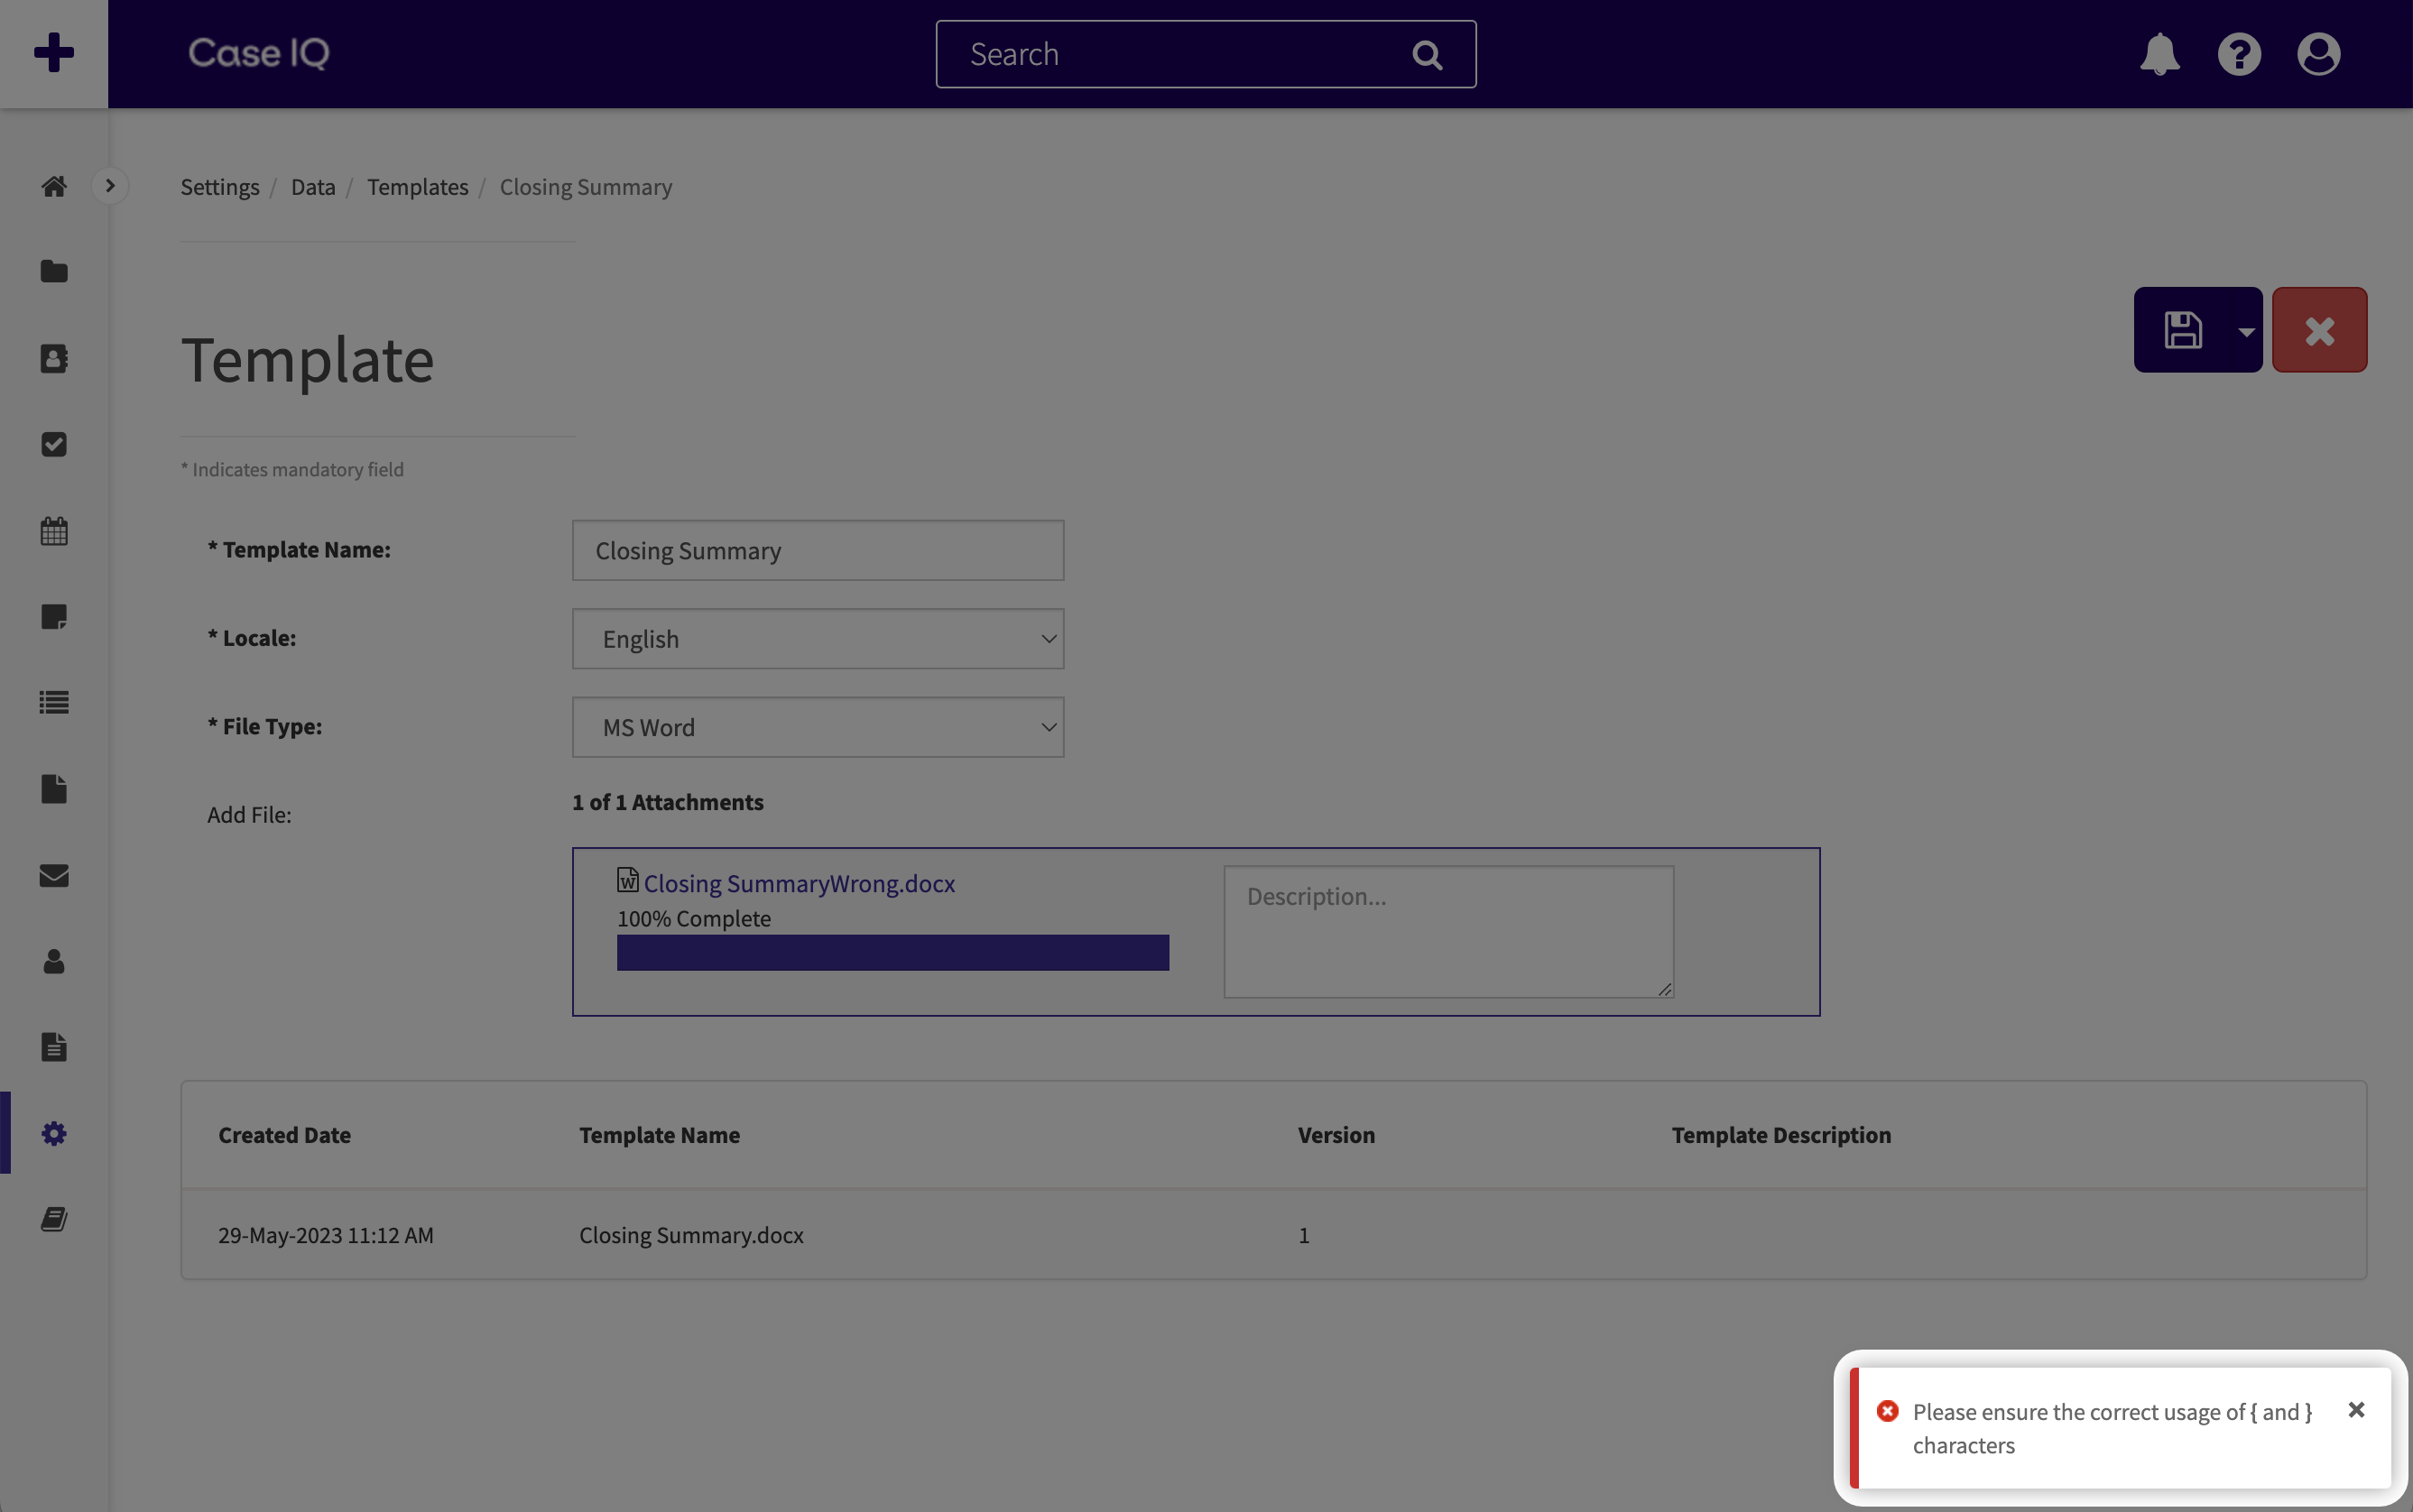
- Click the Save button to upload your template file.
When you click Save, the system will validate that the tags in the template file are useable and there are no unclosed loops. If there are any errors, the application will display a warning reading: "Please ensure the correct usage of { and } characters". Correct any errors in the template file by closely reviewing the tags that you have entered.
- An unclosed loop means that there is an opening loop “{#...}” without a closing loop “{/…}” in the text after a field name tag.
- Tags cannot contain spaces within the curly brackets.
- All tags and loop openings and closings must be enclosed by curly brackets, i.e. “{}”, rather than parentheses, “()”, or square brackets, “[]”.
Once you have corrected any errors, follow the instructions in the "Update a Template" tab to reupload the file.
Validate a Template
Users can generate documents with your template for any case as soon as it has been uploaded. You can validate the template you just added by generating a document for a case in your application. The video clip below these steps validates the example template added in the "Upload a Template" tab of this article. If you upload this example template, you can follow along with these steps to validate a template: ExampleTemplate.docx
- On an existing case's page, click the Files tab, then click the Add File button. You can also click the "+" button on the case's page, then select "File".
- Fill in the New File form:
- Kind: select “Generated Template”.
- Locale: choose the same language as the template file.
- File Type: choose the file format in which the document should be generated.
- Template Name: select the template that you uploaded earlier.
- Summary: you can choose to enter a description of the generated document.
- Click the Save button. If a field name is tagged in the template file but is empty for the case, the tag will be populated as a blank space in the document.
- The generated document will be created as a file record, which you can find under the Files tab of the case. View the document by clicking the file in the grid and downloading the attachment to your computer. If you generated the document as a PDF, you can preview the file instead.
Delete
Update a Template
If you need to correct errors or update information in a template that has already been uploaded in Case IQ, you can upload another file to the existing template’s record in Case IQ. By using this method, all versions of the template will be logged in the template record history and the system will automatically use the most recent version when a document is generated using the template. Review the following steps to upload an updated template file:
- Make any necessary changes to your template in the Word file and save the updated file on your desktop.
- On the Templates page, click the existing template record row in the Templates grid.
- Click the Edit button.
- Attach your edited template Word file in the “Add File” box.
- Click Save on the Template’s page. The system will add a version number and the new version of the template will be available to all users when generating a document.
Delete
Delete a Template
If you need to permanently remove a template, you can delete it from the Templates page or from a Template's page directly.
If you only need to delete a single template, navigate to the Template's page. Click the Options ( ) button, then select the "Delete" option.
You can also delete multiple template options from the Templates grid. Select the checkbox for each row you would like to delete, then click the Delete button above the grid.
Delete
Common Field Name Tags
The following tables contain some field name tags often used in templates. Check the Static Field Glossary for any other standard system fields in the application.
Case Fields
| Field Name | Text to enter in template |
|---|---|
| Case Number | {caseNumber} |
| Case Type | {caseType} |
| Case Owner | {owner} |
| Case Created Date | {createdDate} |
| Case Created By | {createdBy} |
| Last Updated By | {lastUpdatedBy} |
| Last Updated Date | {lastUpdatedDate} |
Party Fields
Open loops with {#party} and close with {/party} to populate all the case’s parties. If you only want to populate primary party information in the document, use {#primaryParty} and {/primaryParty} instead.
| Field Name | Text to enter in template |
|---|---|
| Party Type | {partyType} |
| First Name | {firstName} |
| Last Name | {lastName} |
| Address | {address} |
| City | {city} |
| Zip Code / Postal Code | {zipCodePostalCode} |
| State / Province | {stateProvince} |
| Country | {country} |
To-Do Fields
Open loops with {#todo} and close with {/todo} to populate all the case’s to-dos.
| Field Name | Text to enter in template |
|---|---|
| To-Do Type | {todoType} |
| Assigned By | {assignedBy __name} |
| To-Do Number | {todo.number} |
| To-Do Status | {status} |
| To-Do Due Date | {due} |
| To-Do Details | {details} |
| Send Email Reminder | {emailReminder} |
Current Date Values
Choose the date and/or time format you want to include in your template. If you want to use your application's date and time format settings, you can use the Current Date & Time (Short), Current Date (Short), and Current Time tags. The format for all other current date tags is hardcoded. To update your application's date and time format, change the "dateFormat", "dateTimeFormat", and "timeFormat" settings on the Options page (see Update Application Options for more on using the Options page).
| Field Name | Date/Time Format | Text to enter in template |
|---|---|---|
| Current Date & Time | April 3, 2020 3:39 PM | {#system}{CurrentDateTime}{/system} |
| Current Date & Time (Short) | Application's "dateTimeFormat" setting, e.g. 2020-04-03 3:39 PM | {#system}{CurrentDateTimeShort}{/system} |
| Current Date | April 3, 2020 | {#system}{CurrentDate}{/system} |
| Current Date (Short) | Application's "dateFormat" setting, e.g. 2020-04-03 | {#system}{CurrentDateShort}{/system} |
| Current Time | Application's "timeFormat" setting, e.g. 03:39 PM | {#system}{CurrentTime}{/system} |
| Current Weekday | Friday | {#system}{CurrentWeekday}{/system} |
| Current Month | April | {#system}{CurrentMonth}{/system} |
| Current Month (Short) | 04 | {#system}{CurrentMonthShort}{/system} |
| Current Day | 03 | {#system}{CurrentDay}{/system} |
| Current Year | 2020 | {#system}{CurrentYear}{/system} |
| Current Year (Short) | 20 | {#system}{CurrentYearShort}{/system} |
| Now | April 3, 2020 3:39 PM | {#system}{Now}{/system} |