Download, Share, Edit, or Delete a File
If you have permissions to view files, you can access a file's details by clicking a file record row in the Files grid (see Files Grid page) or via a case under the Files tab (see A Case's Page).
File's Page Features
The following section covers common details on a file's page noted in the screenshot below. You may see additional fields on your application's files, depending on the configuration of your application.

- Case number: the number of the case associated with the file.
- File number: when you add a file, the system generates a number to identify the file for the case. For example, if you added another file for this case, it would be 2026-001/16.
- Share File button: click to share the file with someone who does not have a Case IQ account via the portal or a secure link. Learn about sharing files in the Manage External Access to a File article.
- Edit button: click the Edit button to change the file's details. See more in the Edit a File section of this article.
- Link button: click the Link button to see all records linked to the file. See more in the Link a File section of this article.
- Options button: access additional file actions, including "View Record Source" and "Delete" options (see details in the View Record Source and Delete a File sections of this article respectively).
- Tabs: click the following tabs on a file's page to see specific information.
- Details: contains all information about the file, including the date the file was created and its tags, kind, and attachment.
- Access: manage who can access the file without a user account. Learn about sharing and editing access in the Manage External Access to a File article.
- Tags: the tags used to categorize the file, so you can quickly identify the attachment without previewing or downloading it. You can only tag “File Upload” kind files. The tags available in your application have been configured by your system administrator. You can tag a file when uploading or editing it (see how in the Edit a File section of this article).
- File link: click the link to preview the file in your browser window. See the Preview a File section of this article for details.
- Download icon: click the icon to download a copy of the file to your device. The file size is indicated beside the icon. See the next section in this article, Download a File, for more.
Download a File
You can save a file from Case IQ to your device by downloading it. You can download all file types except URLs.
You can download multiple files at once from the Files grid. Select the files you want to download, then click the Download button in the grid header. You can download up to 20 files at once.
You can also download a file from the file's page. Click the download icon on the file's page.
Preview a File
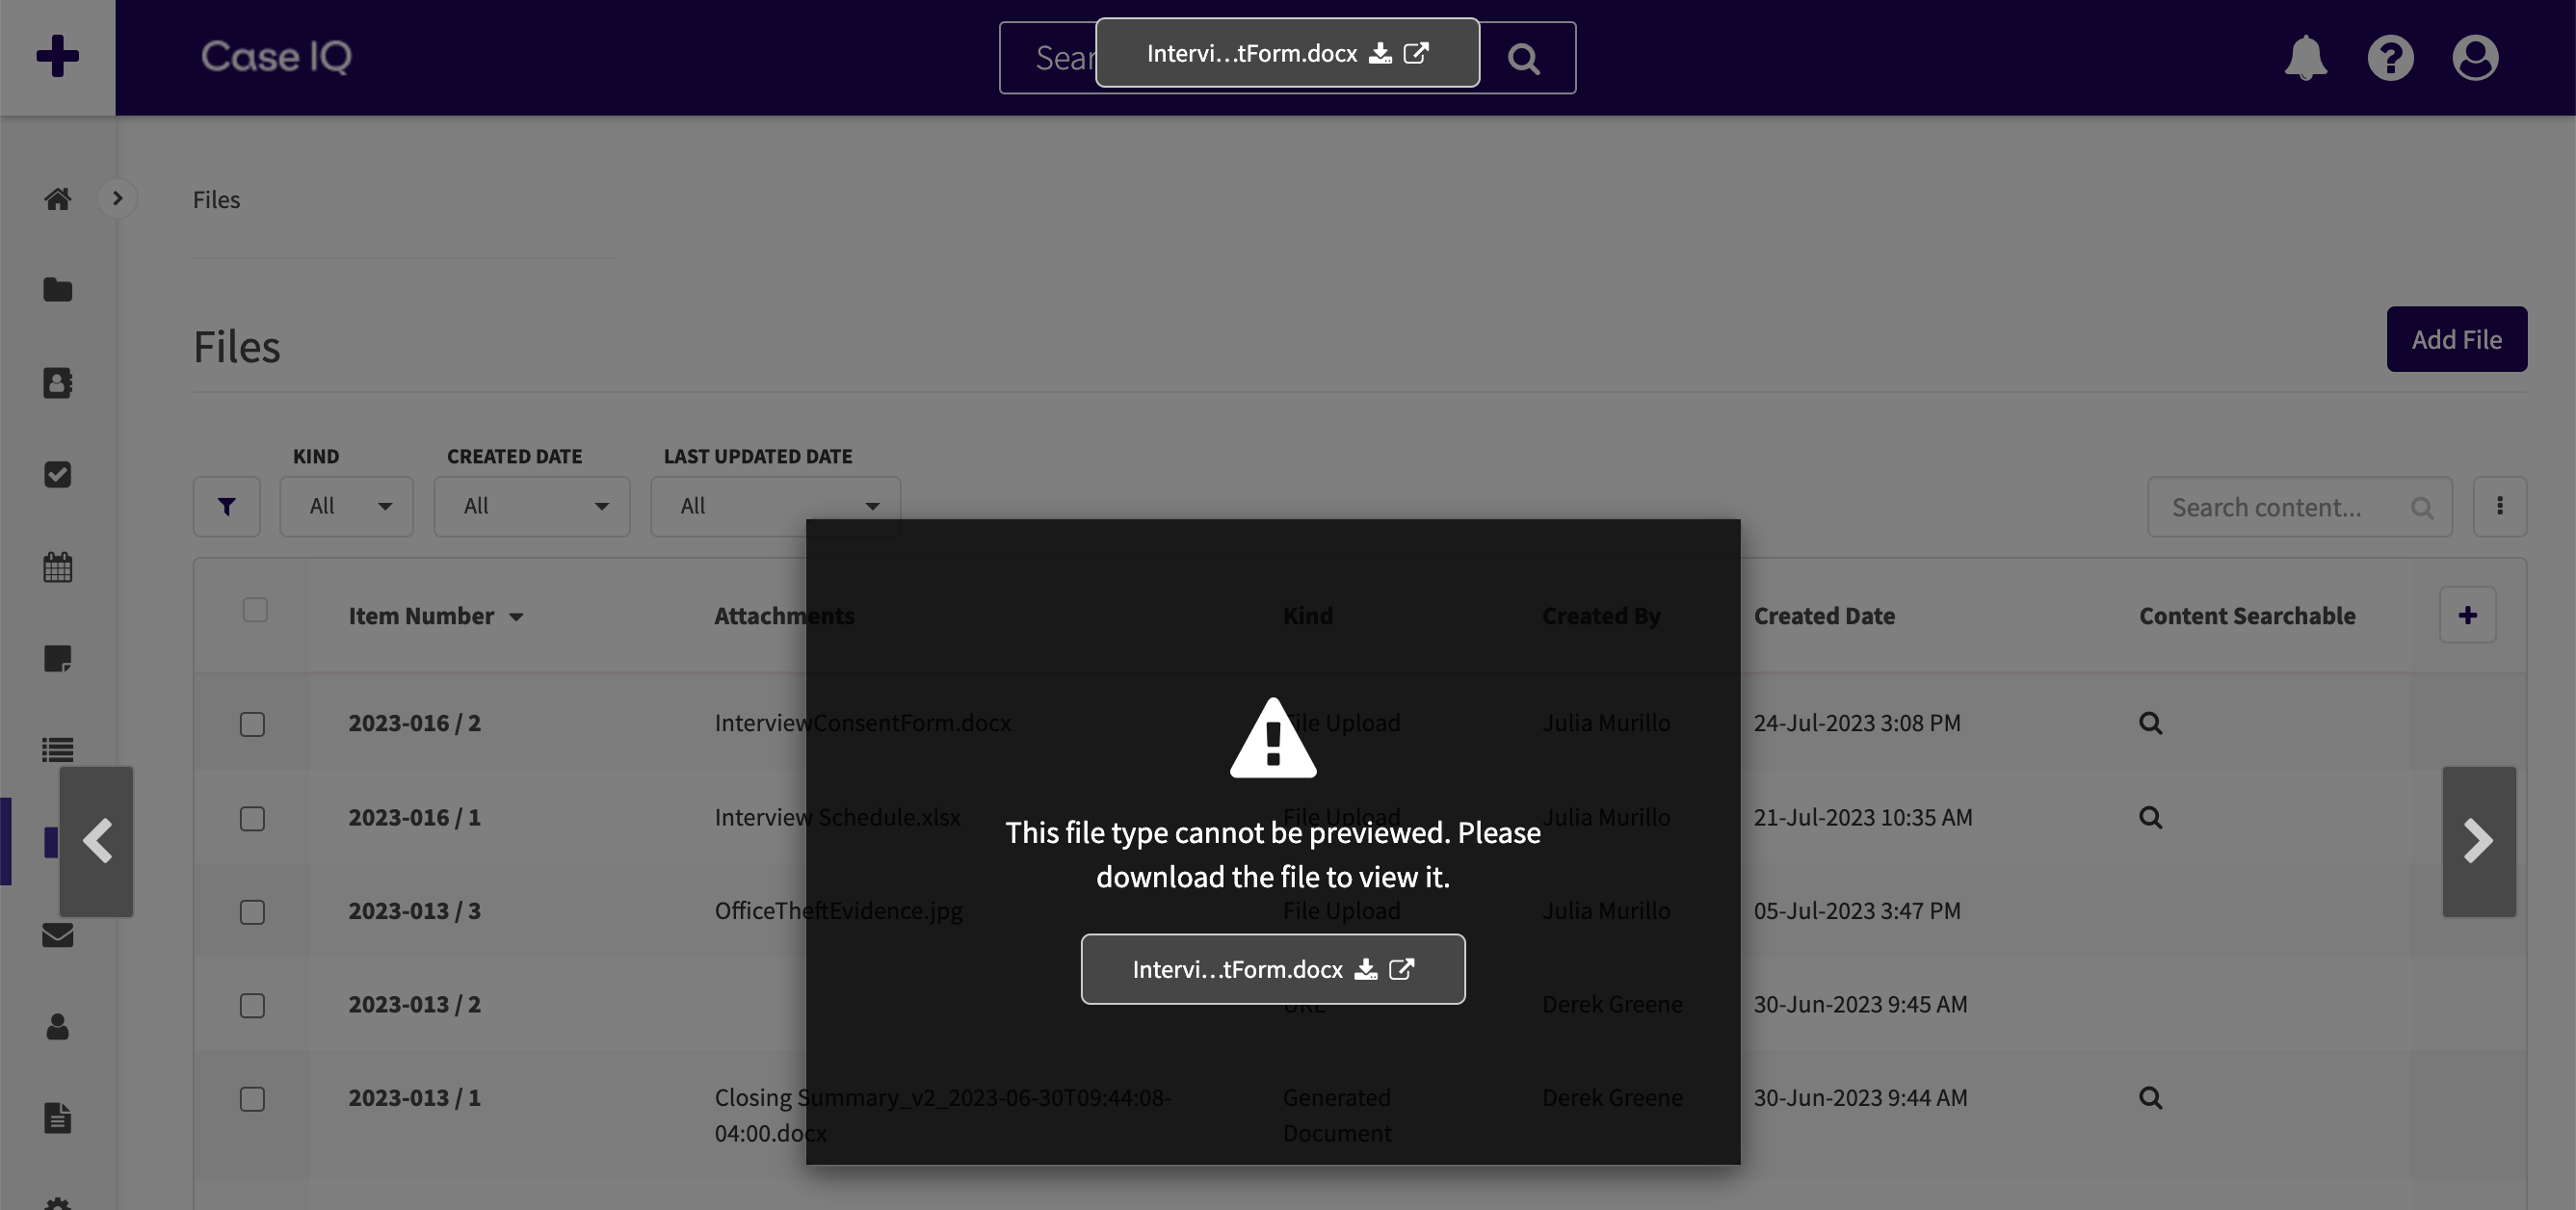
In addition to downloading files, you can preview certain file types in your browser without saving the file to your device. The following file types are supported for preview: jpeg, png, gif, bmp, and PDF. Other file formats, such as .docx or .txt, cannot be previewed and you will need to download these files to open them.
You can preview a files from:
- The Files page in the Files grid. Hover over the rightmost cell in a row to see the “…” (ellipses) button. Click the “…” (ellipses) button to see the preview option.
- A file's page. Click the file link.
When you click “Preview” on the Files page, you can preview other files in the grid by clicking the arrow buttons on each side of the page or using the left and right arrow keys on your keyboard.
If you attempt to preview a file that is not a jpeg, png, gif, bmp, or PDF, you will see the following warning:
Edit a File
You can change a file's details from its page. If you have permission to edit file records, use the following steps to make updates:
- Click the Edit button on a file's page.
- The file's page will now be in edit mode. Use the text boxes, picklists, radio buttons, and other data input options to update the information in the file form's fields.
- You can also update an uploaded file's tags in edit mode. To add a tag to the file, search for and select a tag in the "Tags" field. If you do not see an existing tag that describes the file and you have permissions to add tags, you can type in a tag name and hit Enter on your keyboard to add it to your application. You can remove one of the file's tags by clicking the "X" beside it.
- To change the attached file, click the Delete icon in the attachment upload box, then drag and drop a new file from your device.
- When you have completed your changes, click the Save button.
Grant Case IQ's AI Access to Files
|
Clairia Premium Feature Reach out to your Customer Success Manager or Account Executive to learn more about this feature. |
Case IQ's AI, Clairia, can reference files uploaded to a case to generate relevant and meaningful responses. The AI will only use files to which you have granted it access. See Start, Rename, or Delete a Chat with Clairia and Generate Case Content Using Playbook Fields for details on using Clairia.
To allow Clairia to use a case's files:
- Navigate to a file's page either from the case or the Files grid.
- On the file's page, click the Edit button.
- Check the "Enable for AI" checkbox.
- Click the Save button.
- The system will begin processing the file so the AI can use it. You will see a confirmation banner on the file's page when processing is complete.
You can also enable files for AI when adding them to a case. When manually uploading a file or dragging and dropping multiple files, make sure to check the "Enable for AI" checkbox (see Manually Upload a File or Drag and Drop Files to a Case for details on adding files).

Link a File
You can link a file with another record, such as a party, note, or to-do, for the same case to show a connection. For example, you could link a file to a party to show that the party provided the file for the investigation. You can link a file to another record from its page using the following steps:
- Click the Link (
 ) button on the file's page.
 - In the "View all linked records" pop-up, click the Link Records button.
- Select a "Record link type" for the link. The link type indicates how the records are related to each other.
- Administrators can configure the available record link types in Settings, see Add, Edit, and Delete Record Link Types for details.
- In the grid, you will see all the case's records to which you have access. Select one or more records to which you want to link to the file. You can link up to 50 records with the file at once.
- When you have finished choosing the record link type and records, click the Link Records button.
- The system will create the links in the background. When they have been created, the links you added will be displayed on the file's page, the other record's page, and the case's page under the Links tab.
Refer to Link a Case's Records for details on editing and deleting record links.
Delete a File
If you need to permanently remove a file, you can delete it from the file's page. Click the Options ( ) button, then select "Delete".
Allow a Portal Reporter to View a File
If the file's case is external and you have the appropriate permissions, you can allow the individual who reported the case to access the file. This means that the reporter can log in to your application's portal and view the file for the case they added. Use the following steps to set a file as external:
- Click the Edit button on a file's page.
- Check the "Allow Reporter Access" checkbox.
- When you have completed your changes, click the Save button.
View Record Source
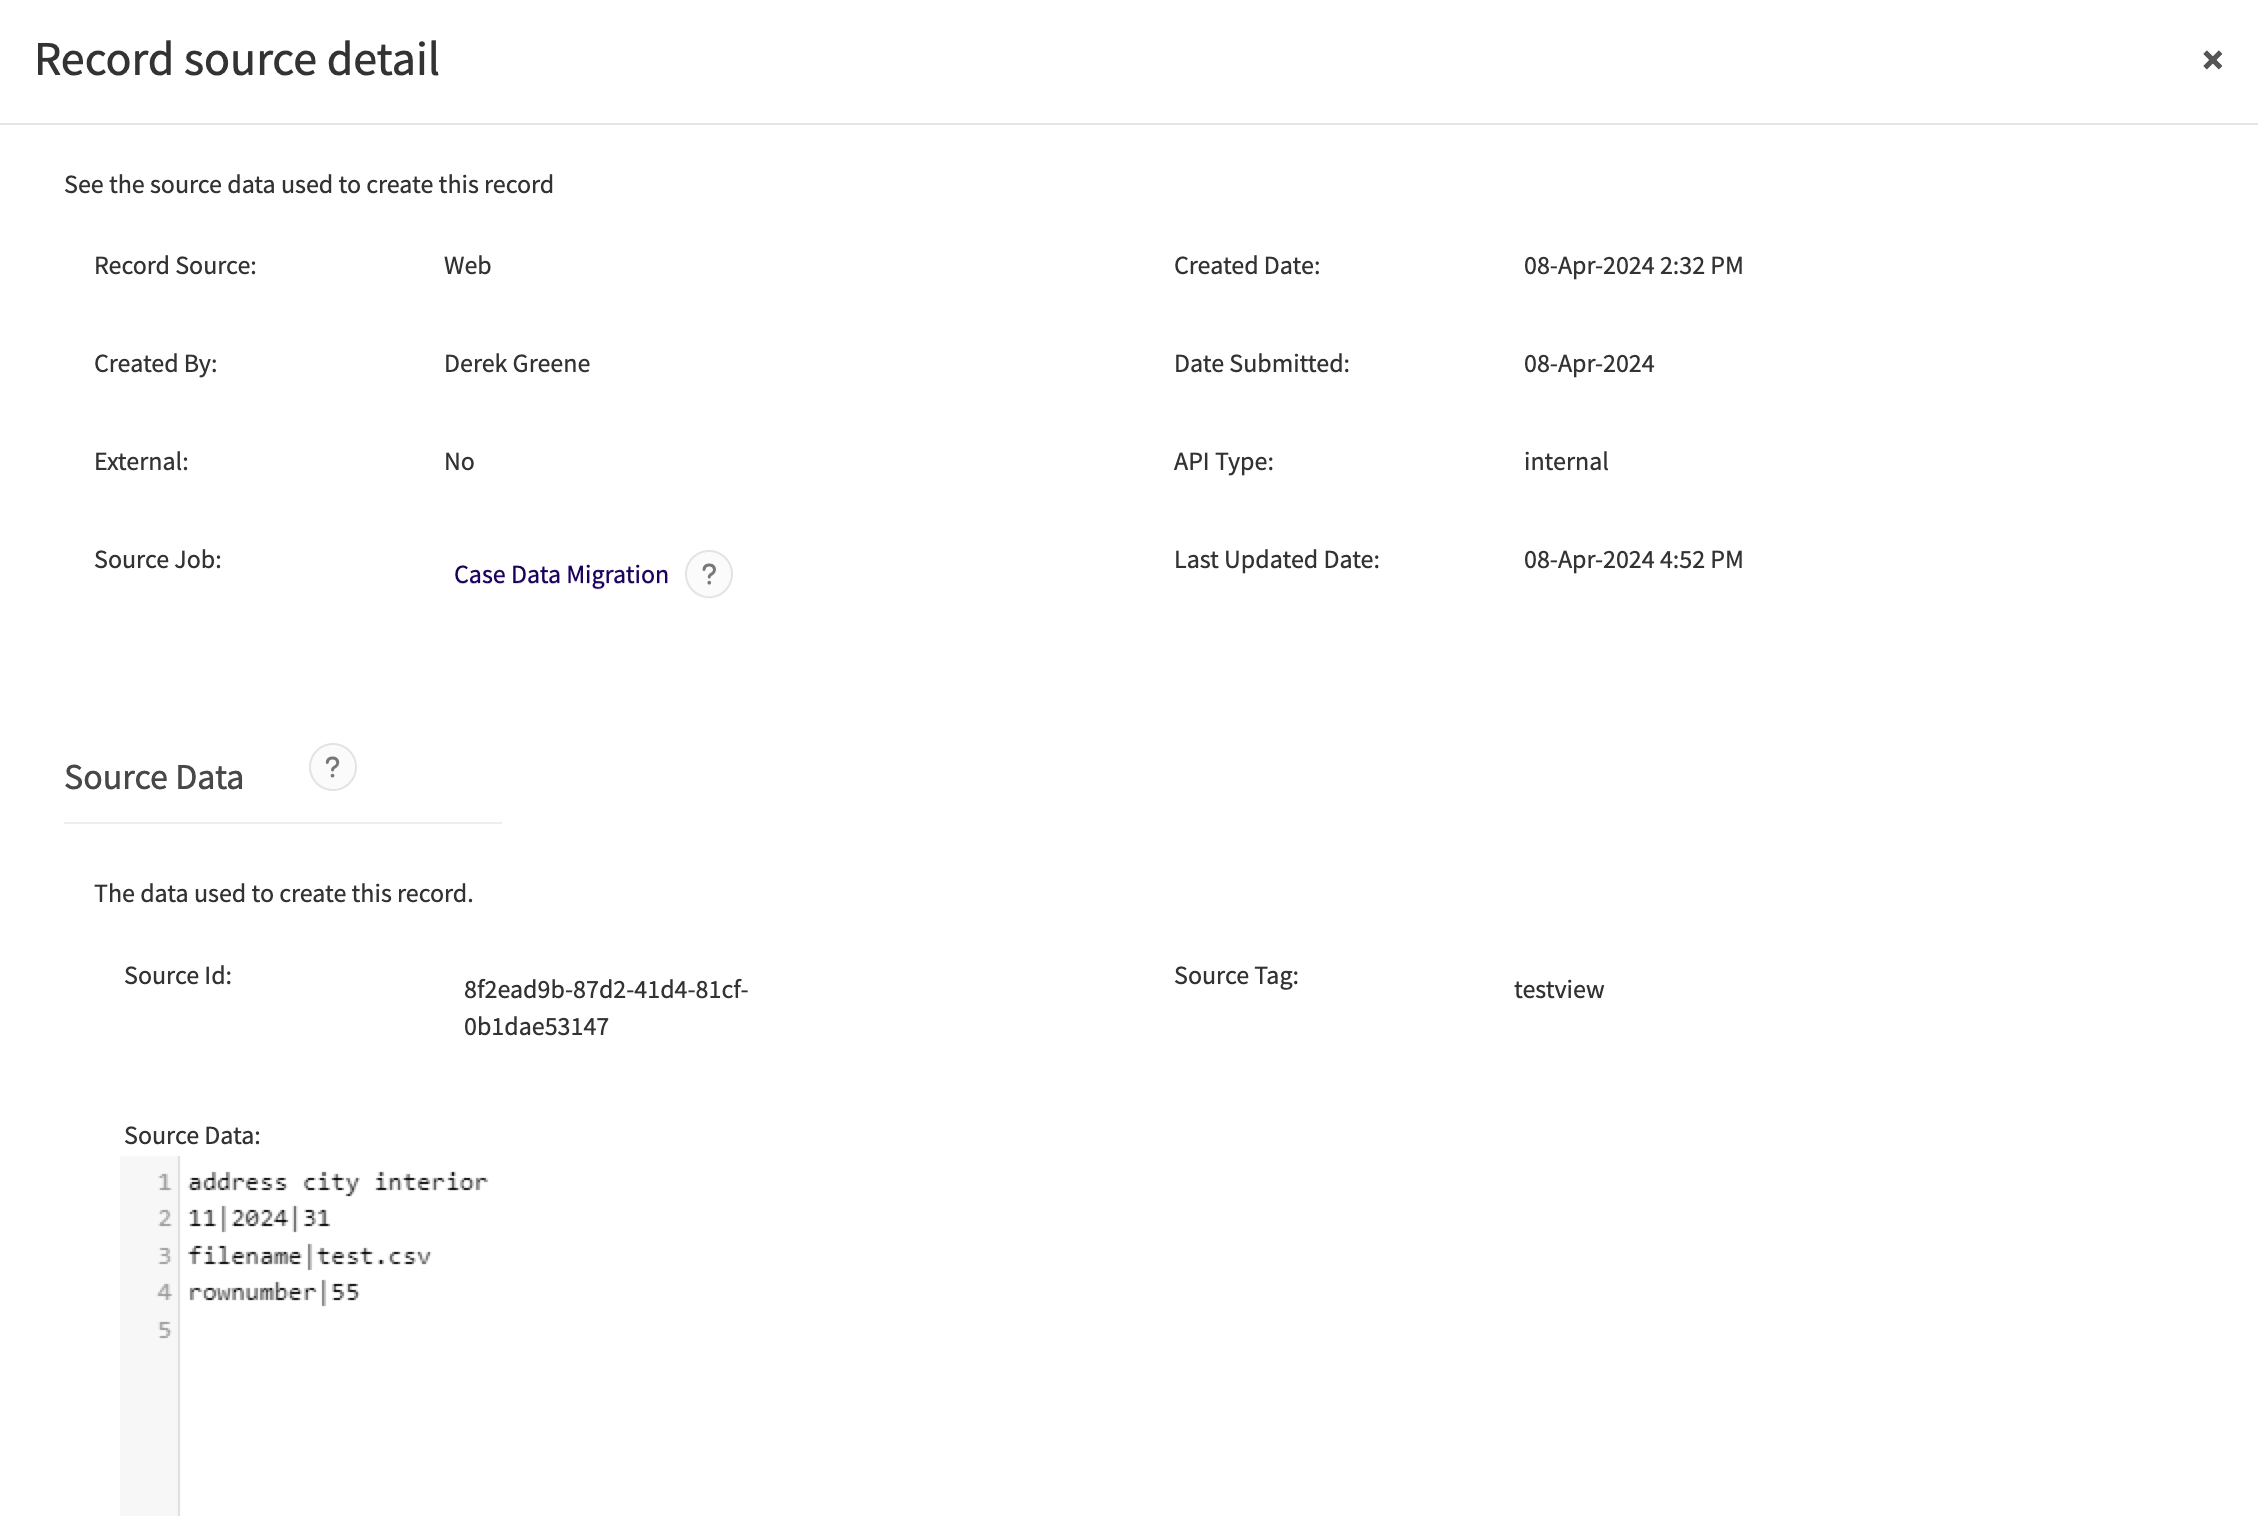
You can use the "View Record Source" option to monitor or troubleshoot your application’s data migrations or integrations. "View Record Source" will pull up the "Record source detail" pop-up, so you can check the system fields' values when the file was created. If the file was created by an integration or data import, you will also see the "Source Job" field and "Source Data" section in this pop-up. The "Source Data" section will show the row in the data import file that the system used to create the file. You can check out the integration log that the system recorded when it processed that data import file by clicking the link in the "Source Job" field.
FAQ
Can I add files to a closed case?
Yes, you can add files to closed cases (i.e. cases where all their workflows are closed).
Can I upload multiple files at once when creating a case?
You can only drag and drop multiple files after submitting a case, meaning you cannot upload files in bulk on the New Case form.
What file formats can I upload?
See the types of files you can upload in Supported File Types.
How many files can I upload to a case?
You can add a maximum of 1000 files to a case in your application and upload 20 files at a time.
From the external portal, reporters can add up to 50 files when submitting or reviewing their case.
What is the maximum file size I can upload?
The maximum file size you can upload to a file record is 50 MB.
How many files can I download at once?
You can download up to 20 files at once from the Files Grid page.
Case IQ could not upload a file. How can I resolve?
If Case IQ could not attach a file you uploaded:
- Make sure the file is a supported file type. See a list of all file types you can upload to Case IQ in Supported File Types.
- Remove any access permissions in your file. Case IQ will not be able to upload restricted or protected files.
- Check how many files have been attached to the case. You can upload a maximum of 1000 files to a case.