Edit, Disable, or Configure a System Notification
System Administrators can manage the standard notifications in the application from the System Notifications page in Settings. To navigate to the System Notifications page, go to Settings > System > Communications > System Notifications.

You can see every type of notification that the application automatically sends to users in the System Notifications grid. All standard notification types are detailed in the "List of Default System Notifications" tab of this article. To view more details or make changes to a notification, click a row in the System Notifications grid to access the notification’s page. This article (1) describes all fields on the notification's page, (2) explains how to edit notification messages, (3) lists all fields you can add to notification messages, and (4) provides examples of updating notifications.
View, Edit, or Disable a Notification
Each notification’s page contains all details and configuration options for the notification type. To change the notification’s setting, click the Edit button. The notification's page will now be in edit mode. Use the text boxes and radio buttons to update the information in the notification's page form fields.
See the following guidance on the Notification fields below:
- Disabled: by default, “Disabled” will be set to “No” for all standard notifications. If you would like to turn off the notification for all users, select “Yes”.
- Methods: select how users should receive the notification. If you have integrated a Twilio account, you may select the “SMS” option in addition to “Email”. For details on connecting your Twilio account with Case IQ, see Twilio Integration.
- Locked: choose if users can disable the notification on their user profile. If you set “Locked” to “Yes”, they will not be able to disable the notification. By default, system notifications are not locked.
- Save to Inbox: choose if the message will be saved to recipients’ in-application inboxes, so they can view the notification in Case IQ later. This option is not recommended for notifications that contain sensitive information, such as a user’s password.
- Language: choose language for which you want to edit the notification content. The system will store the "Subject", "HTML Body", and "Text Body" separately for each language, so you can edit the notification content separately for each language.
- Subject: the subject line of the notification. The text in this field will be used as the subject line for email notifications and the header for notifications in-application. See more details on adding field data into the notification subject in the "Configure a Notification's Content" tab of this article.
- HTML Body: the formatted version of the notification content. The HTML Body text will be used by modern email clients and for in-application notifications. See details on updating this text in the "Configure a Notification's Content" tab of this article.
- Text Body: the plain-text version of the notification content. If your organization uses an older email client or an email client with high security settings, the email client will use the Text Body content instead of the HTML Body. It is recommended to add Text Body content to ensure email clients do not block your notification emails with their spam filters. See details on updating this text in the "Configure a Notification's Content" tab of this article.
Click the Save button to implement your changes to the notification. The video clip below shows how to disable a notification, which will prevent it from being sent to users.
Delete
Configure a Notification's Content
Notifications can contain two types of text:
- Static text that will be the same every time the notification is sent to users. In the screenshot below, the static text is highlighted in purple.
- Placeholder text, called “tags”, that Case IQ will recognize and replace with contextual information when the notification is generated. The tags are highlighted in pink in the screenshot below.
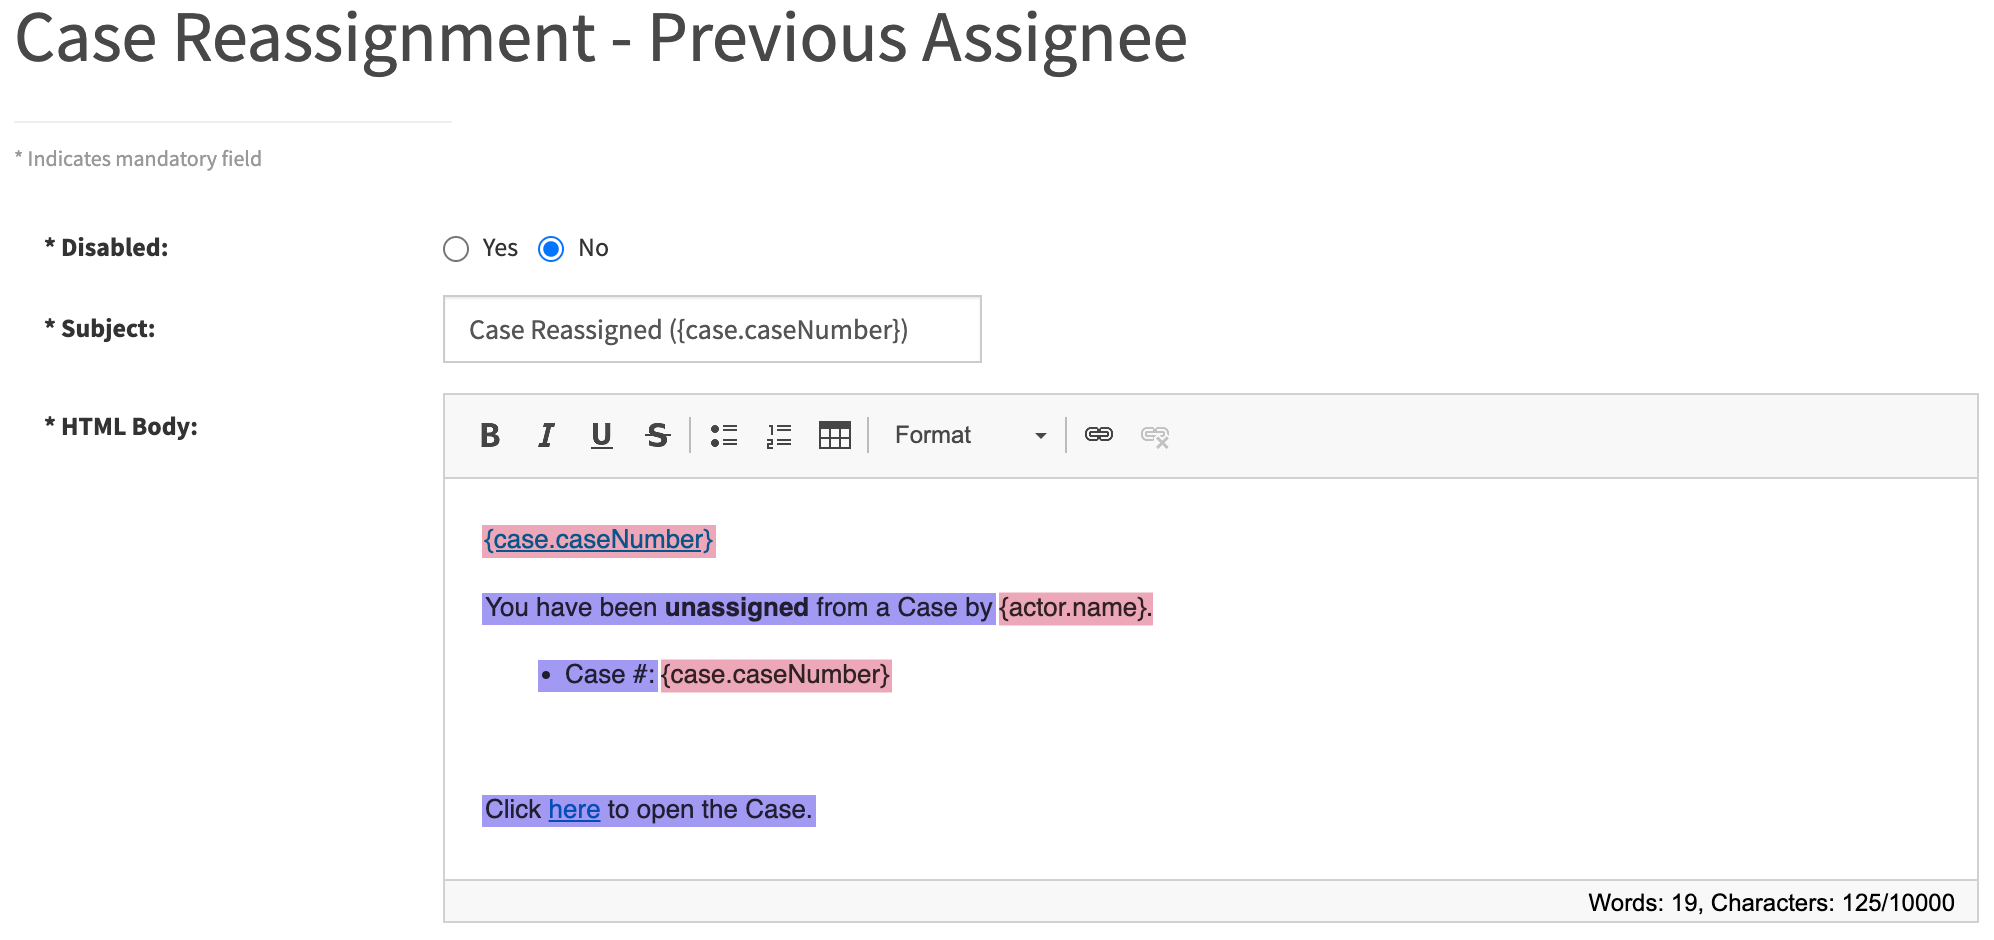
By including both types of text, notification messages are standardized but always contain relevant information, such as the date, record number, or action, when the notification is sent to a user. System Administrators can update both types of text in a notification’s Subject, HTML Body, and Text Body fields.
You can add the tags in the following chart to a notification's content. In addition to the tags below, you can include any case field in system notifications. See the Static Field Glossary for all case field name tags.
| Entity | Field Name | Tag |
|---|---|---|
| Case |
Primary party | {case.primaryPartyId__partyName} |
| Email |
Body | {email.body} |
| Email ID |
{email.emailThreadId} |
|
| Email Thread ID |
{email.id} |
|
| Sender | {email.senderName} | |
| Subject | {email.subject} |
|
| Entity shared with external user | Entity type | {entityName} |
| Entity URL | {entityUrl} |
|
| Shared file | Attachment ID | {attachmentId} |
| File ID | {id} |
|
| Attachment name | {fileName} |
|
| Recipient email | {email} |
|
| Expiry date |
{expiryDate} |
|
| Shared file message | {message} |
|
| Verification code |
{verificationCode} |
|
| System | Actor | {actor.name} |
| Language | {language} |
|
| Login URL | {loginUrl} |
|
| Base URL | {system.baseUrl} |
|
| Customer name | {system.name} |
|
| Team |
Team description | {team.description} |
| Team ID |
{team.id} |
|
| Team name |
{team.name} |
|
| To-do | Assigned by | {todo.assignedBy__name} |
| Case Number | {todo.caseId__caseNumber} |
|
| Due date | {todo.due} |
|
| Email reminder | {todo.emailReminder} |
|
| To-do ID | {todo.id} |
|
| To-do Number | {todo.number} |
|
| Status | {todo.status} |
|
| Type | {todo.todoType} |
|
| Usage overage | Overage type | {type} |
| Warning threshold | {warningThreshold} |
|
| User | Confirmation code | {code} |
| Days until deactivation | {daysUntilDeactivation} |
|
| Days until expiry | {daysUntilExpiry} |
|
| Name | {name} |
|
| New email | {newEmail} |
|
| New username | {newNick} |
|
| Previous email | {originalEmail} |
|
| Temporary password | {password} |
|
| Reset link | {resetLink} |
|
| First name | {user.firstName} |
|
| Username | {user.nick} |
Format the HTML Body
Text formatting you apply in the HTML Body will be retained in the notification message. Use the text formatting toolbar to change the font style, such as bold or italic font, bulleted or numbered lists, tables, headings, and hyperlinks. The example below shows how formatted text in the HTML Body will be displayed in the notification message.
| HTML Body Field Text | Example Notification Message |
|---|---|
|
A new incoming email has been attached for your case {#case}{caseNumber}{/case}.
|
A new incoming email has been attached for your case 2021-11-0004.
|
Add a Link in the HTML Body
To add a clickable link in a notification:
- Highlight the text you want to make a link in the HTML Body field with your mouse cursor and click the link icon in the text formatting options. You can edit an existing link in the notification by clicking the link text, then clicking the link icon.
- The Link popup will be displayed, so you can set the type of link and where the link will navigate users.
- Display Text: set the text to include in the notification message that users can click to access your link. If you highlighted text in your notification message prior to clicking the link icon, the text you highlighted will already be in the “Display Text” field.
- Link Type: select the type of page to which the application should navigate the user when they click on the link from the following options:
- “URL”: navigate the user to a website.
- “Email”: open a draft email to send a message to an email address. The browser will open the draft email in the user’s default email client.
- “Phone”: load a phone number in the user’s default telephone service application.
- After you select a “Link Type”, additional fields will be displayed to enter the link address and more details depending on the link type. The additional fields for each “Link Type” selection are listed in the table below these steps.
- When you have completed the additional fields, click Ok to save your link. Save your changes to the notification message by clicking the Save button on the notification's form.
| Link Type Selected | Additional Fields in the Link Info Tab |
|---|---|
| URL |
|
|
|
| Phone | Phone number: enter the phone number that the user’s device will load when clicking the link. |
List of Default System Notifications
| Name | Subject | Recipient | Message |
|---|---|---|---|
| Access Request Owner Notification | {requestUser} has requested access to {caseNumber} |
Case owner |
You have a pending access request. * Case number: {caseNumber} * Requested by: {requestUser} * Reason for request: {?requestReason}{requestReason}{:else}None provided{/requestReason} Review Access Requests [{system.baseUrl}/case/{caseId}/team?tab=accessRequests] |
| Case Auto Assignment Actor | Case Assignment Completed ({case.caseNumber}) |
User who submitted or reassigned the request |
{case.caseNumber} [{system.baseUrl}/case/{case.id}] {@eq key=responseCode value=0} {case.owner__name} have been automatically assigned a Case by {actor.name}. {:else} {@eq key=responseCode value=1} No eligible user could be assigned.{@eq key=source value="auto_assign"} The previous owner was retained.{/eq} {:else} Assignment failed. Reassign from the case page. {/eq} {/eq} * Case #: {case.caseNumber} Click here [{system.baseUrl}/case/{case.id}] to open the Case. |
| Case Email Other Reply Notification | New Email for Case {case.caseNumber} |
Email recipient who is not the case owner |
You have a new email for Case ({case.caseNumber}). * From: {email.senderName} * Subject: {email.subject} View or reply to this message in Case IQ. [{system.baseUrl}/email/{email.emailThreadId}?msg={email.id}] |
| Case Email Reply Notification |
Email attached to your case {case.caseNumber} has been replied to |
Case owner |
An Email attached to your Case ({case.caseNumber}) has been replied to. * From: {email.senderName} * Subject: {email.subject} Click here [{system.baseUrl}/email/{email.emailThreadId}?msg={email.id}] to view the Email. |
| Case Inbound Email Notification |
New Email received for your case {case.caseNumber} |
Case owner |
A new incoming Email has been attached to your Case ({case.caseNumber}) * From: {email.senderName} * Subject: {email.subject} Click here [{system.baseUrl}/email/{email.emailThreadId}?msg={email.id}] to view the Email. |
| Case Notification Investigative Team |
Investigative Team ({case.caseNumber}) |
New investigative team member |
{case.caseNumber} [{system.baseUrl}/case/{case.id}] You have been added to the Investigative team on a Case. * Case #: {case.caseNumber} Click here [{system.baseUrl}/case/{case.id}] to open the Case. |
| Case Reassignment From |
Case Reassigned ({case.caseNumber}) |
User unassigned from case |
{case.caseNumber} [{system.baseUrl}/case/{case.id}] You have been unassigned from a Case by {actor.name}. * Case #: {case.caseNumber} Click here [{system.baseUrl}/case/{case.id}] to open the Case. |
| Case Reassignment To |
Case Assigned ({case.caseNumber}) |
User assigned to case |
{case.caseNumber} [{system.baseUrl}/case/{case.id}] You have been assigned a Case by {actor.name}. * Case #: {case.caseNumber} Click here [{system.baseUrl}/case/{case.id}] to open the Case. |
| Configuration Import Complete |
Configuration Import Completed{@gt key=errorCount value=0} With Errors{/gt} |
User who initiated a configuration import (see Export and Import a Configuration File) |
A configuration import has been completed{@gt key=errorCount value=0} with {errorCount} {@eq key=errorCount value=1}error{:else}errors{/eq}{/gt}. {@gt key=errorCount value=0}Please see the Integration Log [{system.baseUrl}/settings/system/integration-log/{parentEventId}/{jobId}] for more details. {/gt} |
| Data Import Attachment Failed | Attachment Data Import failed. See the integration log for details. | The data import's error notification recipient (see Add or Edit a Data Import) | Attachment Data Import failed. |
| Data Import Attachment Passed |
Attachment Data Import Successful. See the integration log for details. | The data import's error notification recipient (see Add or Edit a Data Import) | Attachment Data Import Successful. |
| Data Import Failed | {entityName} Import Failed | The data import's error notification recipient (see Add or Edit a Data Import) |
{entityName} data import failed: {errorCount} {@eq key=errorCount value=1}error{:else}errors{/eq} detected in the file. Review the Integration Log [{system.baseUrl}/settings/system/integration-log/{parentEventId}/{jobId}] for detailed information. Please correct the issues and re-upload the file to complete the import. |
| Data Import Processed Success | Data Import Successful |
The data import's error notification recipient (see Add or Edit a Data Import) |
Data Import Successful |
| Data Import Successful | {entityName} Import Completed | The data import's error notification recipient (see Add or Edit a Data Import) |
{entityName} data import completed: {recordsStored} {@eq key=recordsStored value=1}record{:else}records{/eq} saved{@gt key=errorCount value=0}, {errorCount} {@eq key=errorCount value=1}error{:else}errors{/eq} encountered{/gt}. {@gt key=errorCount value=0} See the Integration Log [{system.baseUrl}/settings/system/integration-log/{parentEventId}/{jobId}] for details. {/gt} |
| Data Import Validation | Data file validation{@eq key=isValid value=1} failed{/eq} {@eq key=isValid value=0} successful{/eq} |
The data import's error notification recipient (see Add or Edit a Data Import) | {@eq key=isValid value=1} The data file did not pass validation and cannot be used to import data. See the Integration Log [{system.baseUrl}/settings/system/integration-log/{parentEventId}/{jobId}] for details. {/eq} {@eq key=isValid value=0} You can import data using this file you tested. {/eq} |
| External Case Access Granted | Case Access Granted | External user who has been granted access |
Access to case {caseNumber} has been granted by {grantedBy}. This access is available through the online portal and will remain active {accessDuration}. Your login credentials will be sent to you in a separate email. To view the case, log in using the link below: {system.baseUrl}/external/case/{caseId} [{system.baseUrl}/external/case/{caseId}] |
| External Case Access Revoked | Case Access Ended | External user whose access has been revoked | Access to the case {caseNumber} and its related records is no longer available through the online portal. Access to the case has been removed. |
| External Password Expired |
Password Expired |
External user whose password has expired |
Hello, Your password has expired. To log in to your account, you can request a password reset [{system.baseUrl}/external/forgot-password{appData.userConfigQueryParams}]. |
| External Password Expiring |
Password Expiring Soon |
External user whose password will expire soon |
Hello, Your password will expire in {daysUntilExpiry} day(s). Please change your password before this time elapses. Click here [{system.baseUrl}/{changePasswordUrl}] to change your password. |
| External Password Generated |
New Password |
External user with a new password |
A new password has been generated for you. This is a temporary system generated password which expires in {daysUntilExpiry} day(s). Please change your password after logging in. * Password: {password} If this is not you or there is an error with this information please delete this email and contact your system administrator. |
| External Password Reset Requested |
Password Reset Requested |
External user who requested a password reset |
Hello, We received a request to reset the password associated with this email address. If you made this request, please follow the instructions below. If you did not request to have your password reset, you can safely ignore this email. Click the link below and use this code to confirm that you have requested a password reset: {code} {resetLink} [{resetLink}] If clicking the link doesn't work, you can copy and paste the link into your browser's address window, or retype it there. |
| External Record Access Granted |
{@eq key=recordsCount value=1}Record Shared{/eq} {@ne key=recordsCount value=1}Records Shared{/ne} |
External user who has been granted access to a case's records | {@eq key=recordsCount value=1}A record has{:else}Records have{/eq} been shared with you in case {caseNumber} and {@eq key=recordsCount value=1}is{:else}are{/eq} available to view in the online portal. [{system.baseUrl}/external/case/{caseId}] |
| External User Expiring |
Account Expiring Soon |
External user whose account is expiring in 14 days |
Hello, Due to prolonged inactivity your account is going to be deactivated in {daysUntilDeactivation} day(s). Please login to the application before this time elapses. Click here [{system.baseUrl}/{loginUrl}] to login. |
| External Username Reminder |
Password Generated |
External user who created a new account |
Hello, A new password has been generated for you. You will receive a follow-up email with your new password. * Email: {user.nick} * System: CaseIQ ({system.baseUrl}/external [{system.baseUrl}/external]) If this is not you or there is an error with this information please delete this email and contact your system administrator. Click here [{system.baseUrl}/{loginUrl}] to login. |
| Files Upload Failure Notification | File Upload Completed: {fileCount} of {totalFiles} File(s) Added to Case {caseNumber} |
User who uploaded files |
Some files failed to upload for Case {caseNumber}. Below are the failed files. You can retry uploading them. * * {.} * {?hasViewAttachmentPermission}Retry Upload [{system.baseUrl}/case/{caseId}/files?retry_upload=true] {/hasViewAttachmentPermission} |
| Files Upload Success Notification | File Upload Completed: {fileCount} File(s) Added to Case {caseNumber} |
User who uploaded files |
Your file upload for Case {caseNumber} is complete. View the uploaded files in the Files tab to verify or manage them. {?hasViewAttachmentPermission}Go to Files for Case {caseNumber} [{system.baseUrl}/case/{caseId}/files] {/hasViewAttachmentPermission} |
| Hotline Case Submission Notify Reporter |
We have received your case, {case.caseNumber} |
External user who created an account when reporting a case via a hotline |
Thank you for using the hotline. This email is to confirm that we have received your case. You can access your case by logging in here [{system.baseUrl}/external/case/{case.id}]. |
| Hotline Password Generated |
New Password |
External user who created an account when reporting a case via a hotline |
A new password has been generated for you. This is a temporary system generated password which expires in {daysUntilExpiry} day(s). Please change your password after logging in. * Password: {password} If this is not you or there is an error with this information please contact our support team via the support address below. |
| Language Added |
New Language Added |
User who added a new language |
The {language} language is now available and translations are ready to be customized. Click here [{system.baseUrl}/settings/data/translations] to open the translations page and then select "{language}" from the "Language" filter to see the list of translations. |
| Language Error |
Problem Adding Language |
User who added a new language |
Oops, something happened while adding the {language} language. If it happens again, contact your administrator. |
| Notify Members Added To Team |
Team ({team.name}) |
Users added to investigative team |
{team.name} [{system.baseUrl}/settings/access/team/{team.id}] You have been added as a member to the following team. * Name: {team.name} * Description: {team.description} Click here [{system.baseUrl}/settings/access/team/{team.id}] to open the Team. |
| Notify Members Removed From Team |
Team ({team.name}) |
Users removed from investigative team |
{team.name} [{system.baseUrl}/settings/access/team/{team.id}] Your membership for the following team has been removed. * Name: {team.name} * Description: {team.description} Click here [{system.baseUrl}/settings/access/team/{team.id}] to open the Team. |
| Notify the Case Owner about the Access Request | {requestUser} has requested access to {caseNumber} |
Case Owner |
You have a pending access request. * Case number: {caseNumber} * Requested by: {requestUser} * Reason for request: {?requestReason}{requestReason}{:else}None provided{/requestReason} Review Access Requests [{system.baseUrl}/case/{caseId}/team?tab=accessRequests] |
| Password Expired |
Password Expired |
User whose password has expired |
Hello {user.firstName}, Your password has expired. Please contact your system administrator. If you have forgotten your password you can try to request a password reset here [{system.baseUrl}/forgot-password]. |
| Password Expiring |
Password Expiring Soon |
User whose password will expire soon |
Hello {user.firstName}, Your password will expire in {daysUntilExpiry} day(s). Please change your password before this time elapses. Click here [{system.baseUrl}/change-password] to change your password. |
| Password Generated |
New Password |
User with a new password |
A new password has been generated for you. This is a temporary system generated password which expires in {daysUntilExpiry} day(s). Please change your password after logging in. * Password: {password} If this is not you or there is an error with this information please delete this email and contact your system administrator. |
| Password Reset Requested |
Password Reset Requested |
User who requested a password reset |
Hello {user.firstName}, We received a request to reset the password associated with this email address. If you made this request, please follow the instructions below. If you did not request to have your password reset, you can safely ignore this email. Click the link below and use this code to confirm that you have requested a password reset: {code} {resetLink} [{resetLink}] If clicking the link doesn't work, you can copy and paste the link into your browser's address window, or retype it there. |
| Portal Case Submission Notify Reporter |
We have received your case, {case.caseNumber} |
Portal user who created an account when submitting a case |
Thank you for using the online portal. This email is to confirm that we have received your case. You can access your case by logging in here [{system.baseUrl}/external/case/{case.id}]. |
| Portal Case Update Notify Reporter |
Case Updated ({case.caseNumber}) |
Portal user who submitted the case |
[{system.baseUrl}/external/case/{case.id}] Your case has been updated, click here [{system.baseUrl}/external/case/{case.id}] to view. |
| Portal Child Update Notify Reporter |
{entityName} Updated |
Portal user who submitted the case |
A {entityName} has been updated, click here [{system.baseUrl}/{entityUrl}] to view. |
| Portal Note Added Notify Case Owner |
{entityName} Added |
Case owner | A {entityName} has been added, click here [{system.baseUrl}/{entityUrl}] to view. |
| Portal Shared Child Notify Reporter |
{entityName} Shared |
Portal user who submitted the case |
A {entityName} has been shared with you, click here [{system.baseUrl}/{entityUrl}] to view. |
| Portal System Option Change Notify Reporter |
Portal Deactivated: No Access to Case |
Portal users with accounts | You can no longer access or receive updates on your cases, as the portal at {baseUrl}/portal has been reconfigured. Please contact the system administrator if you have any questions about this change. |
| Request Bulk Cancel Notification | Response form deactivated, requests cancelled |
User who sent the request | Pending requests linked to a deactivated response form were cancelled. |
| Request Cancelled | The request you received has been cancelled |
External recipient of request |
The request you previously received has been cancelled and can no longer be completed. If you received a link or verification code for this form, please note that it is no longer active. This email was sent to: {recipient} |
| Request Cancelled Notify Case Owner | Request ({childNumber}) Cancelled |
Case owner |
This request has been cancelled and is no longer available to the recipient. {?hasViewPermission} View Request Details [{system.baseUrl}/request/{id}] {/hasViewPermission} |
| Request Declined Notify Case Owner | Request ({childNumber}) Declined |
Case owner |
The recipient has declined this request. If needed, you can follow up with them or send a new request. {?hasViewPermission} View Request Details [{system.baseUrl}/request/{id}] {/hasViewPermission} |
| Request Expired | The request you received has expired |
External recipient of request |
The request you previously received has expired and can no longer be completed. If you received a link or verification code for this form, please note that it is no longer active. This email was sent to: {recipient} |
| Request Expired Notify Case Owner | Request ({childNumber}) Expired |
Case owner |
This request has expired and is no longer available to the recipient. {?hasViewPermission} View Request Details [{system.baseUrl}/request/{id}] {/hasViewPermission} |
| Request Link | {subject} |
External recipient of request |
{message} To complete this request, please click the link below: Access the {responseFormName} Form here [{system.baseUrl}/request-form/{id}] You will receive a separate email with the verification code, for secure access. This information and the code will expire on {dueDate}. This email was sent to: {recipient} Please do not share this email. It contains a secure link to Case IQ. Do not share this email, link, or access code with others. |
| Request Reminder | Reminder: Request form "{subject}" is due {dueDate} |
External recipient of request |
This is a reminder that an upcoming request is due on {dueDate}. {message} To complete this request, please click the link below: Access the {responseFormName} Form here [{system.baseUrl}/request-form/{id}] You will receive a separate email with the verification code, for secure access. This information and the code will expire on {dueDate}. This email was sent to: {recipient} Please do not share this email. It contains a secure link to Case IQ. Do not share this email, link, or access code with others. |
| Request Submission | Your responses have been successfully submitted |
External recipient of request |
Thank you. Your responses have been successfully submitted. No further action is required at this time. This email was sent to: {recipient} |
| Request Submitted Notify Case Owner | Request ({childNumber}) Completed |
Case owner |
The recipient has submitted the form. You can now review their responses. {?hasViewPermission} View Form Responses [{system.baseUrl}/form/{responseFormEntityName}/{record}] {/hasViewPermission} |
| Request Verification Code | Verification Code |
External recipient of request |
Please enter this verification code on the page where you were asked to complete your form: {verificationCode} Thank you, {system.name} |
| Service Account API Key Expiring | Service Account API Key Expiring Soon | The service account's email (see Add and Manage an API Service Account) |
Hello, The API key: {apiKey} for the Service Account: {nick} will automatically regenerate in {daysUntilExpiry} day(s). Please rotate your API keys. |
| Shared File Expiration Update |
File Share Expiration Notice |
Shared file recipients |
The expiration date for a link shared with you has been changed to {expiryDate}. You can access the link here [{system.baseUrl}/shared-link/{id}] You will receive a separate email with the verification code. |
| Shared File Link |
{subject} |
Shared file recipients |
{message} Access files here [{system.baseUrl}/shared-link/{id}], please note this link will expire on {expiryDate}. You will receive a separate email with the verification code. |
| Shared File Notify Case Owner |
Shared File has been Read | Case Owner |
{caseNumber} [{system.baseUrl}/case/{caseId}] A file shared on your Case, {fileName}, has been read by {email}. Click here [{system.baseUrl}/file/{attachmentId}] to open the File. |
| Shared File Notify Investigative Team |
Shared File has been Read |
Investigative team members |
{caseNumber} [{system.baseUrl}/case/{caseId}] A file shared on Case #{caseNumber}, {fileName}, has been read by {email}. Click here [{system.baseUrl}/file/{attachmentId}] to open the File. |
| Shared File Verification Code |
Verification Code |
Shared file recipients |
Please enter this verification code in the file sharing portal: {verificationCode} Thank you, {system.name} |
| State Migration Complete |
Status Update Complete |
User who migrated a workflow status (see Edit, Activate, Deactivate, or Delete a Workflow: Edit a Workflow) | All {entityName} statuses have been updated. |
| Static Service Account API Key Expiring | Service Account API Key Expiring Soon |
The service account's email (see Add and Manage an API Service Account) |
Hello, The API key: {apiKey} for the Service Account: {nick} for customer: {customerCode} will automatically regenerate in {daysUntilExpiry} day(s). Please rotate your API keys. |
| Todo Assign |
To-Do (#{todo.number}) assigned to you by {todo.assignedBy__name} |
User assigned to to-do |
{todo.caseId__caseNumber} [{system.baseUrl}/case/{case.id}] / {todo.number} [{system.baseUrl}/to-do/{todo.id}] {todo.assignedBy__name} has assigned you a To-Do of type {todo.todoType}. * Case #: {todo.caseId__caseNumber} * To-Do #: {todo.number} * To-Do Type: {todo.todoType} * Status: {todo.status} * Due Date: {todo.due} Click here [{system.baseUrl}/to-do/{todo.id}] to open the To-Do item in Case IQ. |
| Todo Reminder |
Reminder: To-Do (#{todo.number}) is due {todo.due} |
User assigned to to-do |
{todo.caseId__caseNumber} [{system.baseUrl}/case/{case.id}] / {todo.number} [{system.baseUrl}/to-do/{todo.id}] This is a reminder that an upcoming To-Do is due in {todo.emailReminder} day(s). * Case #: {todo.caseId__caseNumber} * To-Do #: {todo.number} * To-Do Type: {todo.todoType} * Status: {todo.status} * Due Date: {todo.due} Click here [{system.baseUrl}/to-do/{todo.id}] to open the To-Do item. |
| Usage Overage |
You have exceeded your {type} allowance |
Users with permissions to view the Usage Dashboard page (see Monitor the User and Storage Usage Dashboard) | You have exceeded your {type} allowance. Please click here [{system.baseUrl}/settings/system/usage-dashboard] to see details. |
| Usage Threshold |
You have reached {warningThreshold}% of your {type} allowance |
Users with permissions to view the Usage Dashboard page (see Monitor the User and Storage Usage Dashboard) |
You have reached {warningThreshold}% of your {type} allowance. Please click here [{system.baseUrl}/settings/system/usage-dashboard] to see details |
| User Email Changed |
Email Changed |
User whose email changed |
Hello {user.firstName}, Your Email has been changed by {actor.name} * New Email: {newEmail} * Original Email: {originalEmail} If this is not you or there is an error with this information please contact your system administrator. Click here [{system.baseUrl}/login] to login. |
| User Expiring |
Account Expiring Soon |
User whose account will expire in 14 days |
Hello {name}, Due to prolonged inactivity your account is going to be deactivated in {daysUntilDeactivation} day(s). Please login to the application before this time elapses. Click here [{system.baseUrl}/{loginUrl}] to login. |
| Username Changed |
Username Changed |
User whose username was changed |
Hello {user.firstName}, Your Username has been changed by {actor.name} * Username: {newNick} If this is not you or there is an error with this information please delete this email and contact your system administrator. Click here [{system.baseUrl}/login] to login. |
| Username Reminder |
Password Generated |
User with a new password |
Hello {user.firstName}, A new password has been generated for you. You will receive a follow-up email with your new password. * Username: {user.nick} * System: Case IQ ({system.baseUrl} [{system.baseUrl}]) If this is not you or there is an error with this information please delete this email and contact your system administrator. Click here [{system.baseUrl}/login] to login. |
Examples
Example 1: Adding a Case Tag to a Notification
The “Case Re-assignment - New Assignee” notification will be used to demonstrate how to add a field name tag, the “Case Type” field, to a case notification’s subject line.
- Click the Edit button on the notification’s page.
- Enter the tag into the “Subject”. In this example, the tag for the “Case Type” is “{caseType}”.
- Click Save. Now the system will include the “Case Type” in each notification subject line.
Example 2: Adding an Email Tag to a Notification
In this example, the “Email attached to case has been replied to” notification will be updated to combine the relevant email record’s body text in the notification’s content using a field name tag.
- Click the Edit button on the notification’s page.
- Enter the tag into the “HTML Body”. In this example, the tag for the email’s “Body” field is “{email.body}”.
- Click Save. The system will now add in the email body of attached cases in the notification content.
Delete