Export and Import a Configuration File
The Configuration Export & Import functionality allows system configuration data to be exported from and imported into the system. Generally, System Administrators will import system configuration data when moving from one Case IQ application environment to another, such as copying over your testing environment configurations to your production application. You may also want to back up your configurations before making a series of changes to settings in the application. Bulk updates to picklist values can be completed, as discussed in the Edit a Picklist Configuration CSV File section of this article.
When moving configuration settings between environments, you will export the configurations from one application environment, check the configuration files you downloaded, then import the files into the other Case IQ application. This article covers all export and import steps in detail and provides guidance on updating Picklist configuration files. A record of all exports and imports will be tracked in the Job Log (previously called the “integration log”, see View the Job Log).
Check your Application's Version
As a precaution, confirm that the version of the application from which you will export data is the same as the application to which you will import data. To see the application version, click the System tab in Settings. The platform version will be displayed on the About page.

Prepare the Application for Export
All applications are deployed with a system-generated workflow called “Status”. If you have not updated the Status workflow in your application, you can proceed to the Export Configuration Files section of this article. If the Status workflow has been edited, you must prepare the application data prior to export using the following steps:
- In the application from which you want to export configurations, create a new workflow to replace the edited Status workflow. See Add a Workflow for instructions.
- After creating the new workflow, delete the system-generated, edited Status workflow. See A Workflow's Page: Delete a Workflow for details.
- The application data is now ready to be exported.
Export Configuration Files
To import system configuration data, you will first need to export your configuration. Review the following steps before proceeding in your own application:
- Navigate to the Configuration Export & Import page under Settings > System > Data Management.
- The grid on the Configuration Export & Import page displays all the types of data that can be configured in your system. Click the row checkbox to select the entities to export.
- Select the Workflows row checkbox, then click the Export button on the grid header. Exporting system configuration data may take several minutes. When the export is complete, you will be prompted to download a ZIP folder that contains a CSV file of the application's workflow data.
- Select the remaining entities in the Configuration Export & Import page grid and click Export. You will be prompted to download another ZIP folder that contains a CSV file for each type of entity you selected.
- You will have 2 separate ZIP folders for: (1) the workflows CSV files and (2) CSVs for all other entity configurations.
- On Windows operating systems, it is important to extract the files from the ZIP folder before making changes to the CSV files. Right click the folder to see the “Extract All” option.
- If you exported the Picklist configuration file, refer to the Edit a Picklist Configuration CSV File section in this article for guidance on making updates to picklist values.
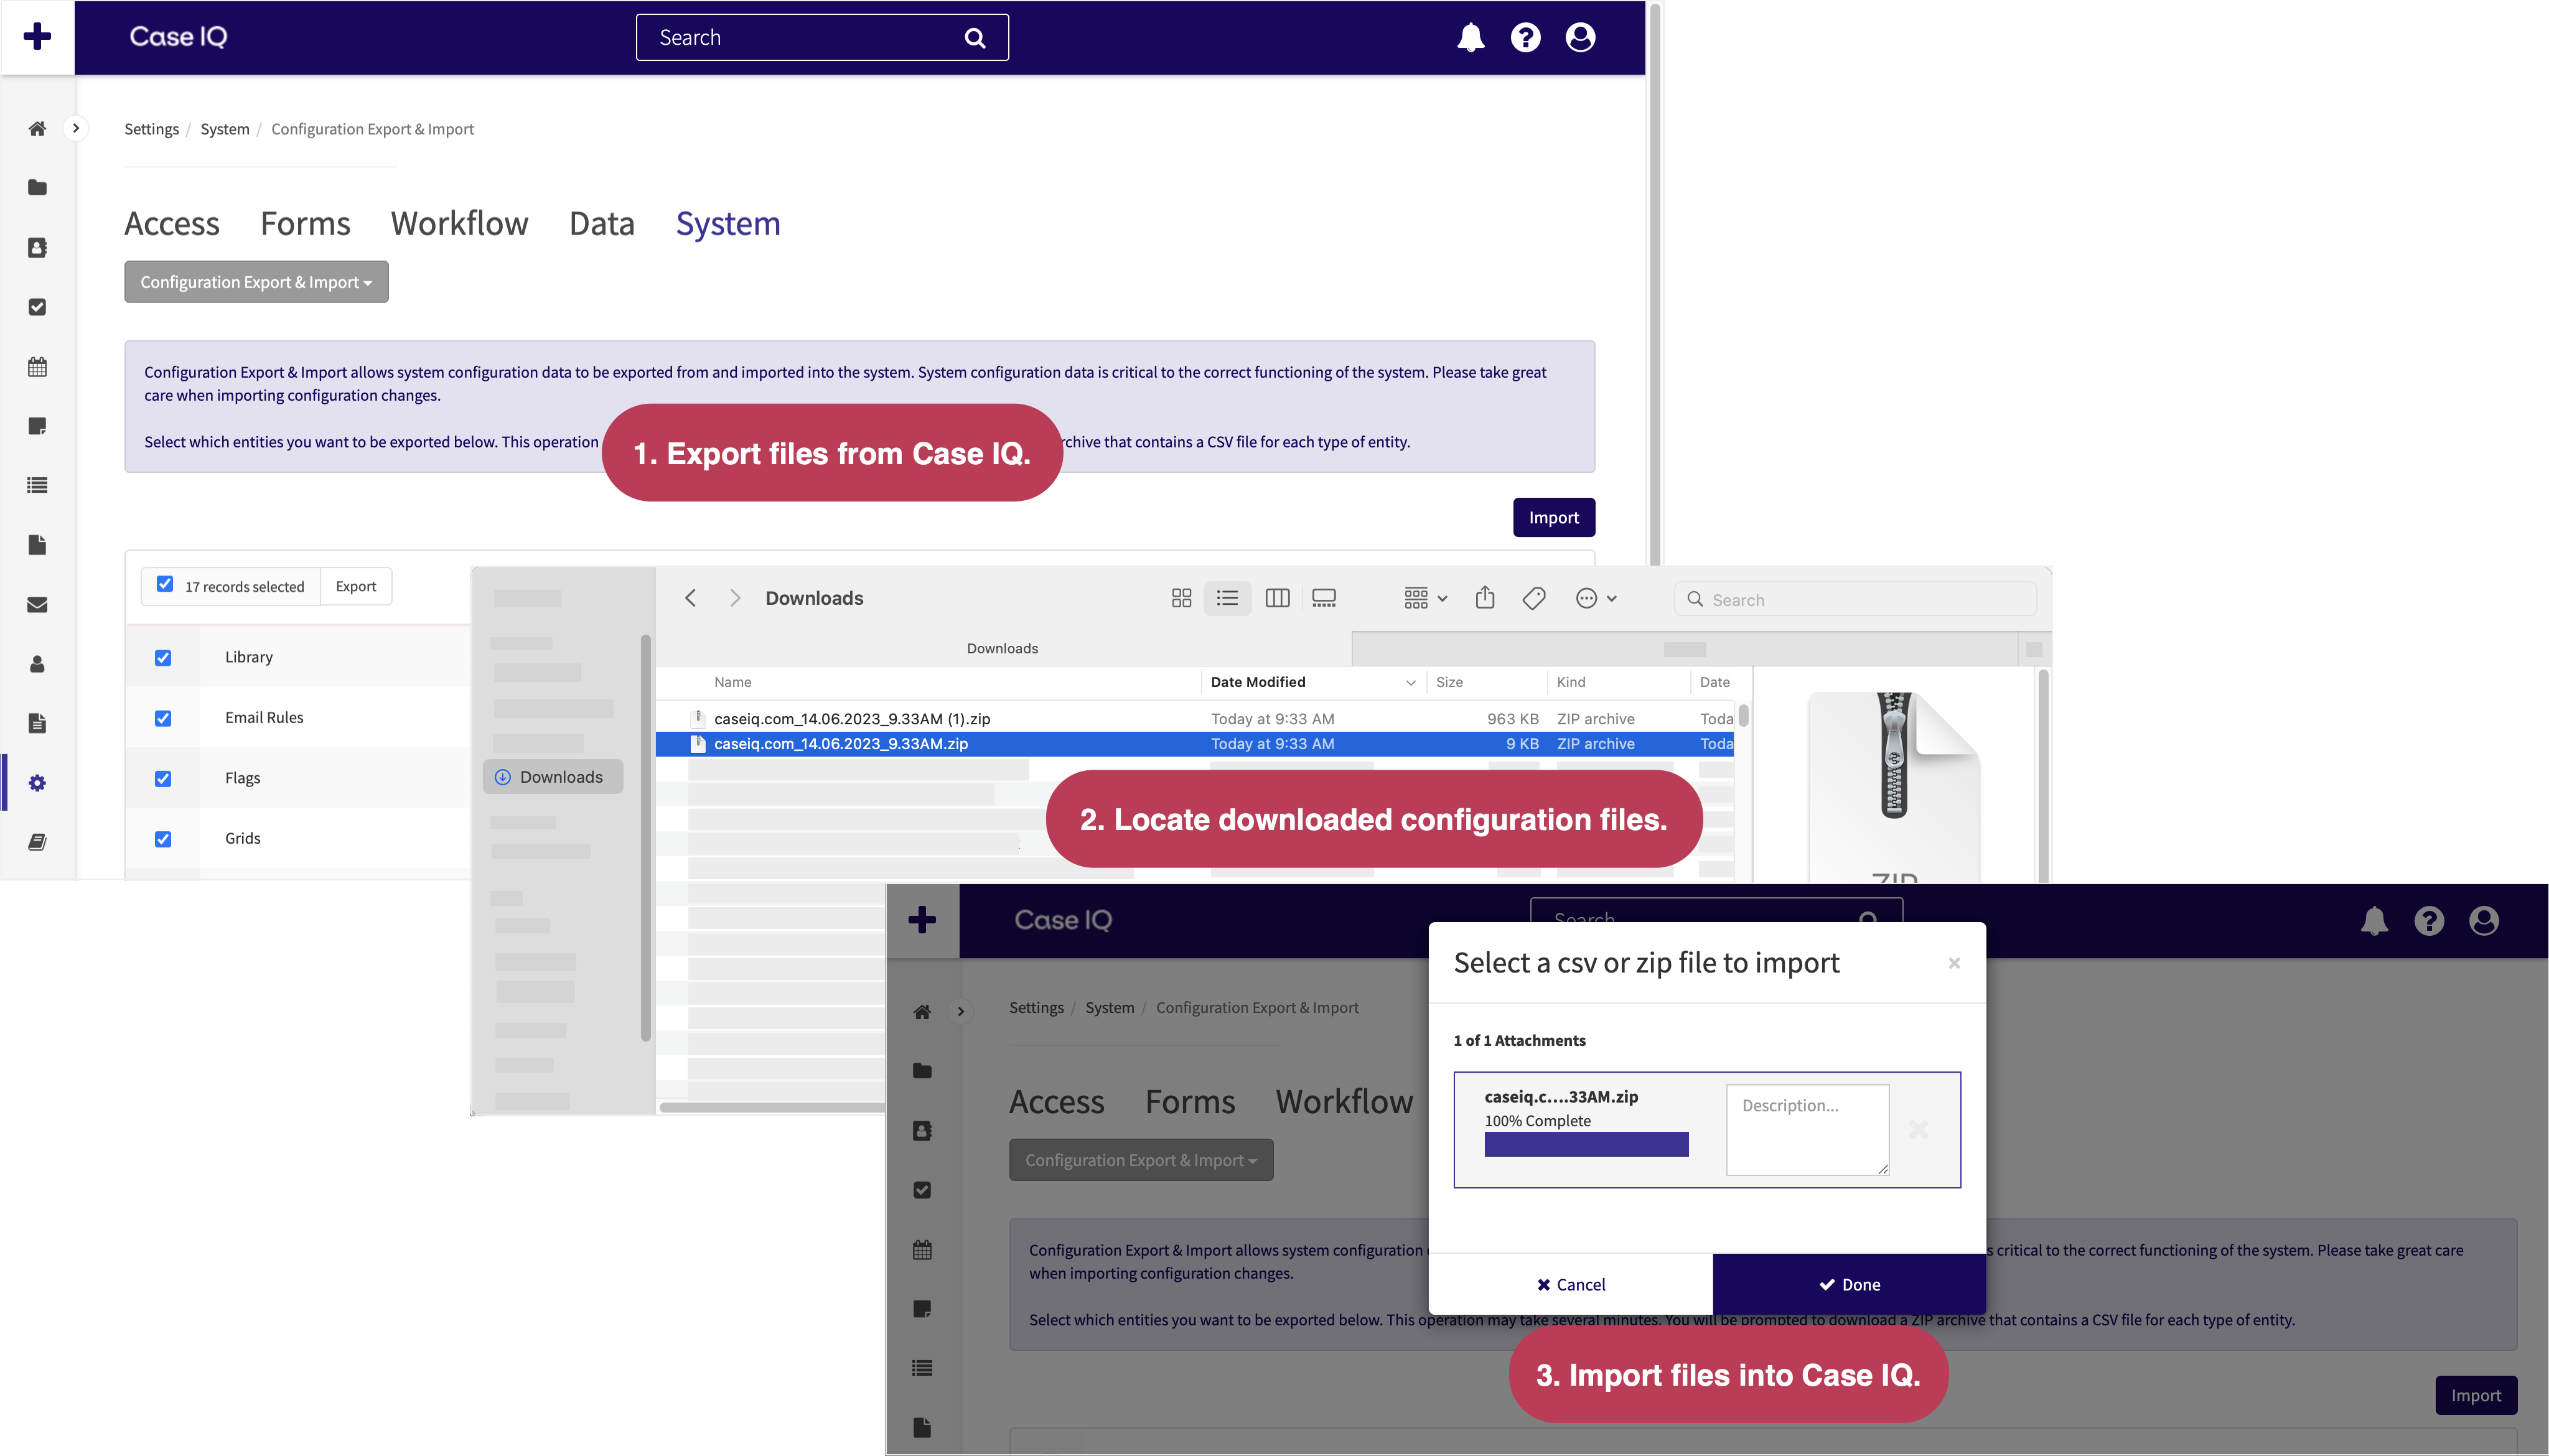
Import Configuration Files
To import the data back into Case IQ:
- Navigate to the Configuration Export & Import page and click Import.
- The Import pop-up will be loaded, where you can select a ZIP folder or individual CSV files to import. Start by importing the Workflows ZIP folder.
- After selecting the workflow folder, click Done.
- Click Confirm on the warning message that pops up to start the import. You will receive an email notification when the import is done. You can also verify the status of the import in the Job Log (previously called the “integration log”, see View the Job Log).
- After importing the workflow ZIP folder into the new application environment, any workflows that were created in the original application will be in “Inactive” status. Navigate to the Workflow page and activate the workflows (see Edit, Activate, Deactivate, or Delete a Workflow for instructions).
- If your workflows have criteria or mandatory fields, you may see "unknown field" in place of the correct field name. The system will correct this after you import and activate your application's form types.
- After successfully importing the workflow ZIP folder and activating the workflows, you can begin to import all other remaining entity configuration files in the new application. Navigate back to the Configuration Export & Import page, click Import, select the remaining configuration files or folders, and click Done to begin the import.
- If the configuration files were exported as a ZIP folder for the entity type, upload the ZIP folder in the Import pop-up instead of the individual CSV files.
- Refresh the page after the import is completed to ensure the changes have been applied.
- Any form types you imported will be set as "inactive" following the import, which you will need to activate before you can use them to create records. Activating the form types will populate the correct field used for any workflow criteria or mandatory fields. Refer to Add and Edit a Custom Form Type for details on publishing custom form types and Edit a Standard Record Type for cases, profiles, parties, and user profiles.
Edit a Picklist Configuration CSV File
In the picklist CSV file, you can add new and delete parent and dependent picklist values, or options in a picklist dropdown menu. However, you must follow the steps explained in this section to ensure that your data import successfully implements your changes to picklists.
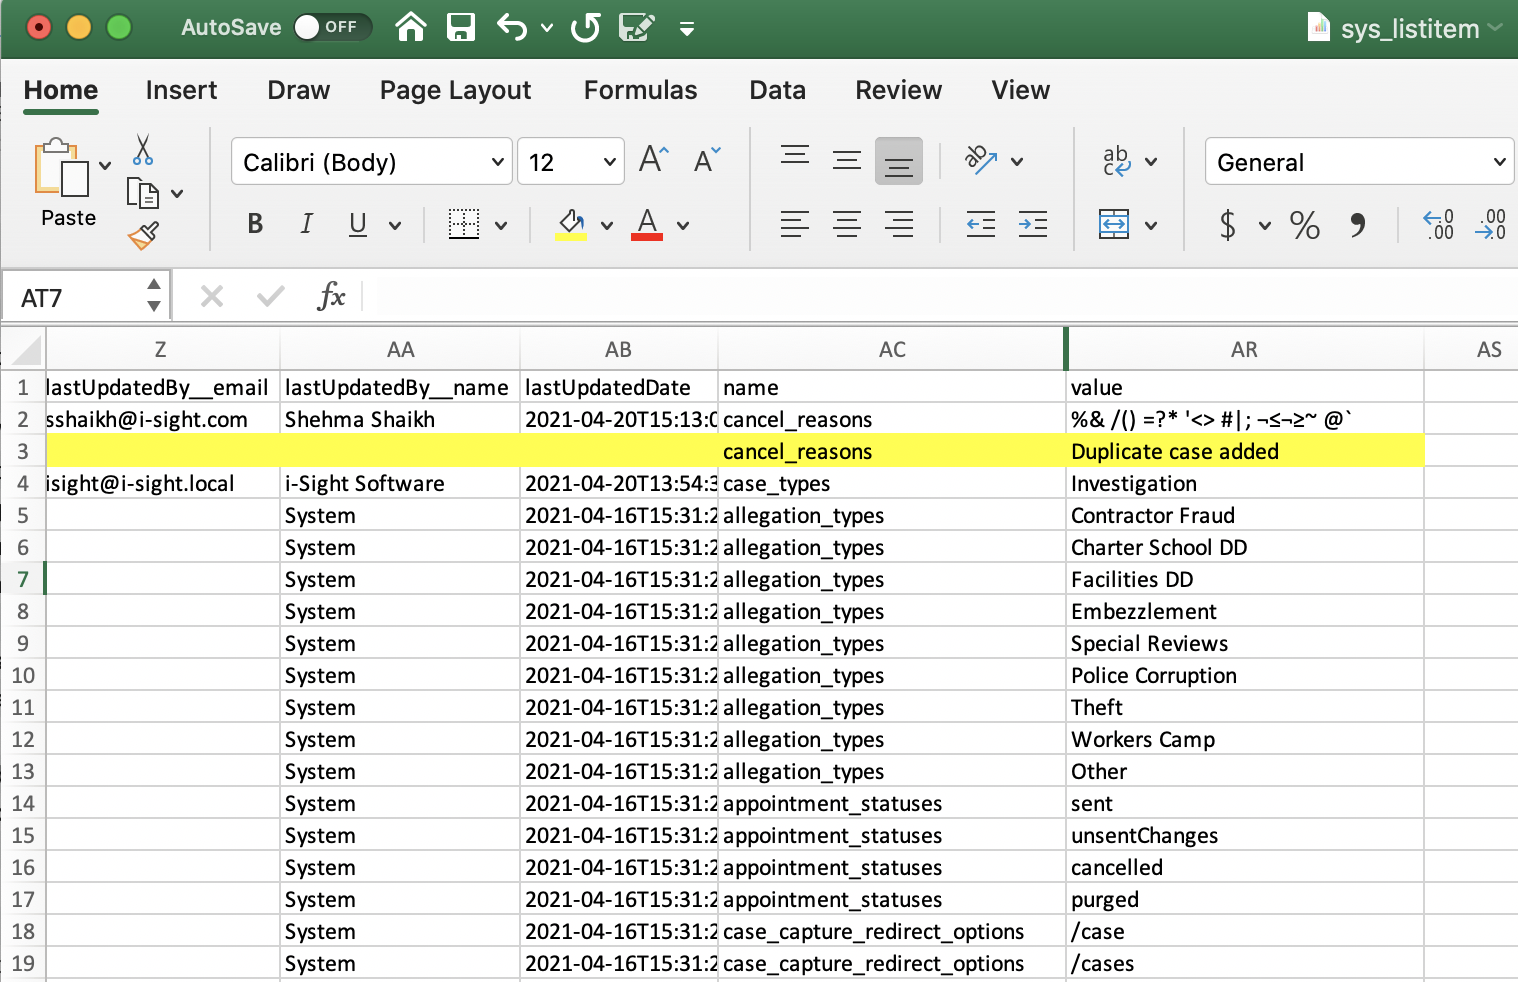
To add new picklist values to an existing picklist:
- Insert a row in the CSV file.
- Look for the “Name” column in the CSV file (the columns are sorted alphabetically). In the “Name” column of the row you inserted, enter the picklist name for which you want to add options. You can copy and paste the name from the other rows of the same picklist.
- In the “Value” column, type in a name for the new picklist value.
- The remaining fields will be filled in by the system, so you do not need to make additional adjustments. In the example below, the row highlighted in yellow was inserted in the exported picklists CSV. The new picklist option, “Duplicate case added”, will be added in the “Cancel Reasons” picklist after the CSV file is imported.
- If there are two identical rows in the CSV file, duplicate values will not be created.
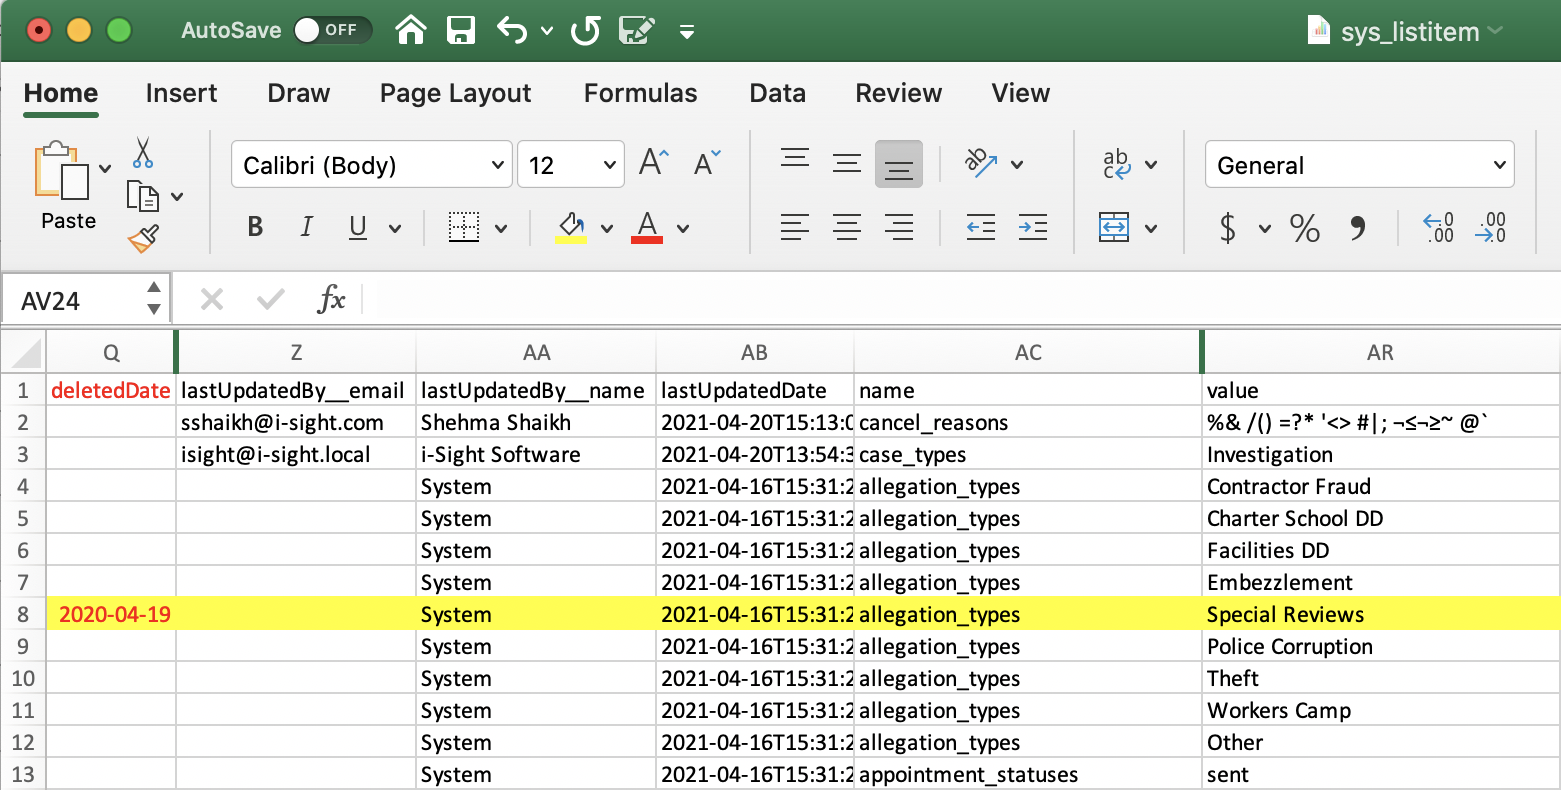
To delete a picklist value:
- Look for the “deletedDate” column in the CSV file.
- Find the row containing the picklist value you want to delete by reviewing the “Name” and “Value” columns.
- In the row of the value that you want to delete, enter a date in the “deletedDate” column, in the following format: YYYY-MM-DD. Adding a time is not necessary. See the “deletedDate” column in red font in the example below, where the “Special Reviews” value for the “Allegation Types” picklist will be deleted.
- After importing the CSV file into the system, the picklist value will be deleted. If you export the picklist configuration again, the value will not appear in the CSV file.
If you export the picklist configuration, then make picklist changes in the application before importing the CSV file, your changes may not be applied correctly. After exporting a CSV file, if you:
- Delete a picklist value in the application, the picklist value will return when the CSV file is imported. Make sure to delete the value in the CSV file too.
- Add a picklist value in the application, the picklist value will remain after importing the CSV file.
- Edit a picklist value’s sequence in the application, the sequence will be reverted to its original value after importing the CSV file. You must edit the “Rank” column for the picklist value row in the CSV as well to keep your changes.
Edit Dependent Picklist Values
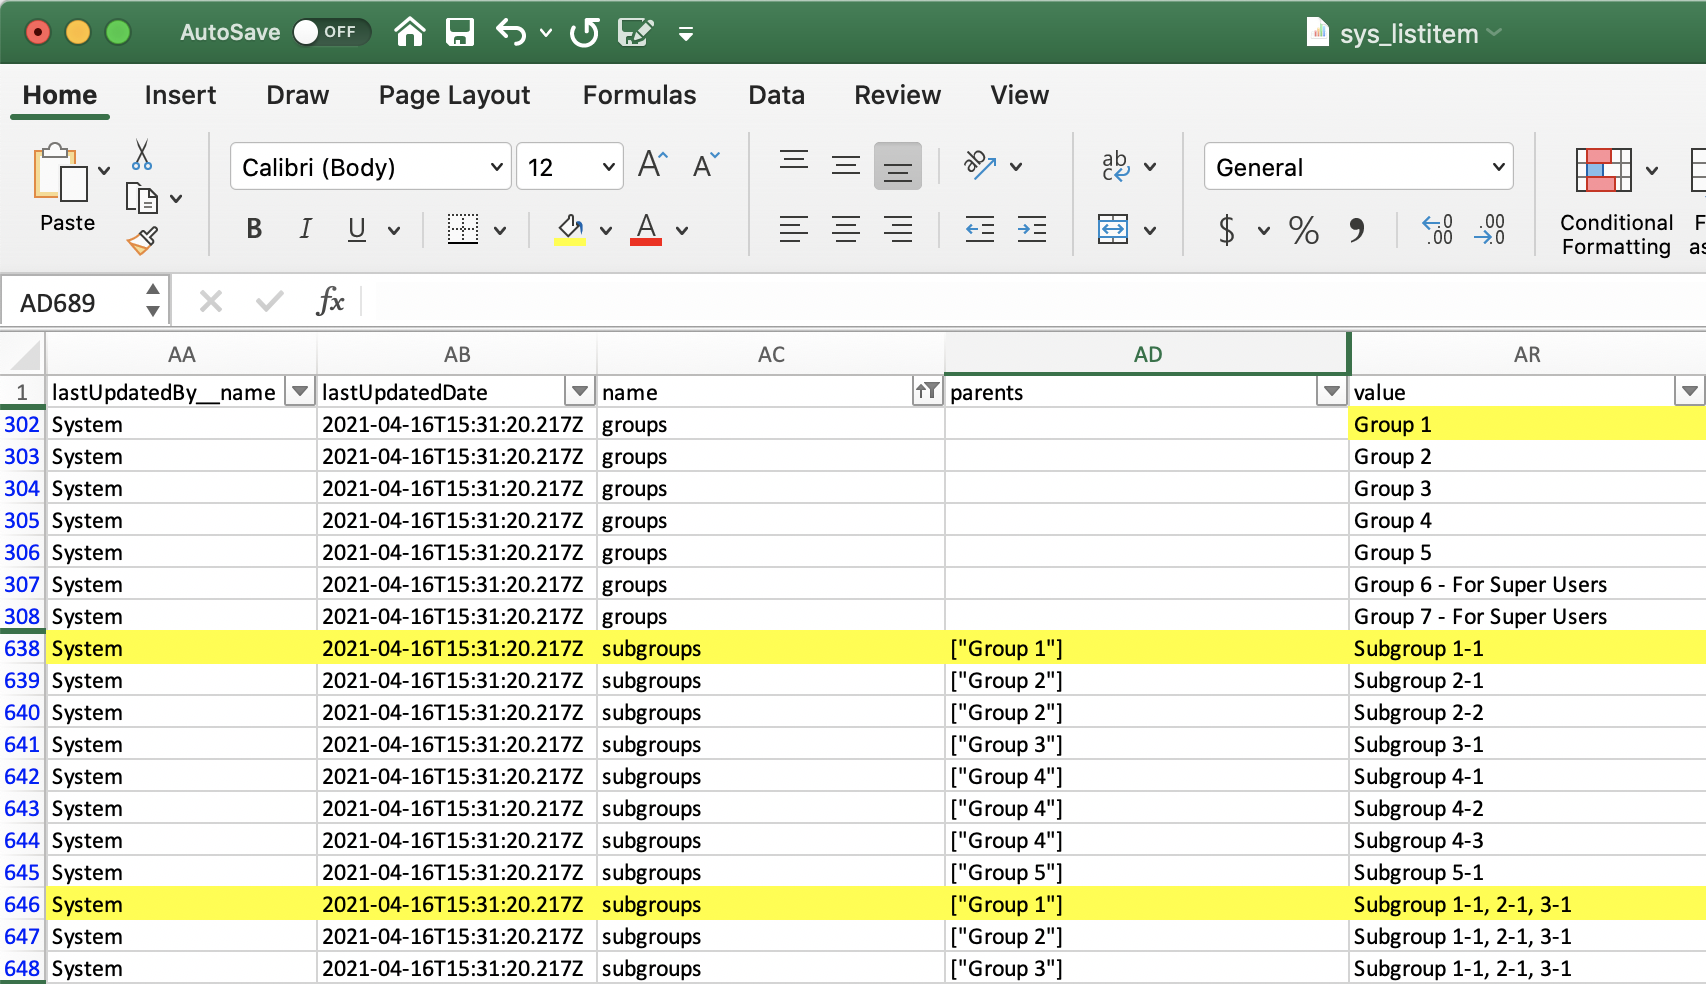
Adding and deleting values for dependent picklists follow the same general rules as picklists (see Configure Picklists and Picklist Options: Parent and Dependent Picklists for a full explanation of parent and dependent picklists). However, make sure that the “Parents” column is filled in. See the Groups and Subgroups picklist rows below as an example.
- “Group 1” is a value in the “Groups” picklist.
- The following values are dependent values of the “Group 1” value: “Subgroup 1-1” and “Subgroup 1-1, 2-1, 3-1”.
- If you were to add another dependent picklist value for “Group 1”, you would add a new row containing “Group 1” in the “Parents” column.