Manage a User Role
A user role defines (1) the actions that an individual can complete and (2) the pages they can access in the application with their user account. Case IQ contains a “Dynamic Action Control List” (ACL) to manage permissions and user roles, which is a hierarchy structure of permissions that allows System Administrators to grant and revoke permissions by user role. See an explanation of each ACL permission option in Access Control List. You can add, update, and edit user roles at any time. You can also ensure that no roles other than the “Super User” or “System Administrator” can manage user roles.
Add a User Role
To create a new user role, select the “User Role” option on the Access tab and click the Add User Role button. On the New User Role form, use the checkboxes in the Permissions section to adjust the entities that users with that role can access and what actions they can complete in the application (see Access Control List for an explanation of on each option).
Copy a User Role
If you need to create a new user role that is similar to an existing user role in the system, you can copy the existing user role. Copy a user role from its page:
- Click the Edit button.
- Click the Options (
 ) button, then select the "Save and Copy" option.
 - If you made any changes to the existing user role, the changes will be saved to the user role. Click Confirm to proceed.
- A New User Role form will be loaded, containing the same permissions as the original user role. You may make any changes to the new user role.
- Click Save to finalize creating your new user role.
Edit a User Role
You can update an existing user role from its page. If you have permission to edit user roles, use the following steps to update a role:
- Click the Edit button on a role's page.
- The user role's page will now be in edit mode. Click the checkboxes to grant or revoke permissions as needed.
- When you have completed your changes, click the Save button.
Set up Case Filters
If you grant permissions to view cases, you can restrict the types of cases a user role can access on the Case Filters tab. Users will only be able to access cases that meet the criteria statements that you add for the role.
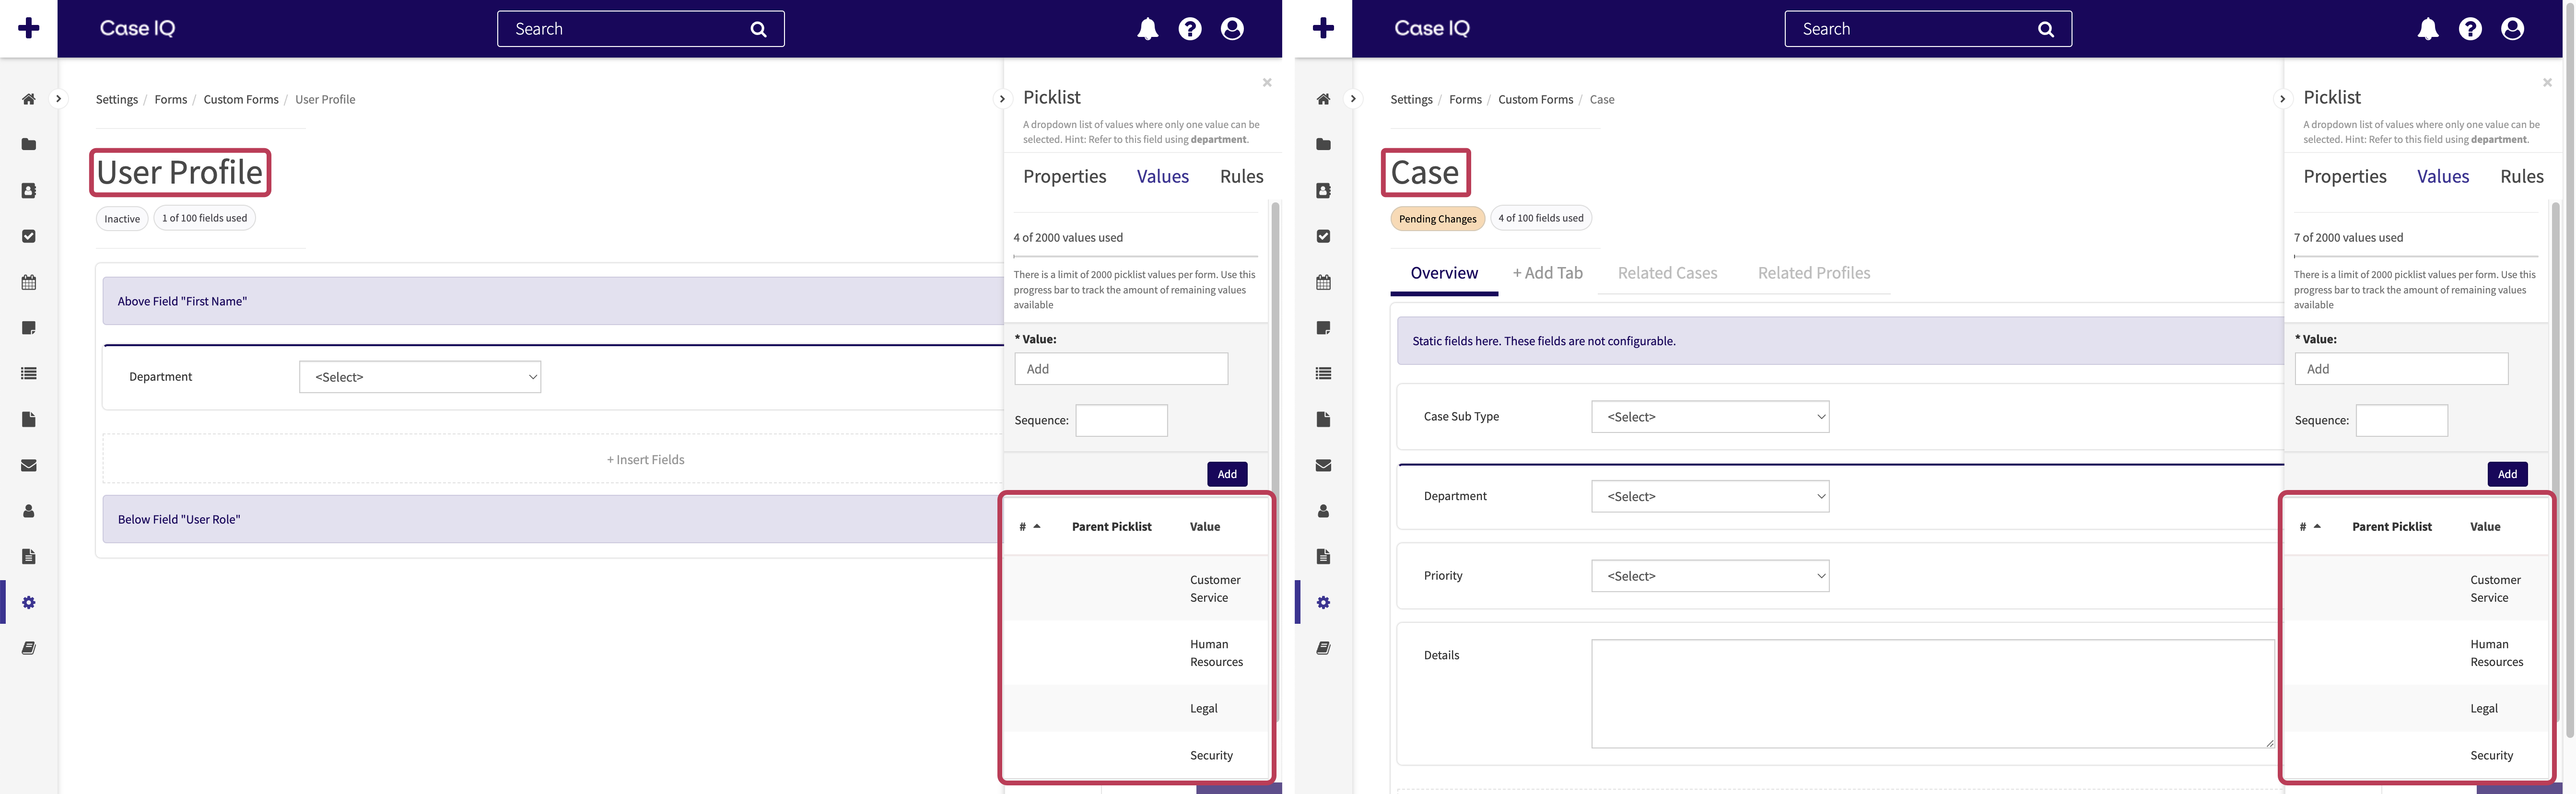
Any “picklist” or “picklist multiple” field on both the user profile and case forms can be used in case filters to restrict access based on the user’s properties. By adding case filters for user profile fields to a user role, you can control the exact situations in which a user can view a case to mitigate the risk of information being accessed without appropriate authorization. For example, if you add a "Department" field on the user profile and case forms, you can set up a case filter to ensure users can only access a case with the same "Department" value as their user profile. See the Use the Form Builder article to learn how to add fields to standard forms. Ensure that the case and user profile picklist contain the same values, as in the screenshots below. Case filters are case sensitive, so the values must be in the same case in both picklists. For example, Case IQ will not match "Legal" with "LEGAL".
Use the following steps to add a case filter for a user role:
- On a User Role’s page, click the Edit button. Then select the Case Filters tab.
- In the Case Filters tab, you will see a series of dropdown menus to set when accounts with the user role can access a case. The system will check that the value in the user profile picklist matches or does not match the case picklist value you choose before showing a case to a user.
- Select the user profile picklist or picklist multiple field on which you want to base the filter. All fields on the user profile form layout will be displayed in this dropdown menu.
- Indicate if the user profile picklist value should include or not include the case picklist value by selecting either “Includes” or “Does Not Include”.
- Choose the case picklist field that the system should check if its value matches or does not match the user profile picklist field value. Any picklist or picklist multiple field on the case form you set as “Available for Case Filtering” in the Form Builder will be displayed in this dropdown menu.
- Click the + Add Another button to add another case filter. Another row of the filter criteria will be displayed so you can set more criteria for when a user can access a case.
- If you create multiple filter criteria, click to toggle “All” or “Or” between the criteria statements. If you select "All", the user will not be able to access a case unless all your criteria are met. If you choose "Or", the user can access cases when at least one of your criteria are met.
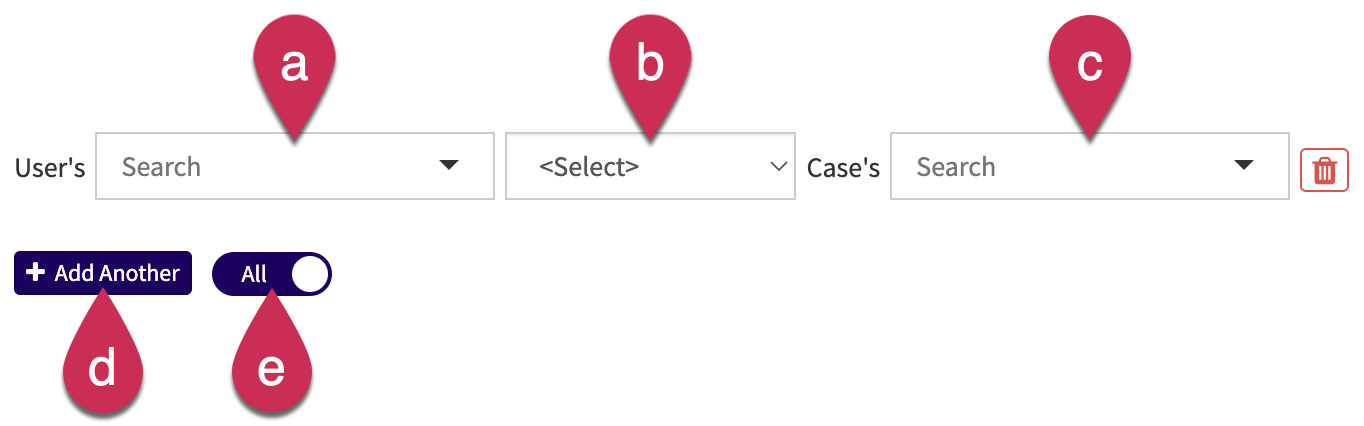
- Save the User Role page. Now, users with the user role will only be able to access a case per your criteria.
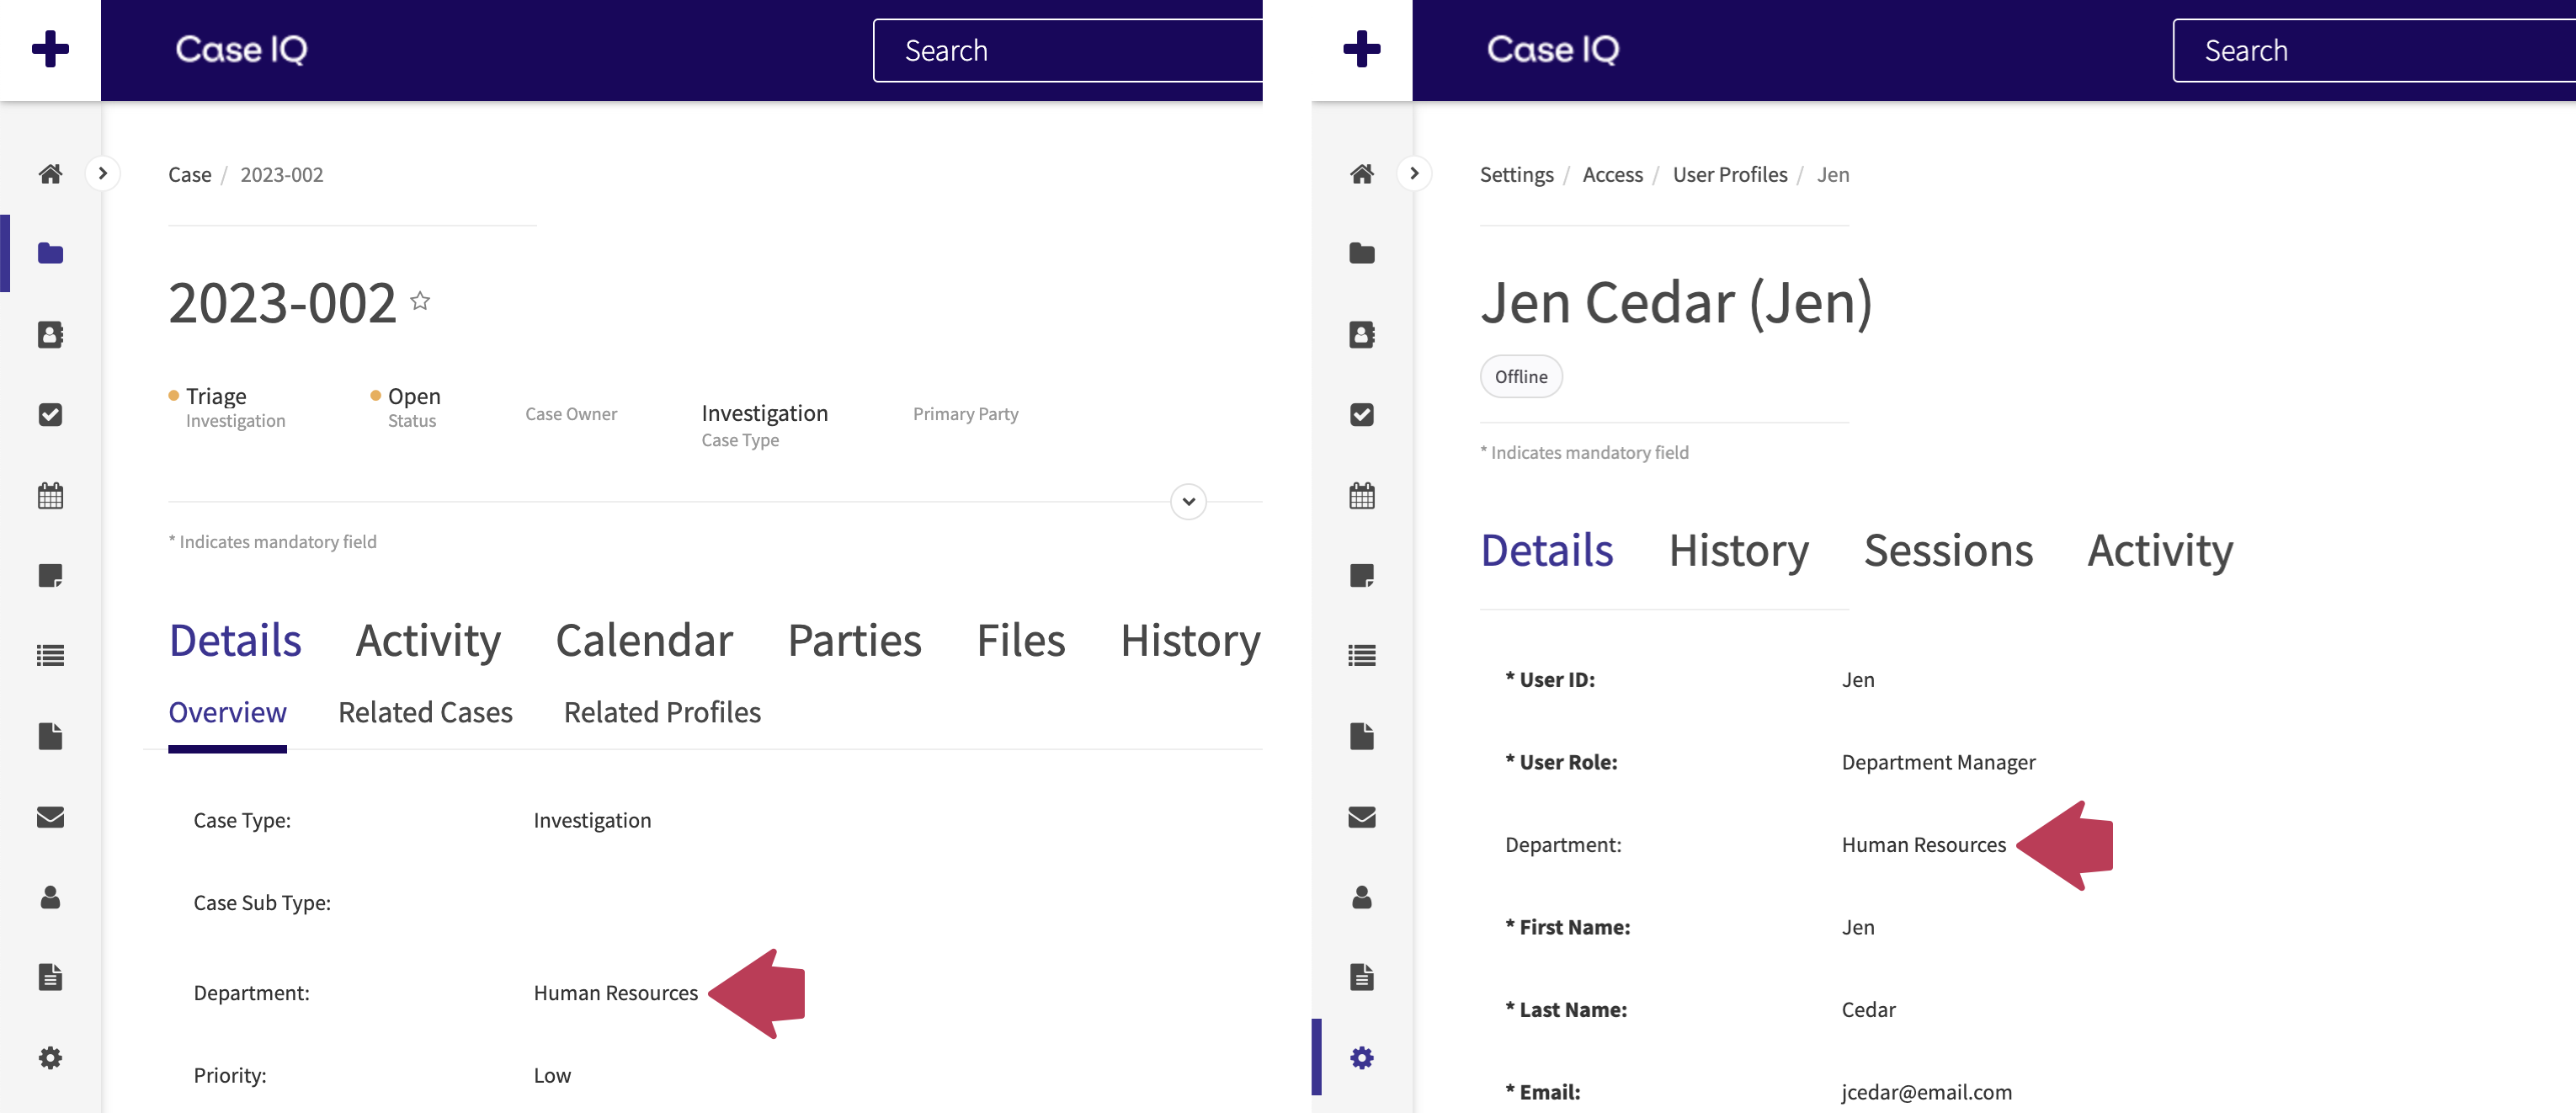
In the video clip example above, a case filter was added for the Department Manager role, so Department Managers will only be able to view cases with the same “Department” value as their user profile. The user profile below, Jen Cedar, will only be able to access cases where the “Department” is “Human Resources”, including case 2023-002 pictured below.
Delete a User Role
You can delete a user role from its page. If you have permission to delete user roles, click the Options () button on a user role's page, then select "Delete" to permanently remove the role from the application.