Configure a Picklist and Picklist Option
System Administrators can configure the options available in most dropdown menus in the application. In Case IQ, a dropdown field in a form with customization options is called a “picklist”. Users can click the field to select one or more of the options that a System Administrator sets when configuring the picklist.
You can configure picklists via three locations in the application:
- In the Form Builder, you can add new picklists to forms, add and delete options for picklists, and configure the settings of picklists and their options.
- From the Picklists page, you can add and delete options for picklists.
- You can add and delete picklist options in bulk from the Configuration Export and Import page.
This article pulls together all information on picklists (including the material in the Use the Form Builder, Add and Delete Picklist Options, and Configuration Export & Import articles), explaining every way you can configure picklist fields and their options.
Create a New Picklist Field
You can add a picklist or picklist multiple field to your form layout in the Form Builder as you would with any other field type. While this article focuses on picklists, the steps below to add a picklist field will be familiar if you have read the Use the Form Builder: Add a Field article.
- To add a picklistfield to a form, open the form type in the Form Builder.
- If you are creating a new form type, click the Add Form button on the Forms page and complete the New Form pop-up.
- If you want to add the picklist field to an existing form type, select the form type on the Forms page, then click the Edit button when the record type's currently active layout is loaded.
- Click the + Insert Fields button or the right arrow icon to open the Field Type sidebar.
- Find the “Picklist” or “Picklist multiple” data type in the Field Type sidebar. To add the field type to your form layout, click and hold it in the Field Type sidebar, drag it to the Form Builder page, and let go of your cursor over the “+ Insert Fields” section.
- The picklist will be added to the page and you can complete the following fields in the Picklistpop-up:
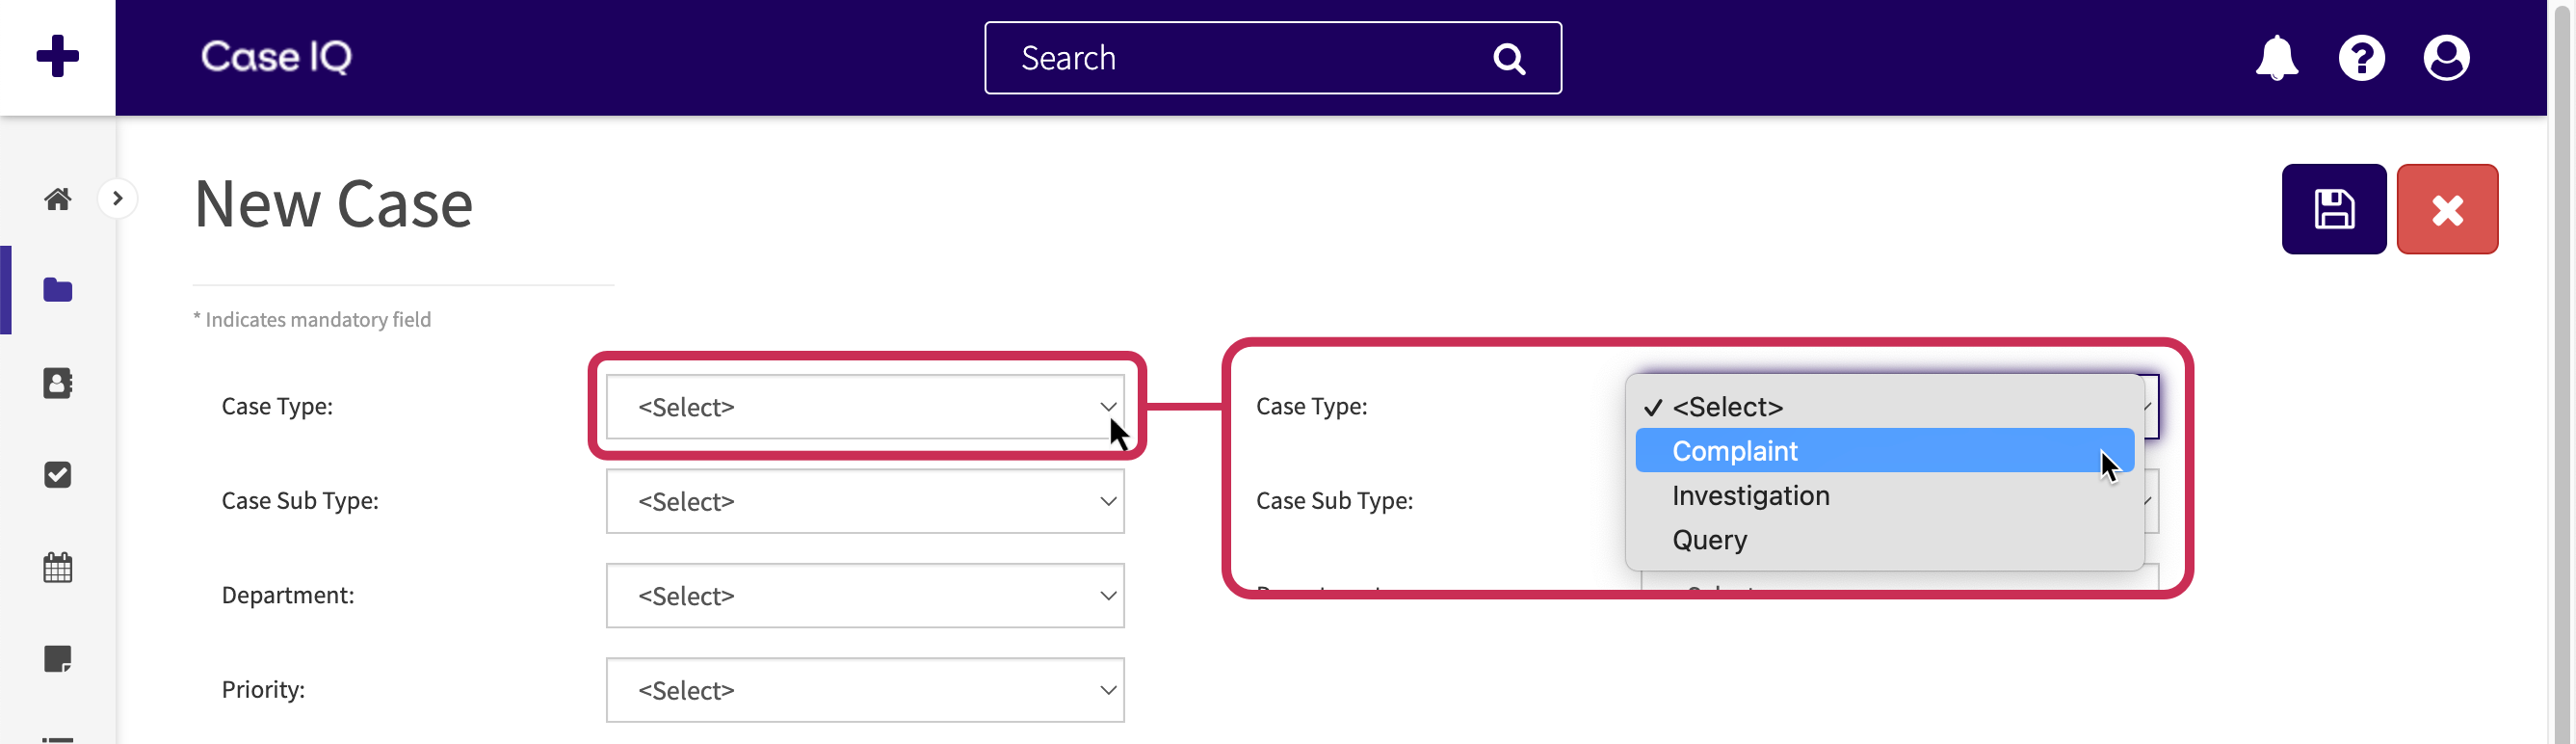
- Name: the picklist field’s system name, i.e. the text that will be shown on grids and reports and used for templates to refer to the field. Entering a name is required when adding a dynamic field. If you do not enter a “Caption”, the “Name” text will be displayed beside the field.
- Caption: the text that appears beside the picklistfield on the form. Adding a caption is optional. If you enter a caption, the caption text will be displayed on the form instead of the “Name” text.
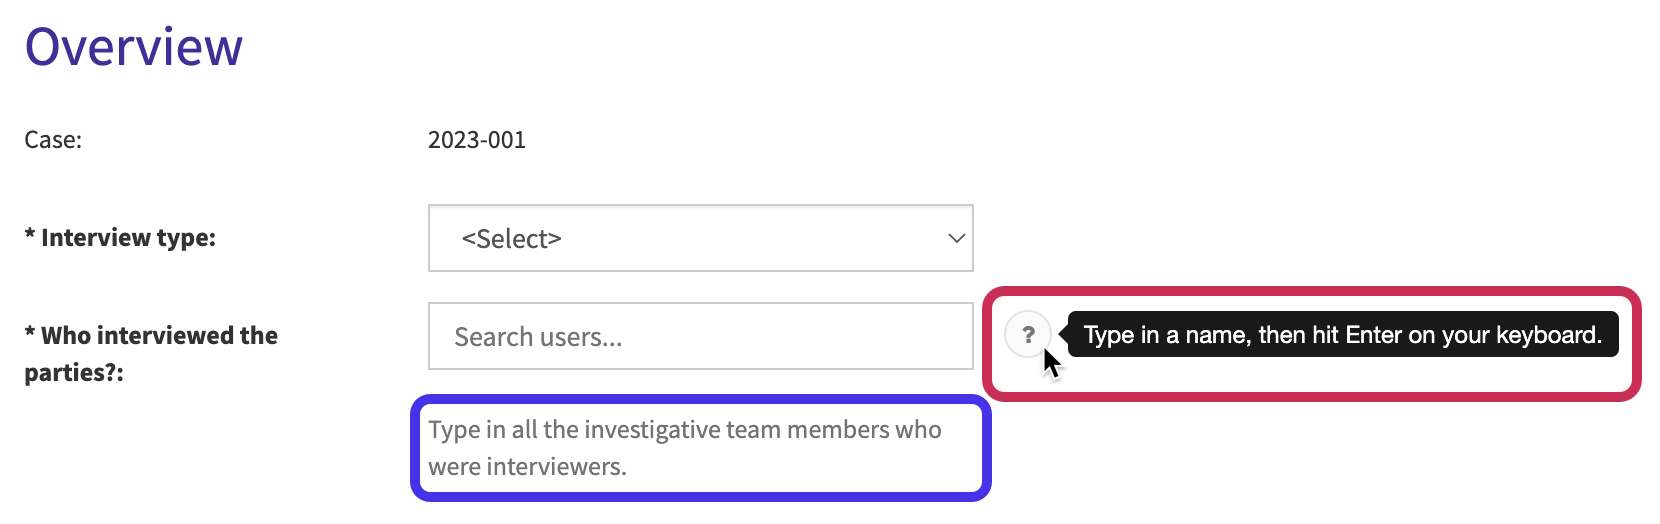
- For example, you can enter a concise name for the picklist in “Name” to show in grids and reports, such as “Interviewers”. Then, you can phrase the “Caption” text as a question to help users filling in the form, such as “Who interviewed the parties?”.
- Input method: select if the picklistoption can be selected by users or calculated. Choose one of the following options:
- Editable: users can select and change the picklist option when adding or editing the form.
- Submit-Only: users can select an option for the picklist but cannot edit it after the form is submitted.
- Computed: the system will evaluate an expression to select an option when the user saves the form. If you choose “Computed”, you can enter an expression in the “Expression” text box to tell the system how to select a picklist option. Users will not be able to edit a computed field on a record’s form. For comprehensive information on writing expressions for computed fields in Case IQ, see Case IQ Expression Language.
- Required: choose if users must select an option for the picklist field before they can submit the form.
- Show on the internal intake form: specify if the picklist field should be displayed on the form to add a new record.
- If "Show on the internal intake form" is switched to "On", the picklist will appear on the New Record page of the record type.
- By default, the option is set to "Off", meaning that the picklist will not be available on the page when adding a new record.
- Sub Text: text that will be constantly displayed under the picklist field. For example, you may want to provide clear and prominent instructions to complete the form. In the screenshot below, the field’s sub text is highlighted in purple. You can include URLs in the text, for which Case IQ will automatically create a link. Make sure to include “http://” or “https://” in the link.
- Help Text: more discrete guidance text, which will only be displayed when the user hovers their cursor over a question mark icon beside the picklist. See an example highlighted in pink in the screenshot below.
- There will be two additional options in the Picklist pop-up when adding a picklist field to the case form:
- An additional "Input method", called "Aggregate", which you can use to summarize the most commonly selected option for a picklist on the case's records. See details on setting up an aggregate picklist field in Use the Form Builder: Set up an Aggregate Field on the Case Form.
- An "Available For Case Filtering" toggle to set up case filters for a user role. See User Roles: Set up Case Filters to learn how to set up case filters to restrict the kinds of cases a user role can access.
- An additional option, “Show on the external portal intake form”, will be available when adding picklists to a standard form type that is on the portal (see Use the Form Builder: Field Type Properties for details).
- When you have finished entering the picklist field's properties, click Save in the pop-up. The picklist will now appear on the Form Builder page.
- You will need to add options for the picklist to display in the field using either the Form Builder or the Picklists page, as described in the next section of this article, Add Options for a Picklist.
- If you intend to add options to the picklist via the Picklists page, publish the form before navigating to the Picklists page. Then follow the steps in the Add Options via Picklists Page section of this article.
- If you want to add options using the Form Builder, proceed to the steps in the Add Options via Form Builder section below.
- To make the new picklist field available on the form, click the Publish button on the Form Builder page.
Add Options for a Picklist
After adding a picklist field via the Form Builder, you can set the options to display in the picklist dropdown menu with the Form Builder, the Picklists page, or a configuration import. The options added using any of these methods will be populated in all three locations.
Add Options via Form Builder
Use the following steps to add picklist options in the Form Builder.
- Click the picklist field on the Form Builder page to open the field’s properties on the sidebar.
- Click the Value tab on the sidebar.
- In the “Value” field, type in the picklist option text to show in the picklist dropdown menu, then hit Enter or Return on your keyboard.
- You can also paste a list of options in the Value field. Copy a list, then paste the list in the Text field and click the Add button. Case IQ can add up to 100 options at once, so if you need to include more than 100 options in the picklist, you will need to copy and paste options in the "Value" field multiple times.
- Using the “Sequence” field, you can indicate the position in the picklist dropdown in which the option should appear by entering a number. If you do not add a sequence number, the options will be sorted alphanumerically.
- If you are editing a form and picklist field that are available on your application's portal, you will also see the “Show on the external portal intake form” toggle in the field properties sidebar. Turn on the “Show on the external portal intake form” toggle if you want to show a picklist option on the application's portal so portal users can see it in the picklist field.
- Click the Add button to add the option to the picklist.
- Click the Publish button to make the new picklist options available on the form.
Add Options via Picklists Page
If you want to use the Picklists page, you can add picklist options using the following steps.
- Click the Add button on the Picklists page.
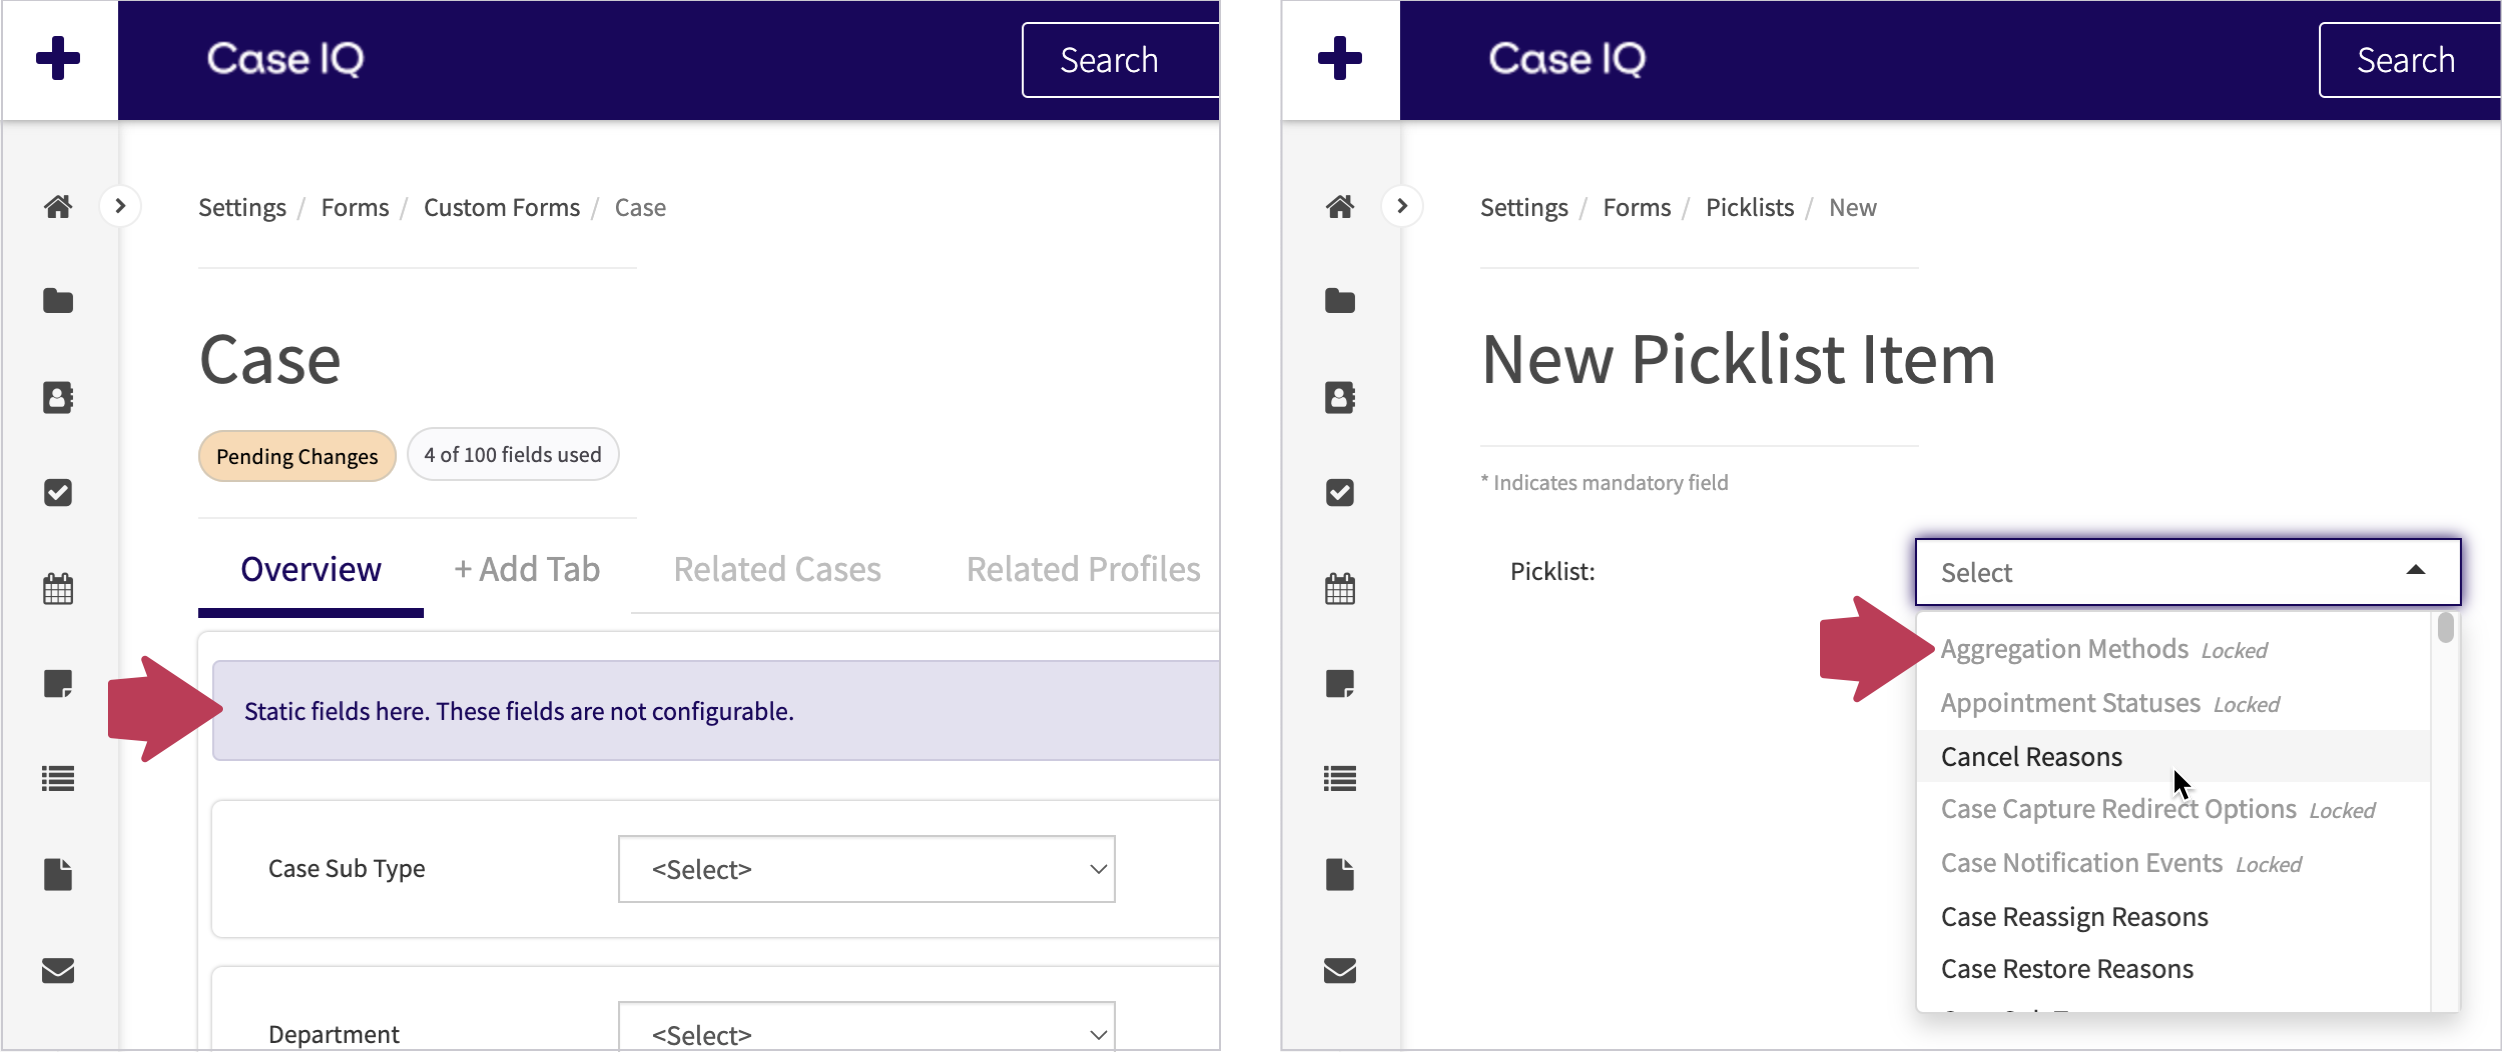
- The New Picklist Item form will be loaded. Select the picklist for which you want to add an option in the “Picklist” dropdown.
- Alternatively, you can select the picklist to which to add an option using the “Picklist” grid filter on the Picklists page before clicking Add.

- Alternatively, you can select the picklist to which to add an option using the “Picklist” grid filter on the Picklists page before clicking Add.
- In the “Value” field, type in the picklist option text to show in the picklist dropdown menu.
- In the “Sequence” field, enter a numerical value to indicate the order that the option should be displayed in the picklist. By default, the options will be ordered alphanumerically.
- If you are adding an option for a picklist field that is available on your application's portal, you will also see the “Show on the external portal intake form” toggle on the New Picklist Item form. Turn on the “Show on the external portal intake form” toggle if you want to show a picklist option on the application's portal so portal users can see it in the picklist field.
- Click the Save button to add the new picklist option or select Save and Copy in the Options (
 ) button menu to add another option. The new option will be displayed on the Picklists page grid.
Add Options via Configuration Import
You can edit your application's system configuration data to add options for a picklist by following the steps below. However, system configuration data is critical to the correct functioning of the system, so take great care when importing configurations. Do not make any changes to the file or folder names. If you want to export application data other than picklists, follow the steps in the Configuration Export and Import article instead.
- Navigate to the Configuration Export & Import page by selecting the “Configuration Export & Import” option in the page menu on the System tab.
- In the grid on the Configuration Export & Import page, select only the “Picklists” row's checkbox.
- Click the Export button in the grid header. Exporting system configuration data may take several minutes. When the export is complete, you will be prompted to download a .zip folder that contains two .csv files of the application's picklist data.
- Extract the files in the .zip folder. On Windows operating systems, right click the folder to see the “Extract All” option. Double click the .zip folder if you are using a macOS.
- Open the following .csv files in Microsoft Excel: “sys_listItem.csv” and “sys_list.csv”. “sys_list.csv” contains the configurations for all picklist fields, while “sys_listItem.csv” records the options for all picklists.
- In “sys_list.csv”, each row is a picklist in your application. Look for the row for which you want to add options in the “caption” column of this file (the columns are sorted alphabetically). This article uses an example dynamic picklist called “Location of incident” to demonstrate these steps.
- In that picklist's row, look for the value in the “name” column, then copy the code in this cell.
- Static picklists (standard picklists available in the application out-of-the-box) will have legible names, such as "cancel_reasons", but dynamic picklist names (picklists added to the application via the Form Builder) will be alphanumeric codes.
- The system uses this alphanumeric code to identify the picklist. In the example below, the “Location of incident” picklist's name is “817f2199-6cd7-4f3a-8b9e-7c3db43b5c31”.

- In “sys_listItem.csv”, insert a row.
- Look for the “name” column in “sys_listItem.csv” (the columns are also sorted alphabetically). Paste the picklist code you copied from “sys_list.csv” in the “name” column of the row you inserted.
- In the “Value” column of the row, type in a name for the new picklist option.
- The remaining columns of this row will be filled in by the system, so you do not need to make additional adjustments.
- In the example below, the rows highlighted in yellow were inserted in “sys_listItem.csv”. The new picklist options, “Pickering office”, “Ottawa office”, and “Windsor warehouse”, will be added in the “Location of incident” picklist after the .csv file is imported.
- If there are two identical rows in the CSV file, duplicate options will not be created.

- To import the new picklist options into Case IQ, navigate to the Configuration Export & Import page and click Import.
- The Import pop-up will be loaded. In this pop-up, only upload the “sys_listItem.csv” file to which you added the picklist options. Do not upload the “sys_list.csv" file.
- After uploading the “sys_listItem.csv” file, click Done.
- Click Confirm on the warning message that pops up to start the import. You will receive an email notification when the import is done. You can also verify the status of the import in the Job Log (previously called the “integration log”, see View the Job Log).
- Refresh the page after the import is completed to ensure the changes have been applied.
Parent and Dependent Picklists
You can create a picklist whose options are dependent on options in an earlier picklist on the form, called a “dependent” picklist. This means the dependent picklist will display different options in its dropdown depending on the user's selection in the parent picklist. Each dependent picklist option can only be dependent on one parent picklist option. If the same dependent picklist option should be displayed for more than one parent option, you will need to add the dependent picklist option multiple times.
You must use the Form Builder to connect a picklist field to a parent. From the Picklists page, you will only be able to add and delete parent and dependent picklist options if the connection has already been set up in the Form Builder.

Set Parent Picklist for Picklist Field via Form Builder
You can set a picklist field to be dependent on another of the form's picklist fields in the Form Builder using the following steps:
- Click the picklist field on the form layout that you want to make the dependent picklist.
- On the Properties tab, click the “Dependent” toggle. A dropdown menu will appear under the “Dependent” toggle, where you can select the parent picklist. The parent picklist must already be added to the Form Builder page before you can set dependent options in this picklist. Click the sidebar’s Save button.
- Click the Value tab. The parent picklist will be displayed above the “Value” and “Sequence” fields. Select an option from the parent picklist. Then, enter the options that should appear in the dependent picklist when that parent option is selected.
- Click the Add button to create the dependent picklist options. You can review the picklist options and their parent options in the tab’s grid.
- Click the Publish button to make the new dependent picklist options available on the form.
Add Options for a Dependent Picklist via Picklists Page
You can follow the steps in the Add Options via Picklist Page section of this article to add options to a dependent picklist using the Picklists page, except you will also need to select the parent picklist option for which the dependent picklist option should be shown.
- Select the dependent picklist in the "Picklists" grid filter.
- Click the Add button.
- On the New Picklist Item form, the parent picklist field will be displayed. Select the parent picklist option on which the dependent picklist option you are adding should be dependent.
- In the “Value” field, enter the text to display in the dependent picklist menu.
- You can use the “Sequence” field to control the order of the picklist option, as you would for a regular picklist. Likewise, the “Show on the external portal intake form” toggle will be available if the picklist to which you are adding a value is available on your application's portal.
- Click the Save button to save the new option for the dependent picklist or you can select Save and Copy in the Options () button menu to add another option.
Edit or Delete a Picklist Option
You can adjust a picklist option via the Picklist page and the Form Builder. You cannot update the “Value” field of a picklist option for data integrity purposes. If you made an error typing in a picklist option's “Value” field, delete the picklist option, then add a new option with the correct “Value”.
Deleting a picklist option removes the option from the picklist moving forward. An existing record will retain a picklist option that a user has set, even if that picklist option has since been deleted. If the existing record is updated with a new picklist option, the deleted picklist option will no longer be available.
Edit or Delete via Form Builder
To use the Form Builder to edit or delete a picklist option:
- Click the picklist field on the form layout.
- Select the Values tab in the picklist properties sidebar.
- Click the picklist option's row in the Values tab grid that you want to edit or delete.
- You can enter a new number in the “Sequence” field to update the order of the picklist.
- Turn on or off the “Show on the external portal intake form” toggle to display or hide the option the portal.
- Click the Save button to update the picklist option.
- If you want to change the text of the picklist option, delete the option and add another one. Click the picklist option for which you wanted to change the text and then the Delete button in the Values tab.
- Follow the steps in the Add Options via Form Builder section of this article to create a new picklist option to replace the one you just deleted.
Edit or Delete via Picklist Page
To use the Picklist page to edit or delete a picklist option:
- Click the picklist option row on the Picklists grid.
- The option’s page will be loaded. Select the Edit button.
- On the picklist option's page, you can update the "Sequence" field or the "Show on the external portal intake form" toggle.
- With the “Sequence” field, you can enter a number to update the order of the picklist.
- Use the “Show on the external portal intake form” toggle to display or hide the picklist option on your application's external portal.
- Click the Save button to update the picklist option.
- If you want to change the text of the picklist option, delete the option and add another one. Click the Options () button on the picklist option's page and select the "Delete" option.
- Follow the steps in the Add Options Via Picklists Page section to create a new picklist option to replace the one you just deleted.
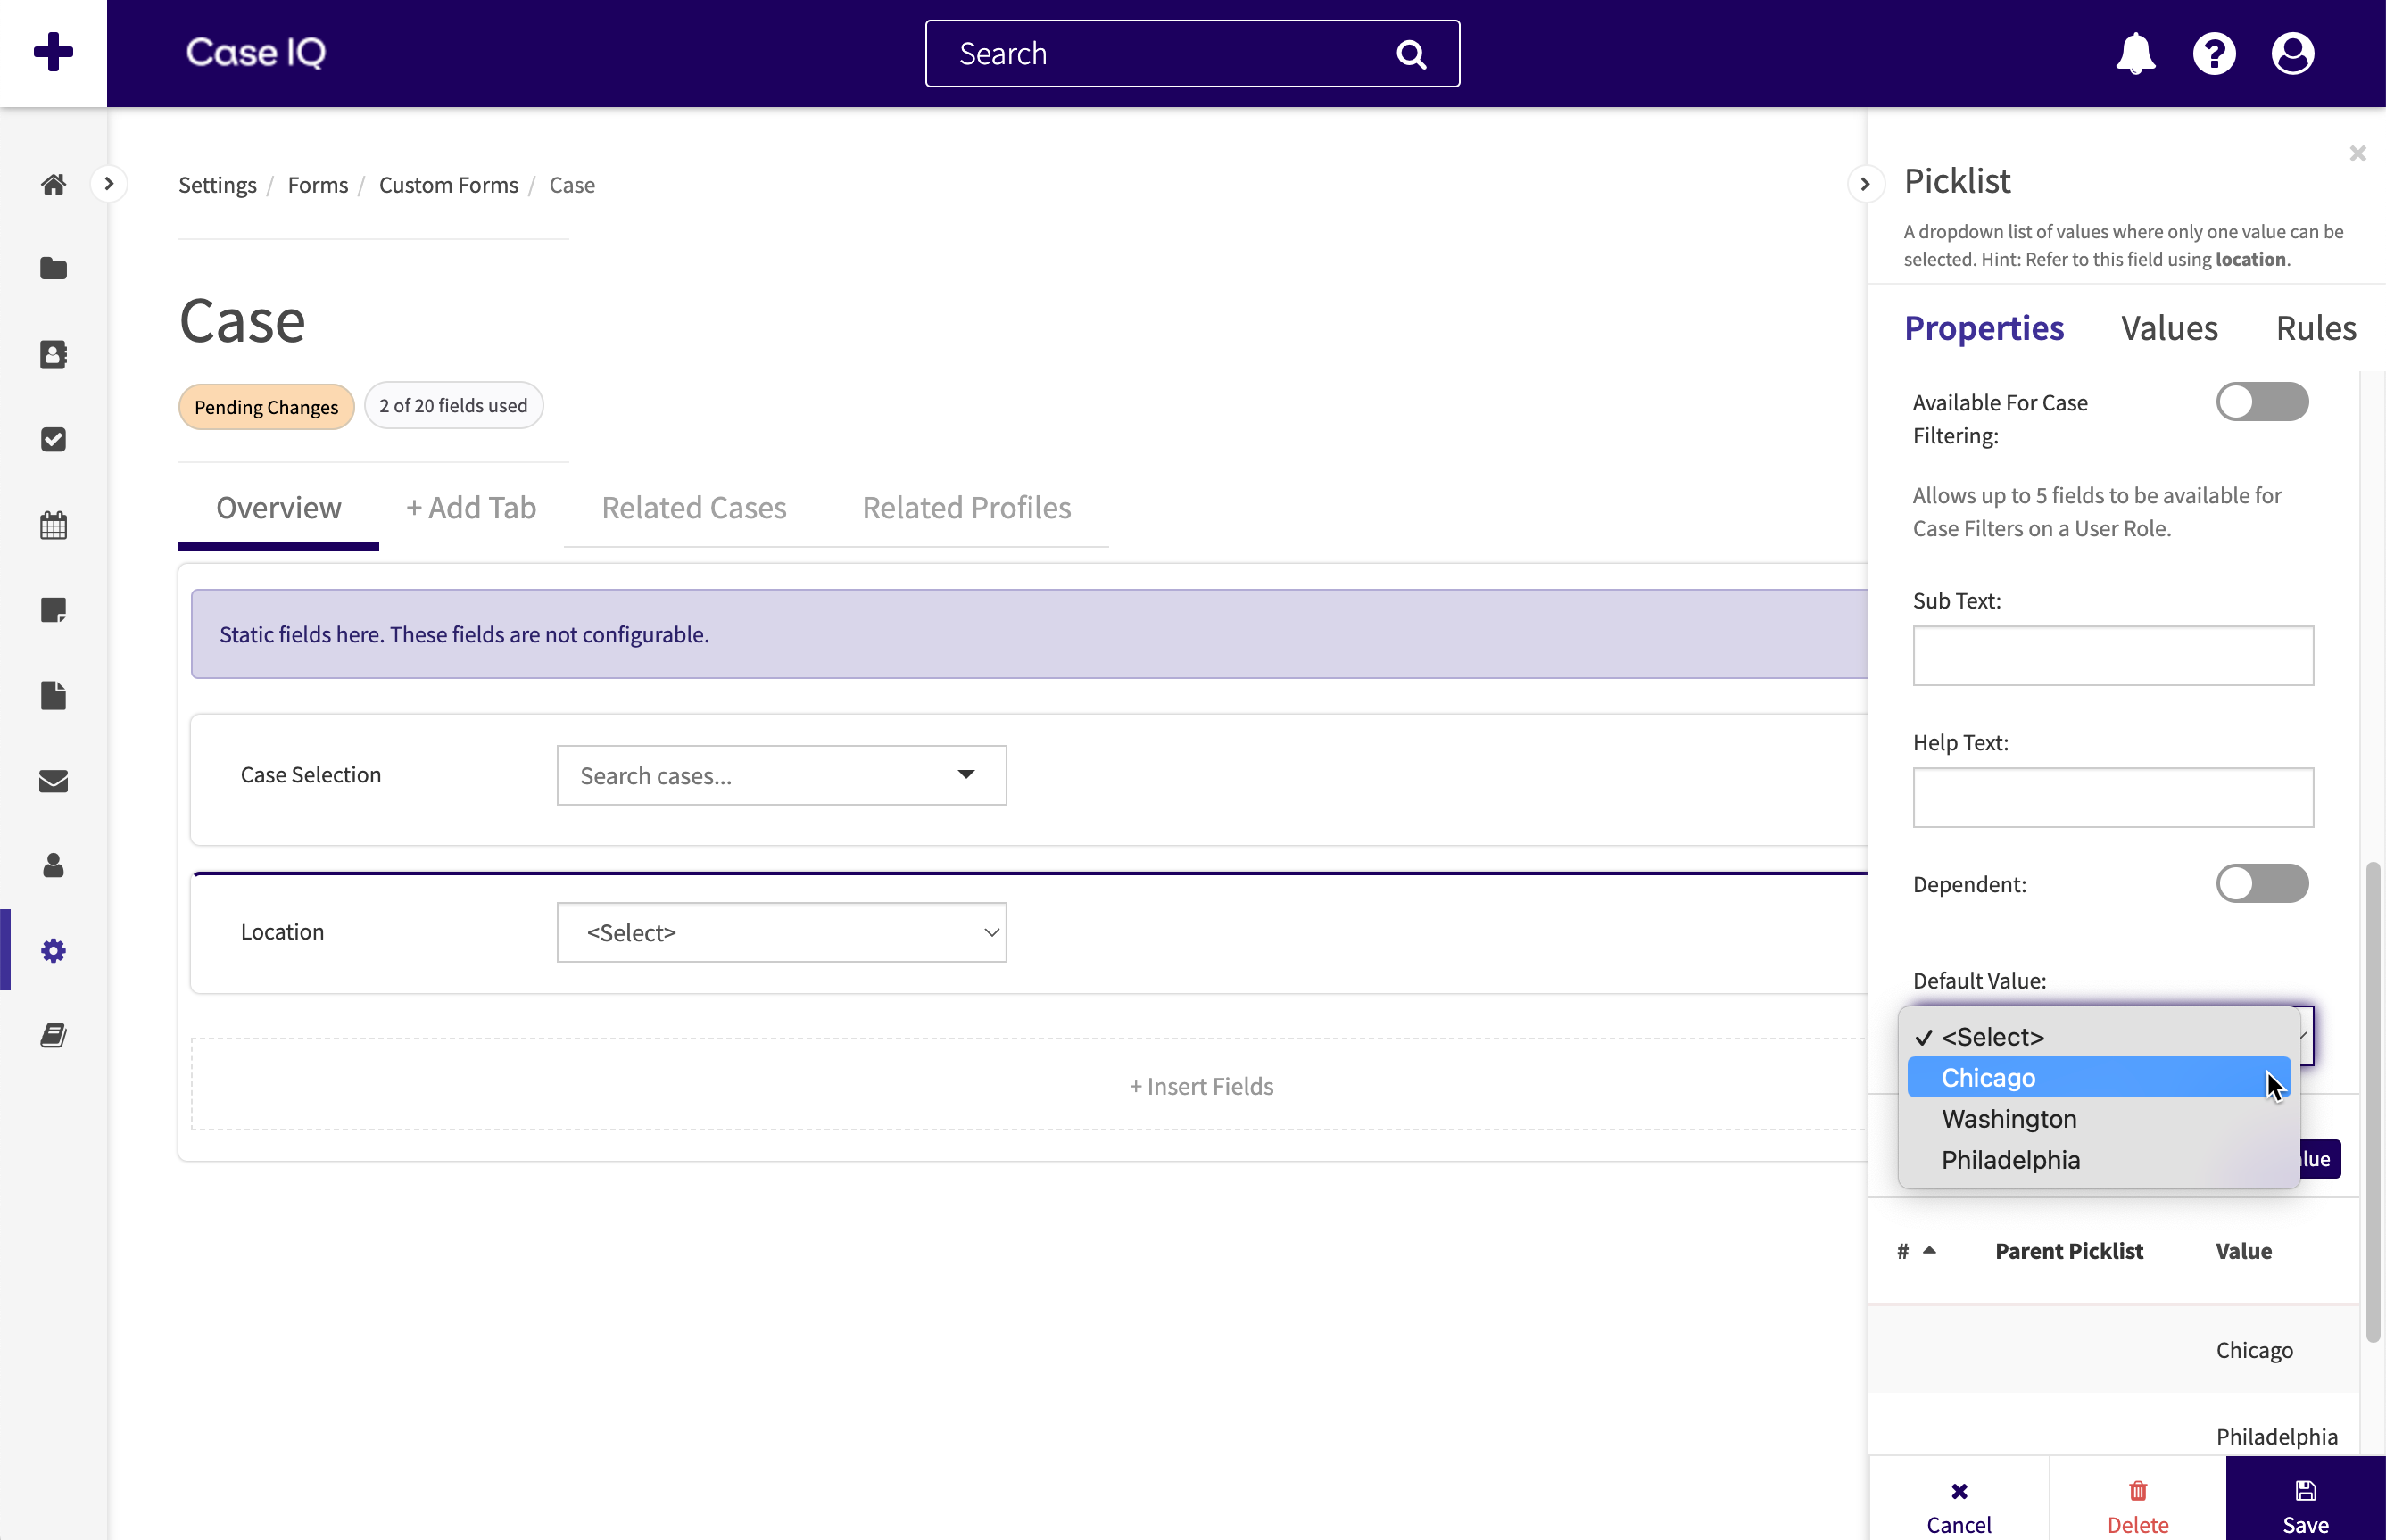
Set Default Value for a Picklist
You can choose to display one of the picklist's options by default on the record type's form before a user selects an option. On the Form Builder, click the picklist field for which you want to set a default value. In the “Default Value” dropdown, select a value from the picklist you want Case IQ to display by default.