Set up Single Sign On (SSO)
Enable and configure a Single Sign On (SSO) integration for your Case IQ application on the "Main App Single Sign On (SSO)" page in Settings. With an SSO integration, users can log in to Case IQ using the same log in information from another application, usually their organization’s human resources information system (HRIS), Active Directory, or Identity Management Service.
There are two methods you can use to set up an SSO integration: (1) uploading metadata or (2) manually configuring all settings. This article will cover both methods to enable an SSO connection, how to generate Case IQ metadata, and how to map fields from your identity provider to Case IQ user account fields.
You can enable an SSO integration from either:
- Settings > System > System > Options.
- Settings > Access > Main App Single Sign On (SSO).
If you update SSO configurations on either page, your changes will be reflected on the "Main App Single Sign On (SSO)" page, Options page, and in application. This article will illustrate the steps to enable an SSO integration on the “Main App Single Sign On (SSO)” page in the Access tab. See the Options article for details on using the Options page.

This article uses several technical terms to explain how an SSO integration works. See a glossary of important SSO terms below:
| Term | Definition |
|---|---|
| Identity Provider | The application that sends information about your users to authenticate them in Case IQ. Generally, organizations use their human resources information system (HRIS), Active Directory, or Identity Management Service as the identity provider in SSO integrations. |
| Service Provider | The application that receives information about your users and to which users gain access via an SSO integration. In this case, Case IQ is the service provider. |
| Metadata | An XML file that contains one of the provider's certificate and URL to help set up a SAML communication between the identity provider and service provider. Case IQ can consume your identity provider's metadata and will generate metadata as the service provider after you save the Single Sign On form. |
Upload Metadata Method
You can quickly configure the SSO integration by uploading a metadata file into Case IQ. Metadata contains the provider certificate and URL in XML format to help set up a SAML communication between the identity provider and service provider.
First, upload your identity provider's metadata into Case IQ. You can upload metadata on the "Main App Single Sign On (SSO)" page by either:
- Clicking the Options (
 ) button and selecting “Upload Metadata”. Drag and drop or use a file browser to upload a metadata file in the Upload File pop-up, then click Done to proceed. You can download a metadata file from your identity provider, which will be an “.xml” file.
- Selecting the Edit button, pasting your identity provider’s URL in the “Identity Provider Endpoint” field, then clicking the Upload button beside the field. Your identity provider url will look something like this sample url: "https://report04.caseiq.com/simplesaml/saml2/idp/metadata.php".

After you submit the metadata using either process, the “Upload Metadata?” pop-up will be displayed. Use the following steps to finish setting up your SSO integration:
- Click Confirm on the “Upload Metadata?” pop-up and the “Identity Provider Certificate”, “Identity Provider Endpoint”, and “Identifier Format” fields will be populated in the “Single Sign On (SSO)” form but your configuration settings will not be submitted yet.
- Complete the “Identifier Mapping” field to indicate the required data field for creating Case IQ accounts, such as email or first name. The field you choose will tell Case IQ how to connect identity provider information with Case IQ user profiles and look for existing user profiles.
- Complete the “Identifier Data Mapping” field to choose the identity provider attribute to map to the data field you select in “Identifier Mapping”. For example, if you select “Email” in “Identifier Mapping”, enter the attribute value of the email field in your identity provider. The following sample identity data mapping attribute was used in the video below for email: “http://schemas.xmlsoap.org/ws/2005/05/identity/claims/emailaddress”.
- Set the ”Enabled" field to “Yes”.
- Click the Save button and your SSO integration will be enabled.
Manual Configuration Method
You can choose to manually enable an SSO integration by completing the Single Sign On form. Click the Edit button and the SSO form will be in edit mode so you can update fields. See an explanation of all SSO form fields below.
- Enabled: click “Yes” to get started configuring your SSO integration. By default, “Enabled” will be set to “No”. If you want to turn off your existing SSO integration, click “No”.
- Protocol: select “SAML 2.0”. This is currently the only protocol supported by Case IQ.
- Auto User Provision Enabled: choose if Case IQ should automatically add user accounts based on the information it pulls from the identity provider.
- If you want Case IQ to automatically create Case IQ accounts for your users via the SSO integration, click “Yes”. Case IQ will create a user account when an individual is first granted access to Case IQ via the SSO connection. If the user’s authentication information is removed from the identity provider, the Case IQ user account will remain active but the individual will not be able to log in to Case IQ.
- Select “No” if you will be manually creating Case IQ user accounts. In this case, a user will not be able to log into Case IQ via SSO unless: (1) the Case IQ account is created before the individual attempts to log in, and (2) their Case IQ account is set as an “SSO user” on their user profile.
- User Role Fallback: if you select “Yes” for “Auto User Provision Enabled”, choose the default user role for Case IQ accounts created via SSO. You will also be able to choose how Case IQ should assign separate user roles to accounts based on identity provider information in the User Mapping section (see the next section of this article for details).
- Identity Provider Endpoint: paste or type your identity provider’s URL in the text box, which will tell Case IQ from what source to accept the authentication information. Your identity provider url will look something like this sample url: "https://report04.Case IQlab.com/simplesaml/saml2/idp/metadata.php".
- If you would like to upload your identity provider metadata (see the Upload Metadata Method section of this article above), you can click the Upload (
 ) button beside the “Identity Provider Endpoint” field to upload the metadata and automatically populate the form with configuration settings.
- If you would like to upload your identity provider metadata (see the Upload Metadata Method section of this article above), you can click the Upload (
- Identity Provider Certificate: copy your identity provider certificate from your identity provider application’s settings and paste it in the “Identity Provider Certificate” field. The identity provider certificate will appear as numerous lines of random alphanumeric characters.
- The certificate is exchanged between the identity provider and Case IQ. Case IQ must have the certificate to confirm that information sent from your identity provider is coming from a trusted source.
- Identifier Mapping: choose the required data field for creating Case IQ accounts, such as email or first name. The field you choose will tell Case IQ how you want Case IQ to connect information from the identity provider to a Case IQ user profile and how Case IQ should look for existing user profiles.
- Identifier Data Mapping: enter the identity provider attribute to map to the data field you select in “Identifier Mapping”. For example, if you select “Email” in “Identifier Mapping”, enter the attribute value of the email field in your identity provider. Your identity provider's data mapping attribute will look similar to the following sample attribute: “http://schemas.xmlsoap.org/ws/2005/05/identity/claims/emailaddress”.
- Identifier Format: indicate how identity provider information will be mapped to Case IQ user accounts via the SSO integration. You can select one of the default options available in the “Identifier Format” picklist or type in a custom format and hit Enter on your keyboard.
- Require Identity Provider to Sign Assertions: choose if the identity provider should sign each assertion. Assertions are messages from the identity provider containing the user's authentication details. By default, “Require Identity Provider to Sign Assertions” is turned on, as this is the default signature option for most identity providers. You can turn this option off if your identity provider does not require assertions to be signed.
- Require Identity Provider to Sign Entire Authentication Response: indicate if the identity provider will sign the SAML response at top level, meaning the signature will appear outside the assertion block. By default, “Require Identity Provider to Sign Entire Authentication Response” is turned off. Turn this option on if your identity provider will sign the SAML response at the top level.
- Request Authentication Context: choose if you want to provide authentication context to indicate what information the identity provider will send to Case IQ in the SAML assertion to make an informed entitlement decision.
- If you select “Yes”, the “Authentication Context” field will be displayed. The system default context will already be populated but you can either select or type in another context.
Service Provider Metadata
Case IQ's Single Sign On page will provide you any necessary metadata your identity provider may require to finalize the SAML communication. The following fields will be automatically generated by the SSO form:
- Service Provider Entity ID: a unique name for Case IQ as the service provider, which by default is the metadata URL.
- Service Provider Consumer URL: Case IQ will use the following format: “[your application’s URL]/authd/saml”.
After setting up and enabling the SSO integration in Case IQ, you can preview and download service provider metadata from Case IQ as well. Click the Options () button to see the “Download” and “Preview XML” options, so you can save the metadata XML file or view it in a pop-up.
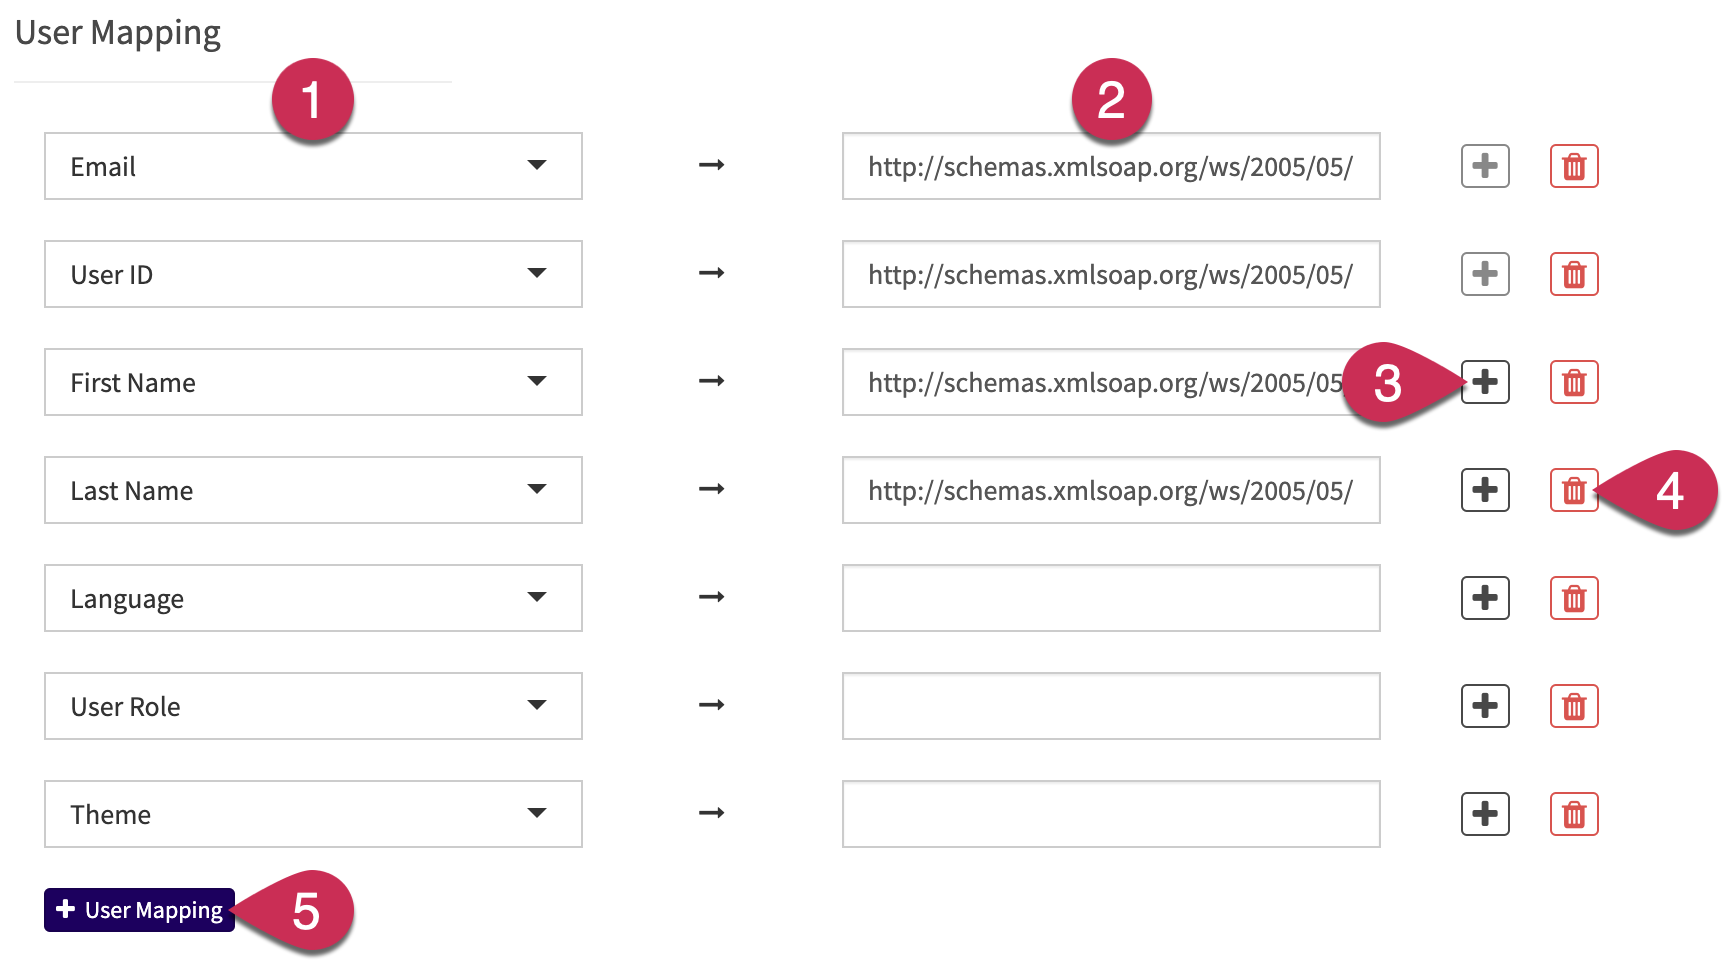
User Mapping
After you have configured your SSO integration, you can set up exactly how the information sent from the identity provider will be used in Case IQ in the User Mapping section. The User Mapping section contains the following components with which you can enter or change the attribute value, set a default field value, and assign custom values.
- The column of dropdown menus, labelled (1) in the screenshot below, are Case IQ user profile fields. The following user profile fields will be displayed in the dropdown menus by default: “Email”, “User ID”, “First Name”, "Last Name", “Language”, “User Role”, and “Theme”.
- The text boxes, labelled (2) in the screenshot below, are data fields sent from the identity provider. For the “Email”, “User ID”, “First Name”, and “Last Name” Case IQ fields, the attribute values used by Microsoft Azure Active Directory will be populated in the identity provider data fields by default, as these attribute values are most commonly used in user mapping. To either enter or change the attribute value, type in your identity provider's attribute value for the equivalent data field.
- When you click the plus button, (3), you can add default values for the user profile field or set up a custom value mapping scheme if there are multiple identity provider values to map to one Case IQ user profile field. See more in the next section, Default User Profile Values and Custom Values.
- Click the Delete button, (4), to remove the user profile field row if your identity provider does not contain a corresponding field. However, the user profile field will also not be filled in if you leave an identity provider attribute field blank.
- Add more fields from the user profile form by clicking the “+ User Mapping” button, (5). The “Search Fields” dropdown that will be displayed will contain all fields on the user profile form, including dynamic fields added via the Form Builder (see Edit a Standard Form Layout).
Default User Profile Values and Custom Values
You can set a default field value by clicking the plus button for the row. The “Default Value" dropdown in the Add Values pop-up will include all options available in the corresponding Case IQ user profile field picklist. This value will be applied to all user accounts created via the SSO integration.
If the corresponding field in your identity provider has more values than the Case IQ user profile field, you can create a custom value mapping scheme in the Add Values pop-up using the following steps.
- Click the plus button for the User Mapping row.
- In the Custom Values section of the Add Values pop-up, click the “+ Value” button.
- Choose a value of the user profile field in the “Select” dropdown.
- Enter the value in your identity provider to map to the user profile value.
- You can add more custom values by clicking the “+ Value” button again.
- Click Save to submit your custom value mapping scheme, which will now be displayed under the identity provider field in the User Mapping section.