View Dates on a Calendar
You can review to-do and appointment Case IQ records on the Calendar page based on your user role’s permissions. Case IQ has two calendar views: (1) the general calendar, which displays date-specific records for all cases, and (2) the case calendar, which only shows date-specific records associated with the case. Date-specific record types include to-dos and appointments. Read more on each record type in To-Dos Overview and Appointments Overview. Both calendars display up to 1000 records at a time.
You can access the general calendar by clicking the Calendar sidebar tab.
Navigate to a case’s calendar from a case's page by clicking on the Calendar tab. The case calendar contains the same layout and options as the general calendar, so they can be used in a similar way.
Calendar Page Features
The main elements on the calendar are numbered in the screenshot below and descriptions are provided following the image.
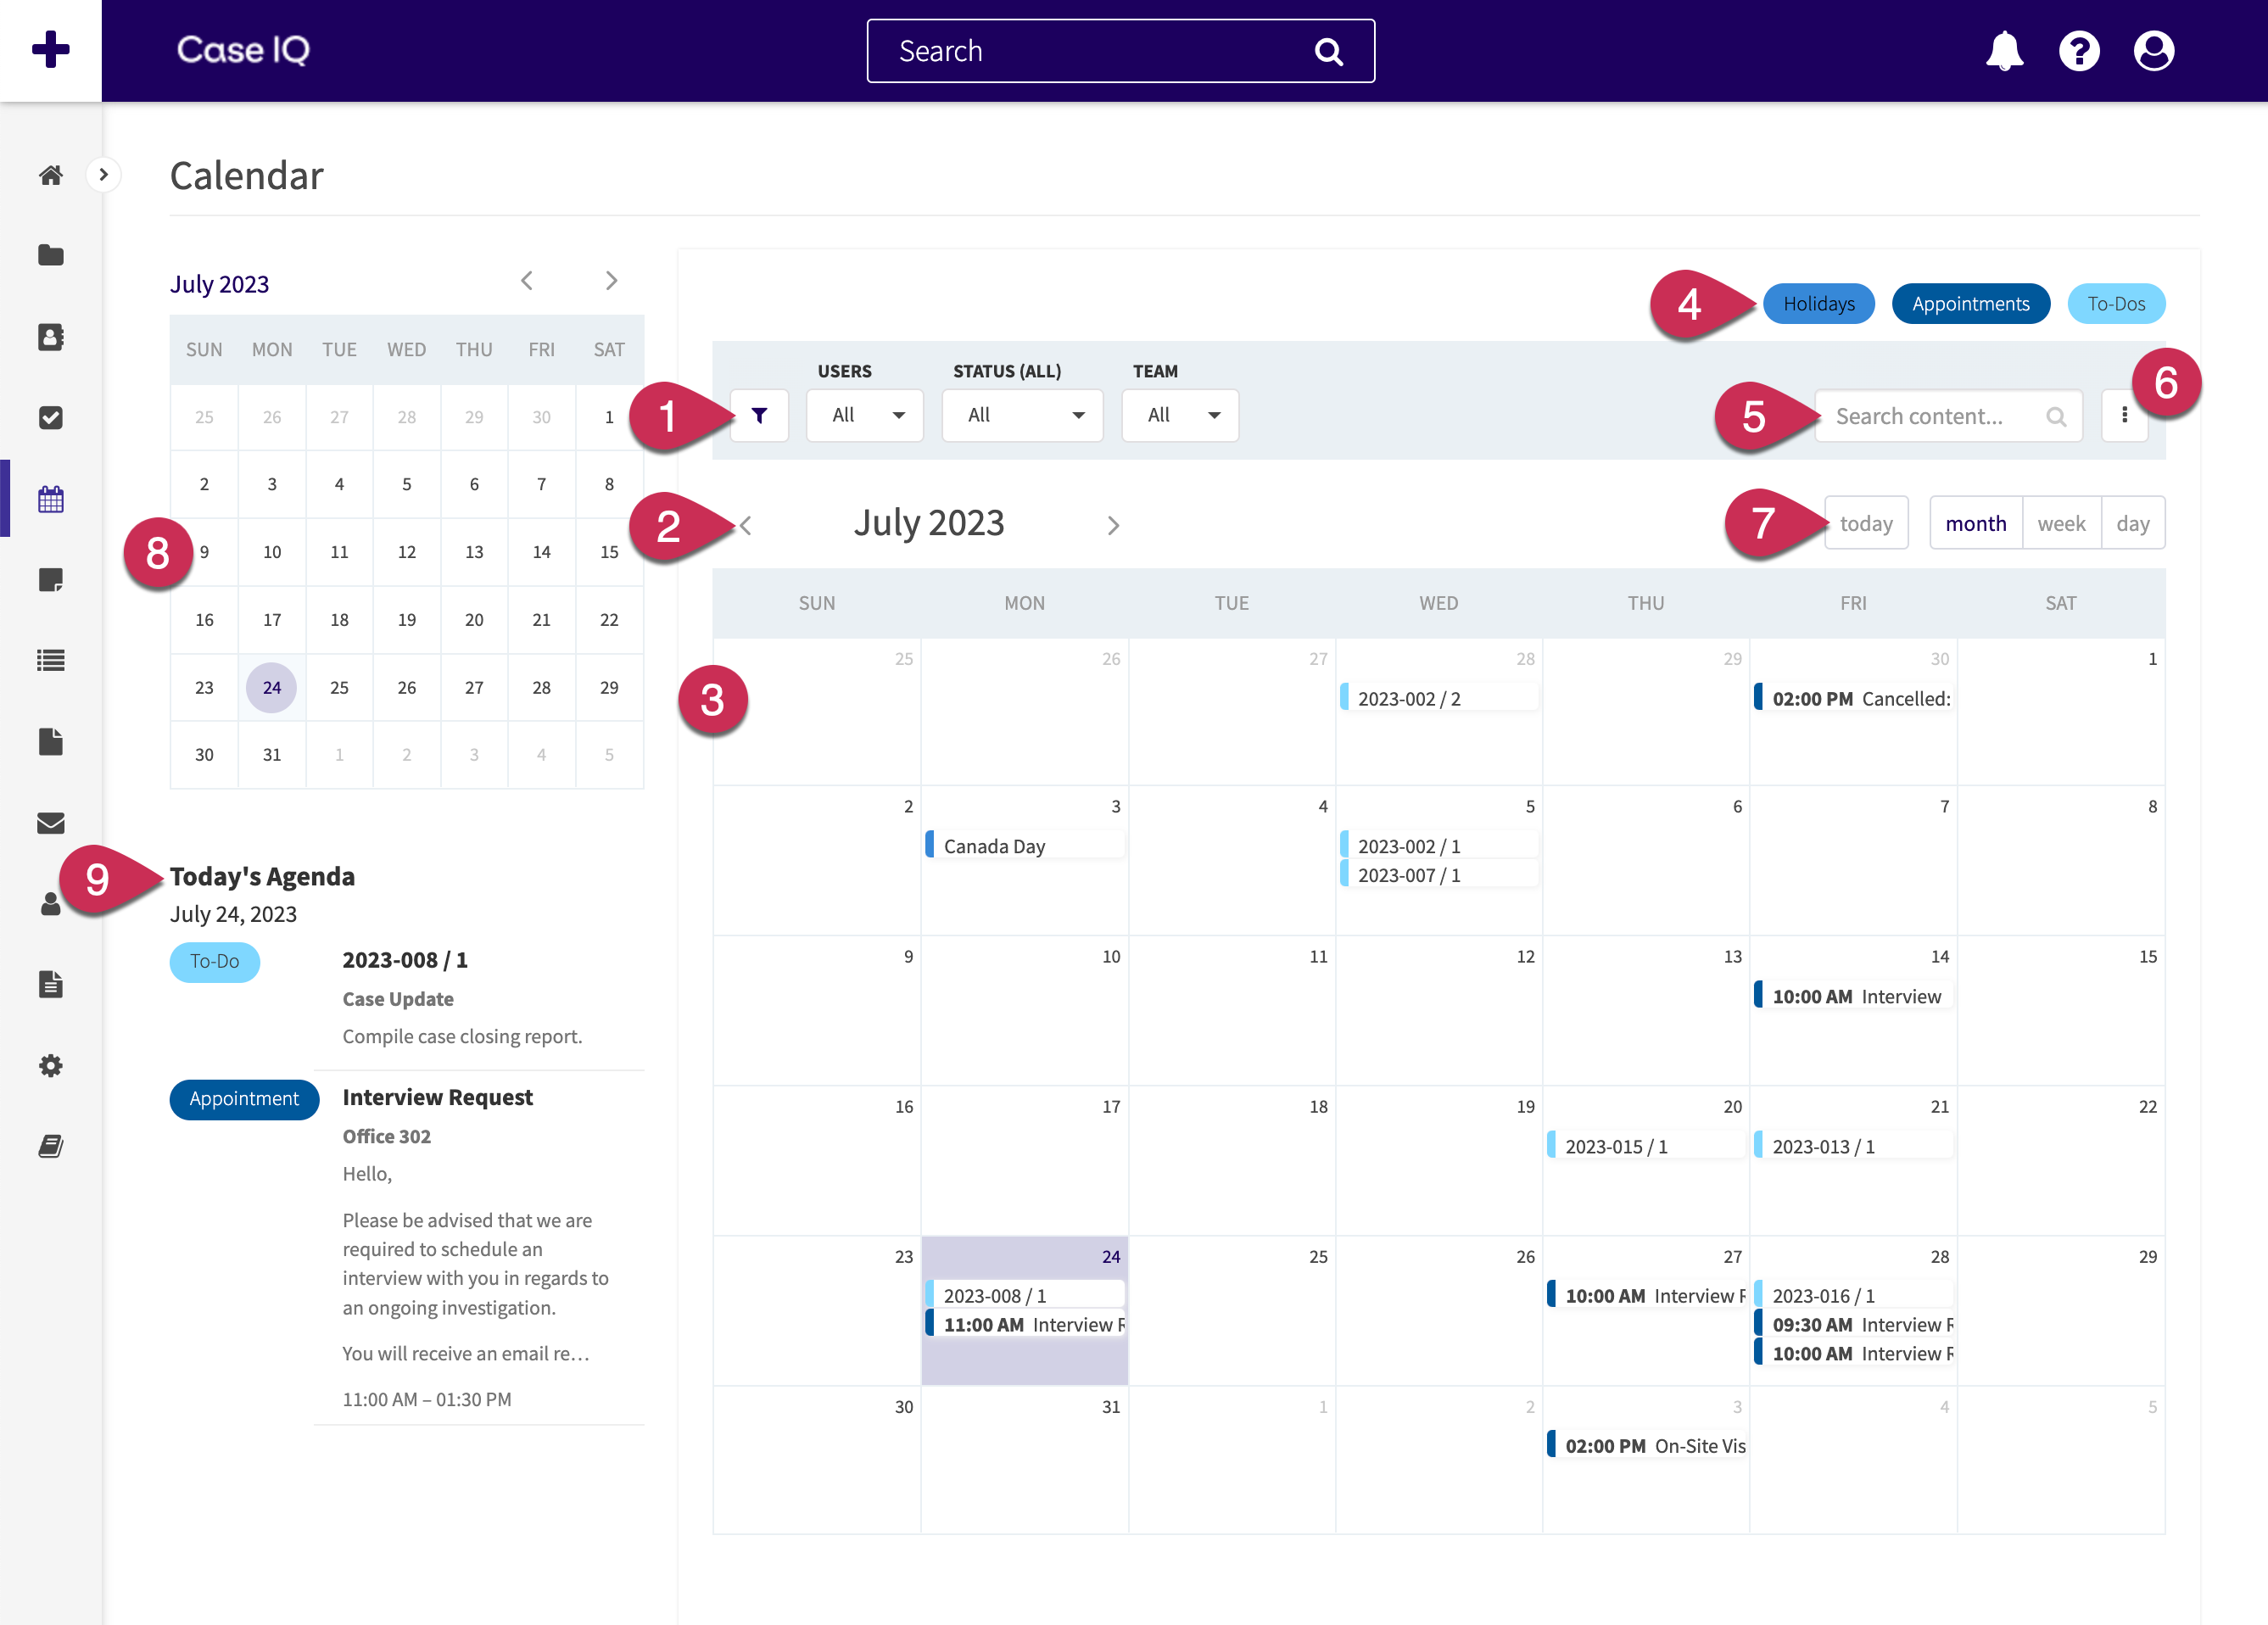
- Calendar filters: you can filter the Calendar to narrow down the appointments, to-dos, and holidays displayed. The filters available by default are "Users", "Status", and "Team". You can add more filters by clicking the Filter Menu button (
 ), selecting the fields by which you want to narrow down the calendar data, then clicking Done. The filter menu includes all to-do, appointment, and holiday fields.
 - Current date range: indicates the date range for the current view of the primary calendar. Click the left arrow to shift the view to a previous date range and click the right arrow to move the date range forward.
- Primary calendar: displays date-specific records on a calendar. You will only see records on the calendar that you have permissions to access.
- To-dos are listed on the due date. To-dos that do not have due dates will not be displayed on the calendar.
- Appointments and the appointment time are displayed on all days in between their start and end dates.
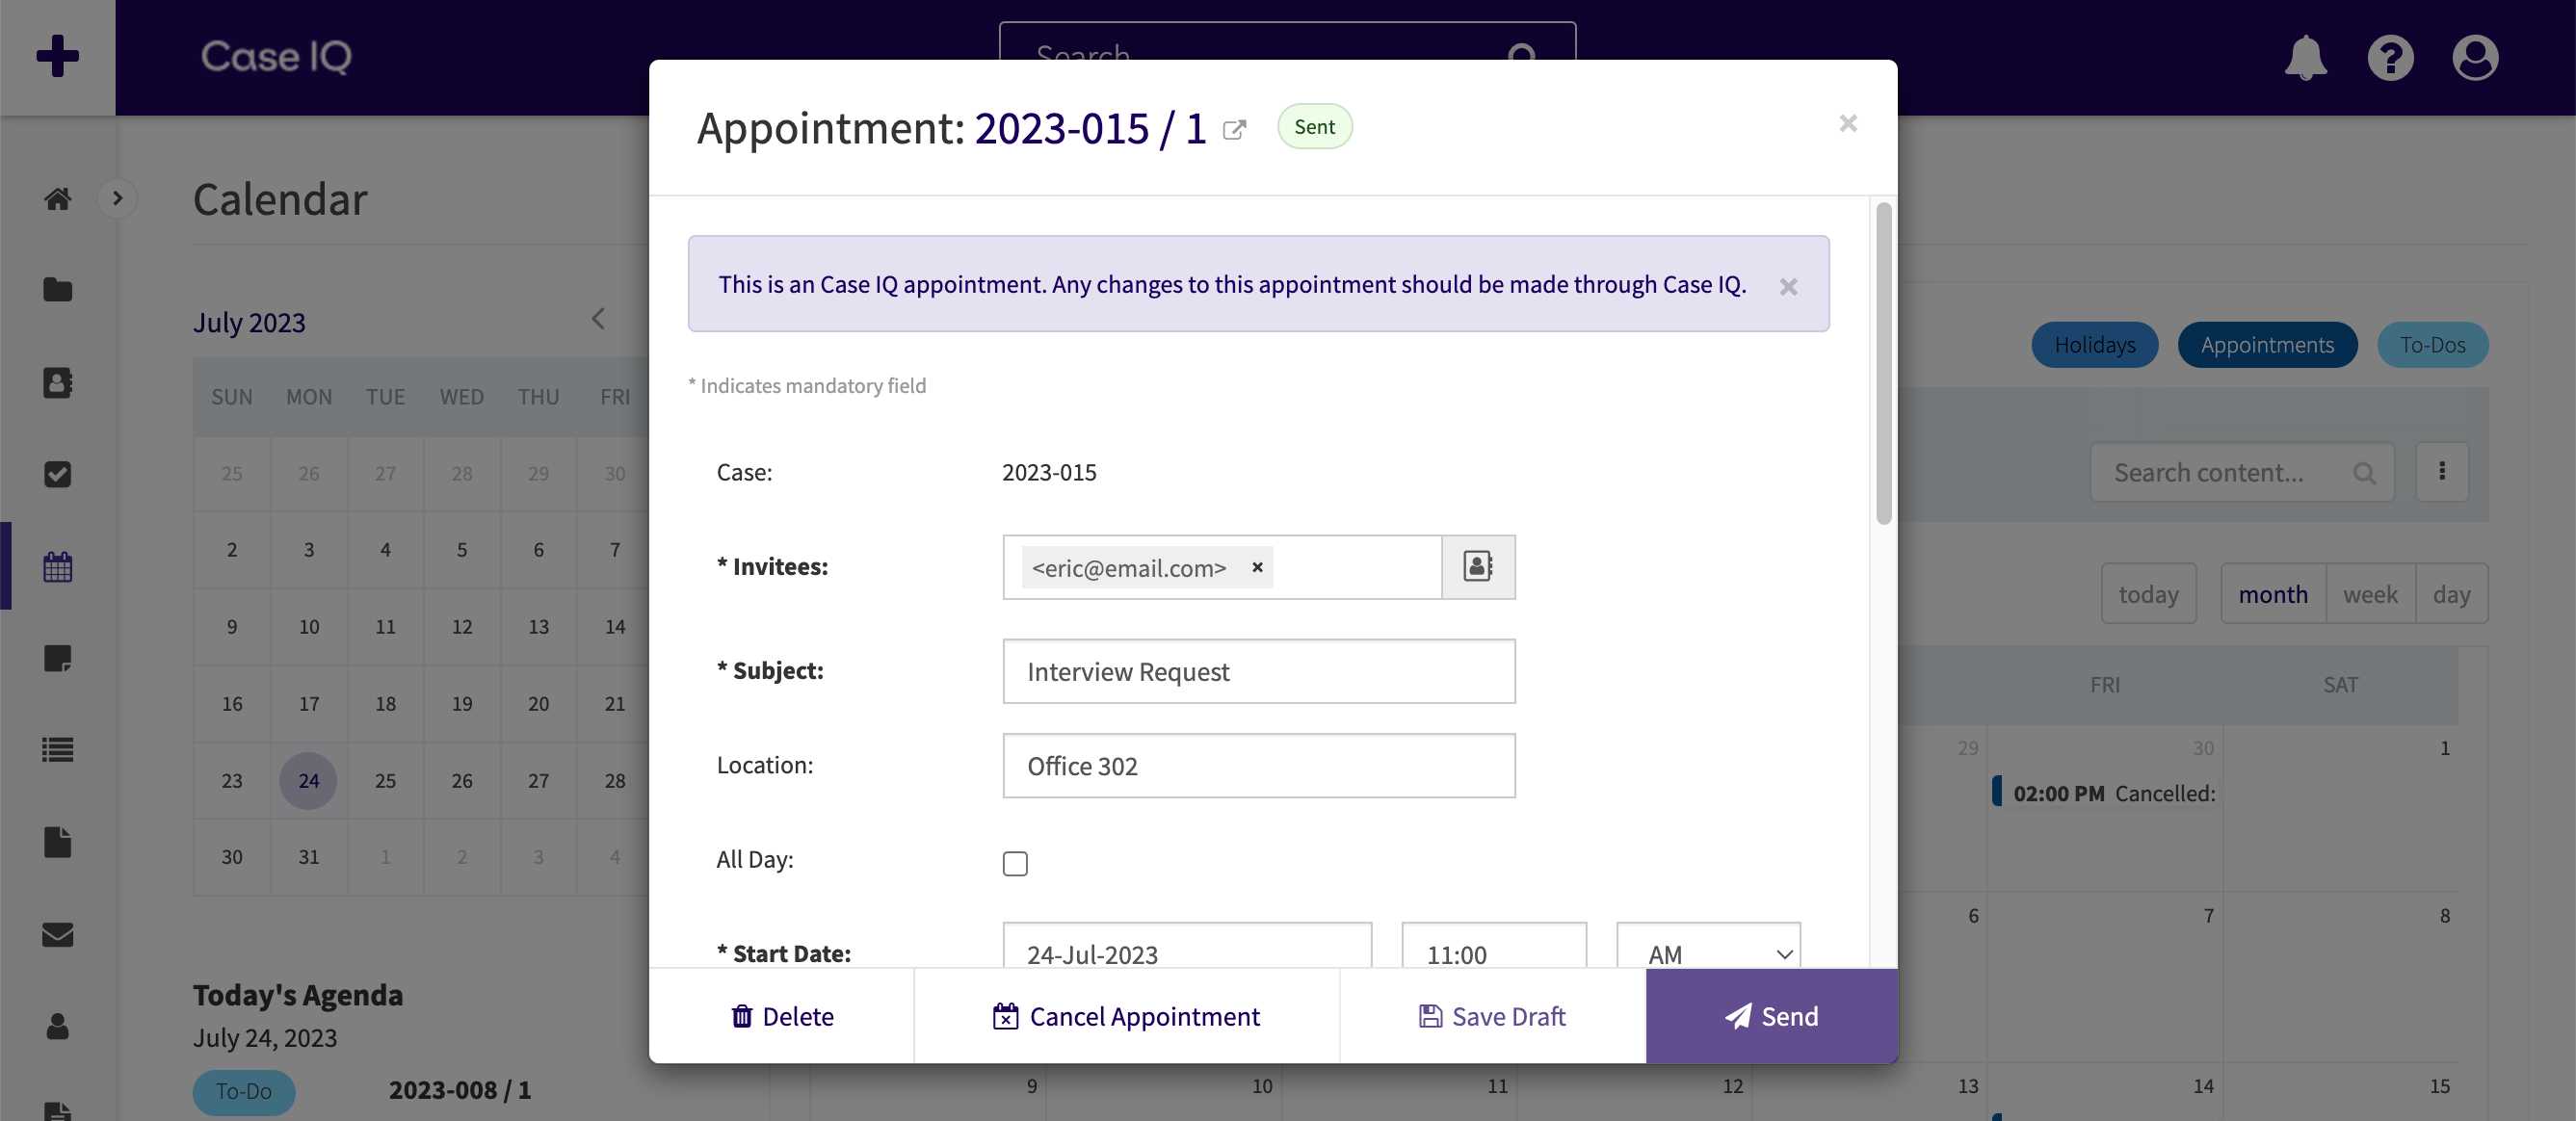
- Click a record to see a pop-up with more details, as shown in the "Appointment and To-Do Pop-up" section of this article.
- The current day will be highlighted in purple.
- Click a day to see the Agenda. The day you select will be highlighted in blue.
- Record type toggles: use the Holiday Calendar, Appointments and To-Dos buttons to show or hide the respective record type in the calendar. For example, by clicking the To-Dos button, the To-Dos button is greyed out and now only appointments are shown in the calendar.
- “Search content…”: enter text in the search box and the grid will show all to-do and appointment records that (1) contain the text and (2) you have permissions to access (read Grids for details).
- Options: in addition to the standard grid options (see Grids), you can choose to view all to-dos and appointments on a traditional calendar view or a grid. See the "Change Your Calendar View" section in this article for more.
- Calendar time range options: choose the time range that the primary calendar should show. By default, the primary calendar will show an entire month at once, but you can limit by week or day. If you have moved the current primary calendar date range to a future or past date range, click the Today button to navigate back to the current date.
- Secondary calendar: a smaller calendar that displays an entire month. Click the left arrow to see previous months and click the right arrow to see upcoming months. The current day will be indicated with a purple circle and the current day selected will be highlighted in blue.
- Agenda: shows any appointments and to-dos scheduled for the day selected on the primary calendar.
Appointment and To-Do Pop-up
When you click an appointment or to-do on the primary calendar, a pop-up of the appointment or to-do's details will be loaded, so you can see more information on the record without navigating away from the Calendar page. The pop-up will contain the same information and buttons as the record's page (described in A To-Do's Page and An Appointment's Page).
Change Your Calendar View
The Calendar page displays to-dos and appointments on a traditional calendar by default, but you can switch it to a grid as needed. Using the grid layout to view date-specific records can be helpful if you need to delete multiple records or see more information on each record at once.
To change your calendar view, click the Options button and then click the “Switch to Grid” option. Each row represents one to-do or appointment record in Case IQ. Click a row and the to-do or appointment's page will be loaded (see A To-Do's Page and An Appointment's Page for more). Similar to the calendar, you will only see records on the grid that you have permissions to access.
To delete multiple date-specific records, click the checkbox beside each record you want to delete. Then, click the Delete button in the grid header.